“Hey, can you make something sweet and cute for the party?” That was Emily’s text, sent just hours before her nephew’s graduation. Honestly, I was scrambling — my kitchen barely rested after a whirlwind week, and here I was, faced with a last-minute request. No fancy cake pans, no elaborate decorations. Just a craving for a celebratory treat that looks the part but doesn’t eat up all afternoon.
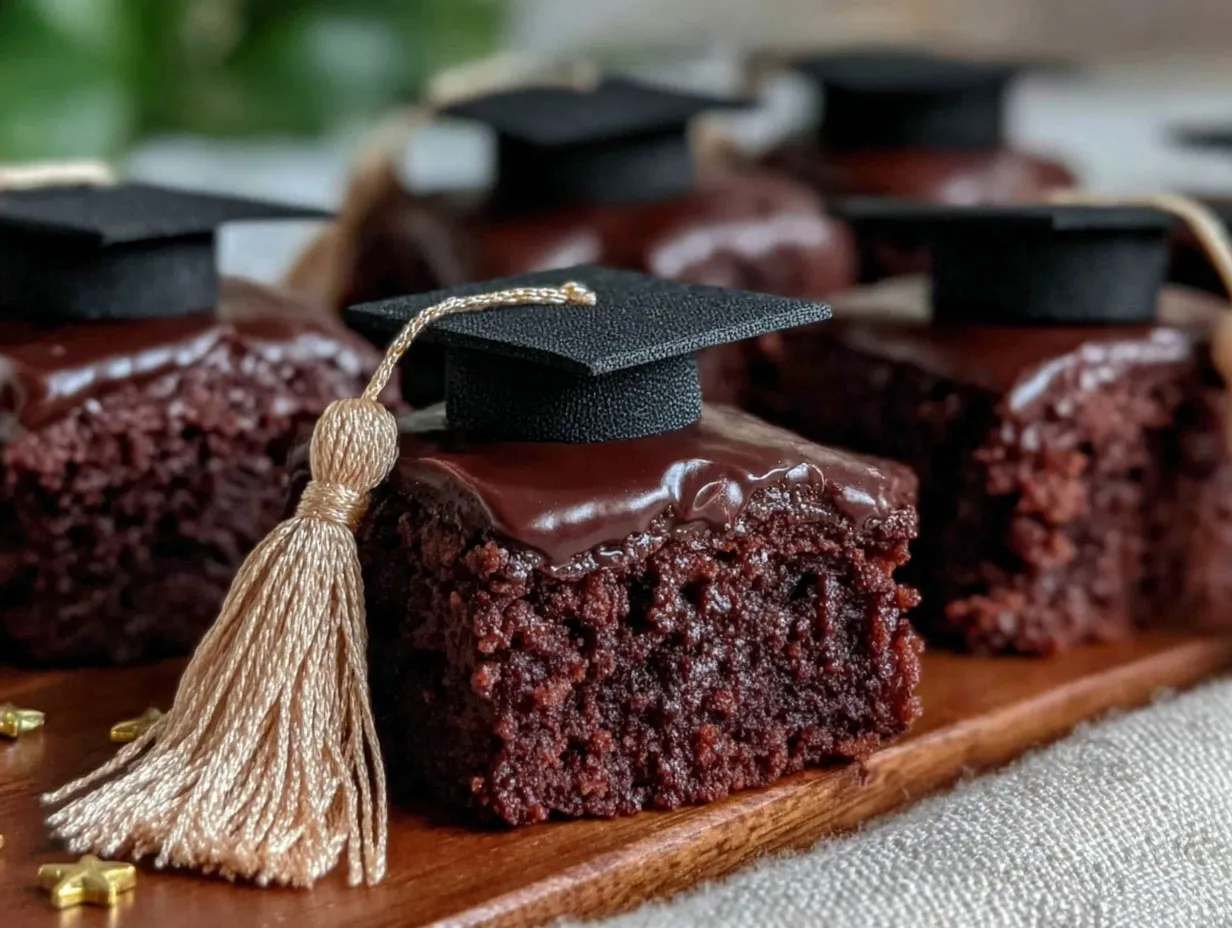
I thought, “Brownies. Easy. Everyone loves brownies.” But how to make them special? The idea struck when I glanced at the mortarboard his cap would wear later that day. What if those brownies wore graduation caps too? A quick experiment started with cutting brownies into squares and topping them with tiny chocolate squares and a bit of icing as the tassel. The first batch was a mess — some toppled, some cracked. But the third tray? Spot on.
These Perfect Graduation Cap Brownie Bites for Celebrations became my surprise hit. They brought a smile to everyone’s face, and honestly, I kept tweaking and baking them several times that week. The best part? They require no specialty ingredients or skills, perfect for a last-minute celebration fix that looks thoughtful without the fuss. It’s funny how something so simple can feel so personal.
Every bite has that rich, fudgy chocolate kick you expect from brownie bites, but with a little festive flair that says “Congrats!” without saying a word. It stuck with me because it’s not just a dessert — it’s a small celebration on its own. And now, I’m passing that on to you, with all the little tips I learned from my trial runs.
Why You’ll Love This Recipe
This recipe isn’t just another brownie bite. Having made these for a handful of celebrations now, I can say with confidence they’re a go-to for anyone needing a quick yet impressive treat. Here’s why:
- Quick & Easy: From mixing to decorating, these take about 45 minutes total. Perfect when you’re juggling party prep and last-minute invites.
- Simple Ingredients: No special trips needed. Basic pantry staples like cocoa powder, flour, and eggs make the base — I usually keep Ghirardelli cocoa powder on hand for that deep chocolate flavor.
- Perfect for Celebrations: Whether it’s a graduation party, a milestone birthday, or just a casual get-together, these bites add a festive touch that’s always appreciated.
- Crowd-Pleaser: Kids, adults, even picky eaters — these brownies get rave reviews. The little cap decorations make them irresistible.
- Unbelievably Delicious: The texture is fudgy but not too dense, with just the right balance of sweetness. The chocolate squares on top add a slight crunch that’s so satisfying.
What sets this recipe apart is the subtle chocolate ganache I add to the tops before placing the chocolate squares, which helps the “caps” stay put and adds richness without being overpowering. Plus, the tiny icing tassels? They’re easy to pipe with a zip-top bag and a toothpick, no fancy tools needed.
It’s the kind of recipe you make once and keep coming back to — because it’s not just about dessert, but about creating moments. If you’ve enjoyed making fun breakfasts like the fluffy sheet pan pancakes or need a sweet sidekick to a savory spread, these are your new best friend.
What Ingredients You Will Need
This recipe uses simple, wholesome ingredients to deliver bold chocolate flavor and that perfect fudgy texture without fuss. Most are pantry staples, and a few extras help with decoration.
- For the Brownie Base:
- 1/2 cup (115g) unsalted butter, melted (I prefer Kerrygold for richness)
- 1 cup (200g) granulated sugar
- 2 large eggs, room temperature
- 1 teaspoon vanilla extract
- 1/3 cup (35g) unsweetened cocoa powder (Ghirardelli or Hershey’s works well)
- 1/2 cup (65g) all-purpose flour
- 1/4 teaspoon salt
- 1/4 teaspoon baking powder
- For the Graduation Cap Decoration:
- Mini square chocolates or chocolate wafers (about 1-inch squares) – brands like Lindt or Guittard have great texture
- 1/4 cup (60ml) heavy cream (to make a quick ganache to stick the caps)
- 1/2 cup (60g) powdered sugar
- 1-2 tablespoons milk (for the icing consistency)
- Black food coloring (optional, for the icing tassels)
Substitution tips: Use almond flour for gluten-free brownies, and swap heavy cream with coconut cream for a dairy-free ganache. If you don’t have mini chocolates, you can carefully cut a regular chocolate bar into small squares. For the icing, a store-bought black gel works great if you want a shortcut.
Equipment Needed
- 8×8 inch (20×20 cm) baking pan – a standard size that works perfectly for brownie bites
- Mixing bowls – one for wet ingredients, one for dry
- Whisk and rubber spatula – for easy mixing and folding
- Sharp knife – to cut brownies into even squares
- Small saucepan – to gently heat cream for ganache
- Zip-top plastic bag or piping bag – for icing tassels (a toothpick or small skewer also helps)
- Wire rack – for cooling brownies evenly
If you don’t have a piping bag, no worries — you can snip a corner off a zip-top bag and use a toothpick to guide the icing. I’ve found that a serrated knife makes cleaner cuts when slicing brownies, preventing crumbly edges. For budget-friendly options, any standard saucepan and mixing bowls will do — no need for fancy gear.
Preparation Method
- Preheat your oven to 350°F (175°C). Grease the 8×8 inch pan or line it with parchment paper for easier removal. This usually takes about 10 minutes.
- Mix the wet ingredients: In a large bowl, whisk together the melted butter and sugar until combined. Add the eggs one at a time, stirring well after each addition. Stir in the vanilla extract. This should take about 5 minutes.
- Combine dry ingredients: In a separate bowl, sift together cocoa powder, flour, salt, and baking powder. This helps avoid lumps and ensures even distribution.
- Fold dry into wet: Gradually add the dry ingredients into the wet mixture, folding gently with a spatula until just combined. Overmixing can make brownies tough, so stop as soon as everything looks uniform.
- Pour batter into the pan: Spread evenly with the spatula, smoothing the top. Tap the pan lightly on the counter to release air bubbles.
- Bake for 20-25 minutes. Start checking at 20 minutes by inserting a toothpick in the center — it should come out with a few moist crumbs, not wet batter. Overbaking dries the bites out.
- Cool completely on a wire rack. This step is crucial before decorating — warm brownies can cause ganache and icing to slide off.
- Prepare the ganache: Heat the heavy cream in a small saucepan over low heat until just simmering. Pour over the mini chocolates in a bowl and stir until smooth. Let it cool slightly; it should be spreadable but not runny.
- Cut brownies: Using a sharp knife, cut brownies into 1.5-inch (4 cm) squares. Clean your knife between cuts to keep edges neat.
- Assemble graduation caps: Spread a small dollop of ganache on top of each brownie square. Place one mini chocolate square on top, pressing lightly to secure.
- Make the icing tassels: Mix powdered sugar and milk to a thick icing consistency. Add black food coloring if desired. Transfer to a piping bag or zip-top bag and pipe a small tassel on each cap, or use a toothpick to drag a line from the chocolate square.
- Let them set: Allow the ganache and icing to firm up for at least 20 minutes before serving.
Pro tip: If you want faster setting, pop the brownies in the fridge for 10 minutes after decorating. Just watch out for condensation when removing them.
Cooking Tips & Techniques
One thing I learned quickly is that the key to these brownie bites lies in timing and texture. Overbaking is a rookie mistake; you want fudgy, not cakey. A toothpick test helps, but remember, a few moist crumbs are good.
Cutting brownies can be messy — warming your knife under hot water and drying it before slicing helps get clean edges. Patience here makes a huge difference in presentation.
When making ganache, the cream temperature matters. Too hot, and it’ll melt the chocolate too much, making it runny. Just simmering is perfect for a smooth, spreadable consistency.
For the tassels, if you don’t have black food coloring, a small dot of ready-made edible gel or even dark cocoa powder mixed into the icing works well. I once forgot the coloring and used a fine-tip marker to draw on parchment paper for a stencil — a little extra work but fun to customize.
Multitasking tip: Start the ganache while brownies bake, then cut and assemble once cool. This keeps everything moving without stress.
Lastly, don’t skip cooling your brownies before decorating! Warm brownies can cause decorations to slide or melt — a lesson learned after a few disaster batches.
Variations & Adaptations
Feel free to switch things up to fit your celebration style or dietary needs:
- Flavor twists: Add a teaspoon of espresso powder to the batter for a mocha kick. Or sprinkle chopped nuts or chocolate chips into the batter for texture.
- Dietary swaps: Use gluten-free flour blends instead of all-purpose for gluten sensitivity. For a vegan version, try flax eggs and coconut oil instead of butter.
- Decoration alternatives: Swap mini chocolate squares for small cookies or fondant cutouts shaped like graduation caps. You can also use colored icing to match school colors.
- Seasonal adaptation: During spring graduations, add a touch of orange zest to the batter for a fresh twist. For winter, sprinkle edible gold dust on the caps for sparkle.
- My personal favorite: I once replaced the ganache with peanut butter frosting for a nutty surprise — it was a hit at a friend’s party who’s peanut butter obsessed.
Serving & Storage Suggestions
Serve these brownie bites at room temperature for the best flavor and texture. They look lovely arranged on a platter, maybe with a few fresh berries or mint leaves for color contrast.
They pair wonderfully with coffee or a cold glass of milk — a nostalgic combo that never fails. At a recent brunch, I served them alongside ham and cheese sliders and they vanished first.
Store leftover brownie bites in an airtight container at room temperature for up to 3 days. If your kitchen is warm, refrigeration helps keep the ganache firm but can dry out the brownies — so wrap them tightly.
For longer storage, freeze the uncut brownie slab wrapped in plastic wrap and foil. Defrost in the fridge before cutting and decorating. Once decorated, these treats are best enjoyed fresh.
Flavors develop nicely after a day, letting the ganache and icing meld into the brownie’s fudgy base. So, if you can resist, prepping a day ahead is a smart move.
Nutritional Information & Benefits
Each brownie bite (roughly 1.5-inch square) contains approximately:
| Calories | 120 kcal |
|---|---|
| Fat | 7g |
| Carbohydrates | 15g |
| Protein | 1.5g |
| Sugar | 12g |
While these are treats, cocoa powder provides antioxidants, and the recipe’s use of real butter and eggs adds richness and some nutrients. For those watching sugar or carbs, try reducing sugar by 1/4 cup or swapping for a natural sugar substitute.
Note: Contains gluten, dairy, and eggs. For allergy-friendly versions, consider substitutions mentioned earlier.
I love that this recipe balances indulgence with simplicity, perfect for celebrating without overdoing it.
Conclusion
These Perfect Graduation Cap Brownie Bites for Celebrations have become a quiet staple in my party repertoire. They’re proof that you don’t need to spend hours or pull out complicated gear to make something special. Whether it’s a last-minute guest invite or a planned celebration, these bites bring smiles and a little festive flair.
Feel free to tailor the decorations, switch up the flavors, or simplify the icing — they’re forgiving and fun to make. Honestly, that’s why I keep coming back to them; they’re easy to love and easy to share.
If you try these, I’d love to hear how you made them your own — maybe you paired them with a savory snack like creamy buffalo chicken dip or a classic like fudgy peanut butter cup brownies. Drop a comment or share your photos!
Here’s to sweet celebrations and simple joys — enjoy every bite.
FAQs About Perfect Graduation Cap Brownie Bites
Can I make these brownie bites ahead of time?
Absolutely! Bake and cool the brownies a day in advance, then decorate just before your event for the freshest look. You can also assemble them fully and refrigerate for a few hours.
What if I don’t have mini chocolate squares for the caps?
You can cut a regular chocolate bar into small squares or use small cookies or fondant cutouts for a creative twist.
How do I keep the icing tassels from smudging?
Allow the icing to dry completely before stacking or transporting. Using a thicker icing helps it set faster and hold shape better.
Can I use a box brownie mix instead of homemade?
Yes, a good-quality box mix works fine. Just follow package instructions, then decorate as directed for the graduation caps.
What’s the best way to cut brownies without crumbling?
Use a sharp knife warmed under hot water and dried before slicing. Clean the knife between cuts to keep edges neat.
Pin This Recipe!
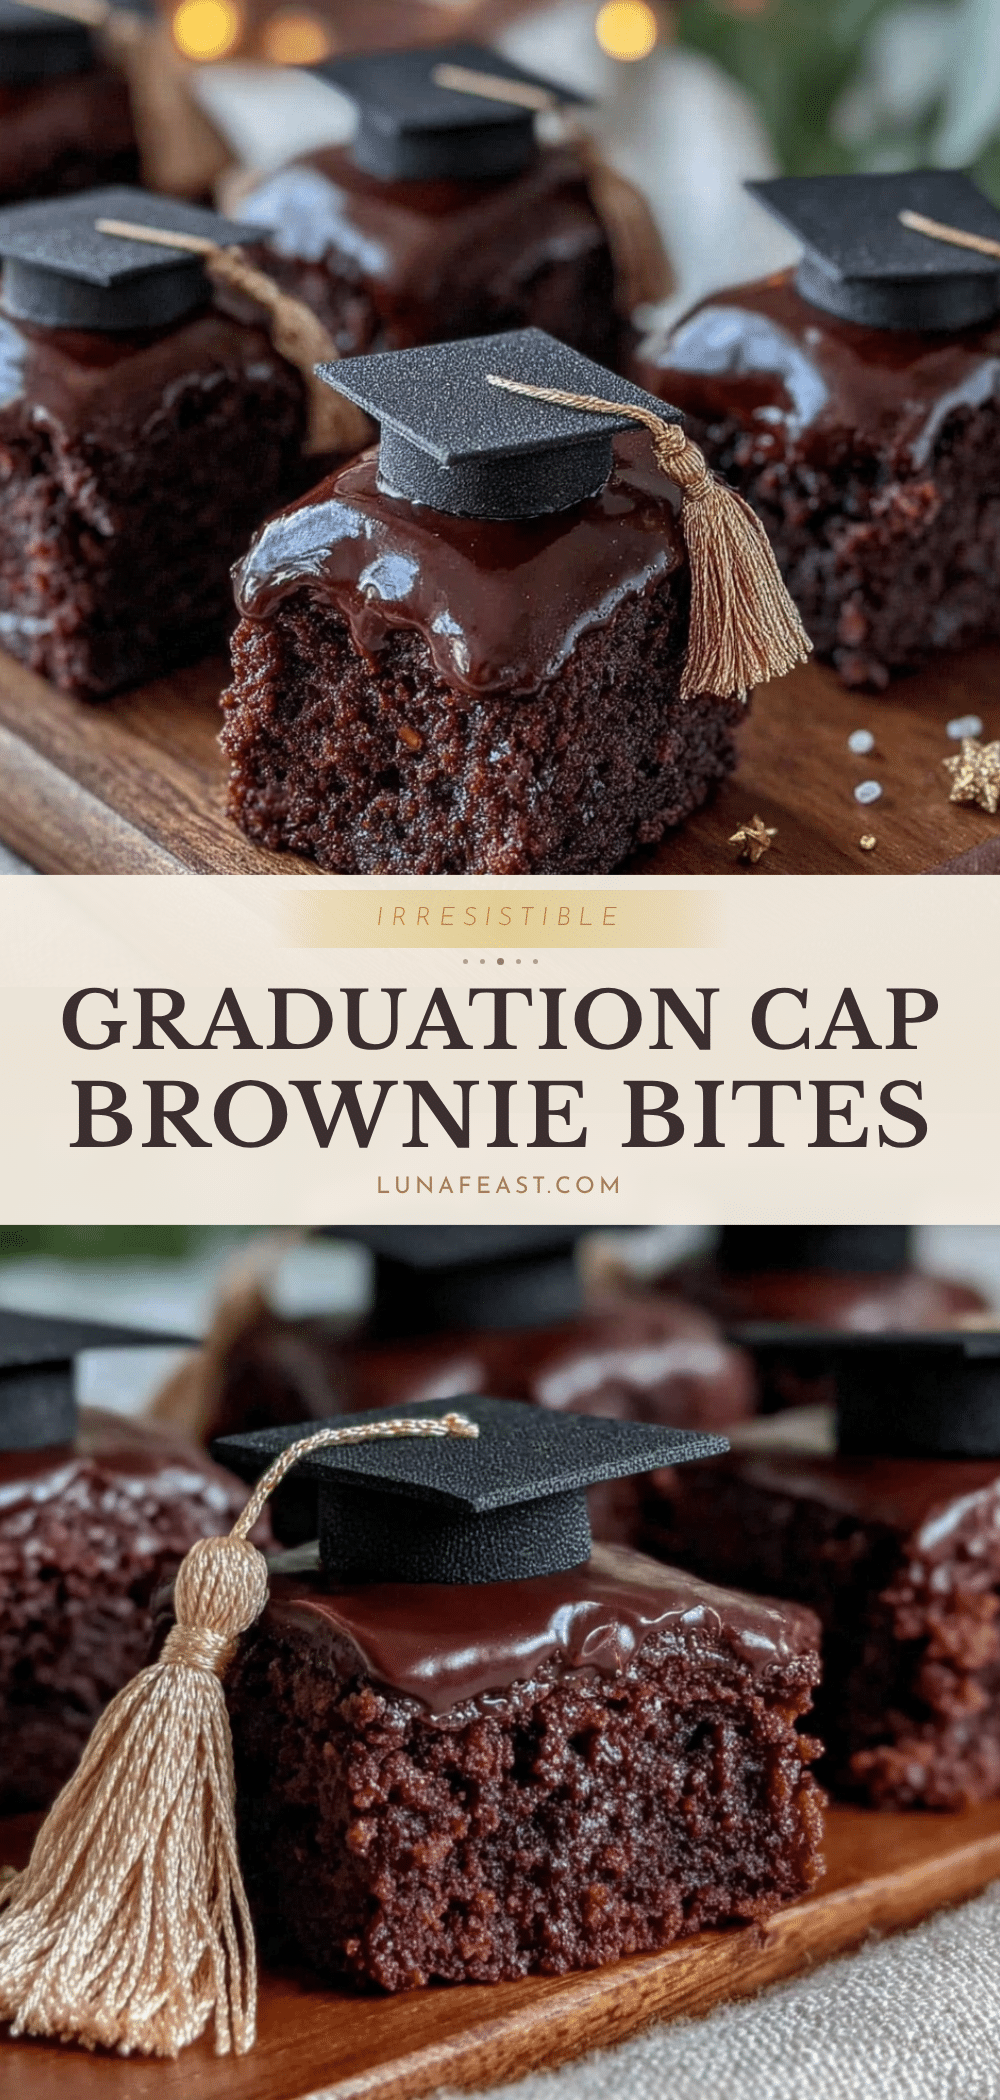
Perfect Graduation Cap Brownie Bites

These fudgy brownie bites are topped with mini chocolate squares and icing tassels to resemble graduation caps, making them a quick and festive treat perfect for celebrations.
- Prep Time: 15 minutes
- Cook Time: 25 minutes
- Total Time: 40 minutes
- Yield: 16 servings 1x
- Category: Dessert
- Cuisine: American
Ingredients
- 1/2 cup (115g) unsalted butter, melted
- 1 cup (200g) granulated sugar
- 2 large eggs, room temperature
- 1 teaspoon vanilla extract
- 1/3 cup (35g) unsweetened cocoa powder
- 1/2 cup (65g) all-purpose flour
- 1/4 teaspoon salt
- 1/4 teaspoon baking powder
- Mini square chocolates or chocolate wafers (about 1-inch squares)
- 1/4 cup (60ml) heavy cream
- 1/2 cup (60g) powdered sugar
- 1–2 tablespoons milk
- Black food coloring (optional)
Instructions
- Preheat your oven to 350°F (175°C). Grease an 8×8 inch baking pan or line it with parchment paper.
- In a large bowl, whisk together melted butter and sugar until combined. Add eggs one at a time, stirring well after each addition. Stir in vanilla extract.
- In a separate bowl, sift together cocoa powder, flour, salt, and baking powder.
- Gradually fold dry ingredients into wet mixture until just combined, avoiding overmixing.
- Pour batter into the prepared pan and spread evenly. Tap the pan lightly to release air bubbles.
- Bake for 20-25 minutes, checking at 20 minutes with a toothpick; it should come out with a few moist crumbs.
- Cool brownies completely on a wire rack before decorating.
- Heat heavy cream in a small saucepan over low heat until just simmering. Pour over mini chocolates in a bowl and stir until smooth. Let cool slightly to spreadable consistency.
- Cut brownies into 1.5-inch squares using a sharp knife, cleaning the knife between cuts.
- Spread a small dollop of ganache on each brownie square and place one mini chocolate square on top, pressing lightly to secure.
- Mix powdered sugar and milk to a thick icing consistency. Add black food coloring if desired. Pipe a small tassel on each cap using a piping bag or zip-top bag and a toothpick.
- Allow ganache and icing to set for at least 20 minutes before serving.
Notes
Use a serrated knife warmed under hot water and dried before slicing for clean edges. Cool brownies completely before decorating to prevent sliding. For faster setting, refrigerate after decorating but watch for condensation. Substitute almond flour for gluten-free and coconut cream for dairy-free ganache. Store leftovers in an airtight container at room temperature up to 3 days or freeze uncut brownies.
Nutrition
- Serving Size: 1 brownie bite (1.5-
- Calories: 120
- Sugar: 12
- Fat: 7
- Carbohydrates: 15
- Protein: 1.5
Keywords: brownie bites, graduation treats, chocolate brownies, celebration dessert, easy brownies, fudgy brownies, party snacks