By the fourth time I made these pumpkin scones in a single week, I started wondering if I had a problem. The first batch came out of the oven at 9 PM on a Tuesday—just to see if the recipe idea in my head would actually work. It did, barely. The second batch, Wednesday morning, was better. By Thursday I was tweaking the butter temperature, and by Friday I had a stack of them on the counter and no good excuse for why.
It wasn’t just the pumpkin—though the deep orange color and that soft, earthy smell hitting the kitchen felt like fall in a single breath. It was the flakiness. That impossible thing where a scone cracks open under your fork and the inside is tender but not doughy, and the outside shatters just a little when you bite in. Most pumpkin scones are dense—almost muffin-like. And that’s fine, honestly. But I wanted the layers. I wanted that maple glaze to pool into the cracks and soak in just enough to make the top sticky without ruining the crisp edges.
The maple glaze came third. The first two tries were too thin, running off the scones like rain. The third one stuck. It sat on top like a glossy little promise, and when I bit into one still warm, the glaze cracked and the butter hit my tongue and I knew I wasn’t done making them yet.
These scones became my Friday morning ritual for three straight weeks. Not because I was testing anymore—I just couldn’t stop. There’s something about the way the cold butter hits the flour, the way the pumpkin puree barely holds it all together, the way your hands smell like cinnamon and nutmeg after. It’s messy and specific and worth every crumb.
I think that’s the thing about a recipe that sticks. It’s not just good—it’s the one you keep coming back to for no real reason. Or maybe every reason. The quiet morning, the hot coffee, the scone that breaks apart exactly right. That’s what this one is for me. I hope it becomes that for you too.
Why You’ll Love This Recipe
I’ve tested a lot of pumpkin scone recipes over the years—some from blogs, some from cookbooks, one that involved a whole stick of frozen butter grated into flour like some kind of baking dare. This version is the one I kept returning to, and here’s why it’s different.
- Actually Flaky : Most pumpkin scones turn out soft and cake-like because the moisture from the pumpkin works against the flour. This recipe uses a technique that keeps the butter cold and the dough barely handled, so you get those real, visible layers.
- Not Too Sweet : The scone itself is just barely sweet—enough to balance the spices but not enough to compete with the maple glaze. You control the sweetness with that drizzle on top.
- Real Pumpkin Flavor : No hiding behind spice blends here. The pumpkin puree does actual work in this dough, adding moisture and color and that unmistakable earthy undertone that makes fall baking worth doing.
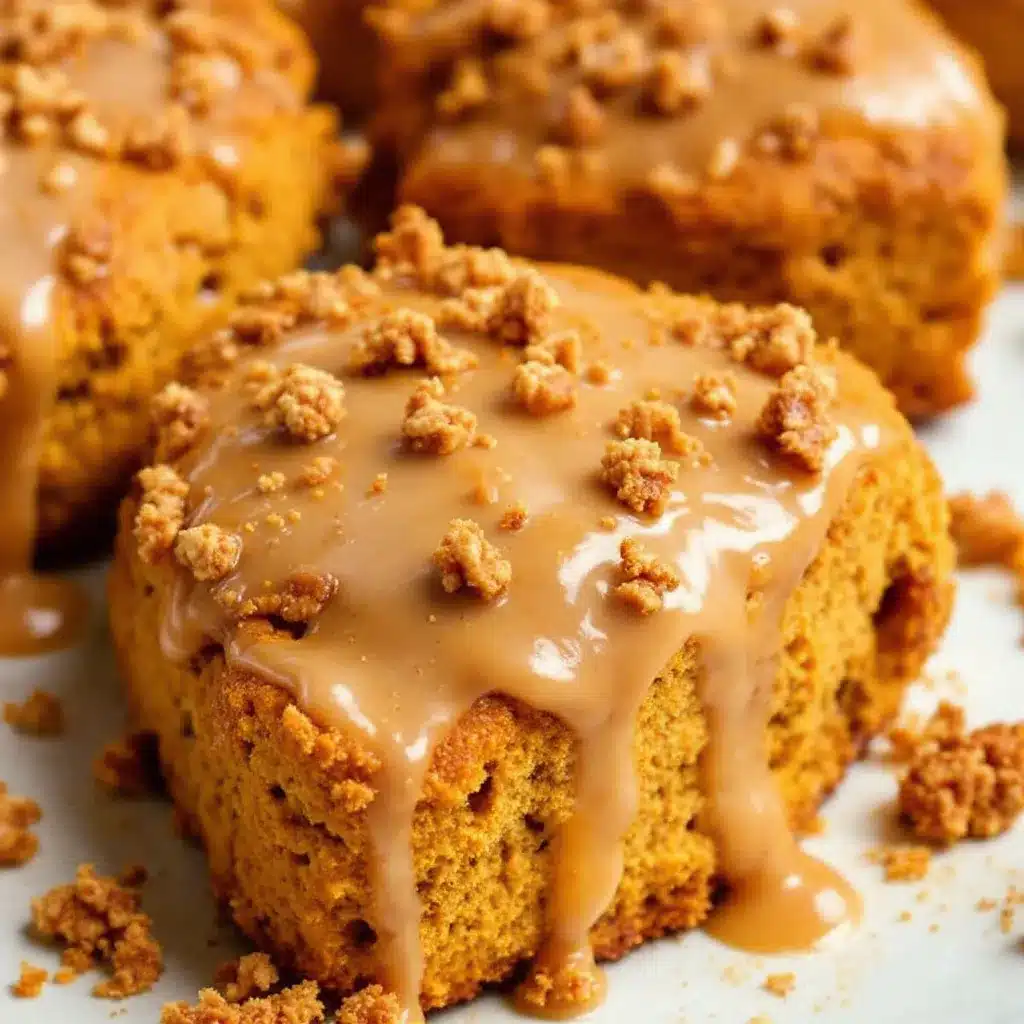
- Maple Glaze That Stays : I messed up the glaze three times before I got it right. This version is thick enough to sit on top without running off, but thin enough to sink into the cracks just a little. It sets up firm but stays soft when you bite.
- Made in One Bowl : The scone dough comes together in a single mixing bowl. Less cleanup means more time to sit and eat them while they’re still warm.
I’ve brought these to a fall brunch and watched people go back for thirds. I’ve wrapped them in foil and handed them to neighbors who texted me later asking for the recipe. They’re that kind of bake—the one that feels special but doesn’t require a stand mixer or a pastry degree.
If you’ve ever made pumpkin scones that came out dense or dry, this is the fix. The technique is simple once you see it, and the result is the kind of scone that makes you close your eyes after the first bite. Not because it’s fancy. Because it’s exactly right.
What Ingredients You Will Need
This recipe keeps things straightforward. Most of these ingredients are probably in your kitchen right now, which is part of the point. The quality matters on a few key things—the butter especially—so I’ll note where to splurge and where to save.
For the Scones
- All-purpose flour, 2 ½ cups (315g) — Spoon and level it into your measuring cup. Scooping directly from the bag packs the flour down and gives you too much, which makes scones dry. I use King Arthur Flour for consistent results, but any brand works.
- Granulated sugar, ⅓ cup (65g) — Just enough to sweeten the dough without overwhelming the pumpkin and spices.
- Baking powder, 1 tablespoon — Make sure it’s fresh. Old baking powder won’t give you the lift you need, and scones without lift are just dense little biscuits.
- Pumpkin pie spice, 2 teaspoons — Store-bought is fine, but I make my own blend with cinnamon, ginger, nutmeg, allspice, and a tiny pinch of cloves. If you’re using a mix, check the label—some blends lean heavy on cinnamon and skip the other spices.
- Ground cinnamon, 1 teaspoon — I add extra cinnamon even when the spice blend already has it. It rounds out the flavor and makes the kitchen smell like October.
- Salt, ½ teaspoon — Don’t skip this. Salt balances the sweetness and makes the spices taste more like themselves.
- Cold unsalted butter, ½ cup (1 stick, 113g) — This is the most important ingredient. The butter needs to be straight from the fridge, cut into small cubes. I’ve used frozen butter and grated it into the flour on hot days—that works beautifully too.
- Canned pumpkin puree, ½ cup (120g) — Not pumpkin pie filling. Pure pumpkin puree only. I prefer Libby’s for its consistent thickness, but any brand that’s 100% pumpkin works. If your puree looks watery, blot it with a paper towel before measuring.
- Heavy cream, ¼ cup (60ml) — Adds richness and helps the dough come together without overworking it. You can substitute whole milk in a pinch, but the scones won’t be as tender.
- Vanilla extract, 1 teaspoon — Pure vanilla, not imitation. It makes a difference in the background flavor.
- 1 large egg — Room temperature if you remember to take it out ahead of time, but straight from the fridge works too.
For the Maple Glaze
- Powdered sugar, 1 cup (120g) — Sift it if it’s lumpy. Nobody wants a lumpy glaze.
- Pure maple syrup, 2 tablespoons — Not pancake syrup. Real maple syrup gives that deep, woodsy sweetness that makes the glaze taste like something special. I use Grade A dark amber for the strongest flavor.
- Heavy cream or milk, 1-2 tablespoons — Start with 1 tablespoon and add more a teaspoon at a time until the glaze is thick but pourable. Heavy cream makes a richer glaze, but milk works fine.
- Vanilla extract, ½ teaspoon — Just a little to round out the maple flavor.
- Pinch of salt — Trust me on this. A tiny pinch of salt in the glaze keeps it from tasting cloying.
Equipment Needed
You don’t need much for these scones, which is part of why I make them so often. Here’s what you’ll want on hand:
- Large mixing bowl — Big enough to get your hands in there for cutting the butter into the flour.
- Pastry cutter or two forks — I use a pastry cutter because it’s faster, but two forks work just fine. You could even use your fingertips if you work quickly and the butter stays cold.
- Baking sheet — Line it with parchment paper. No greasing needed, and cleanup is a breeze.
- Parchment paper — Keeps the scones from sticking and makes transferring them to a cooling rack easy.
- Cooling rack — The scones need to cool before you glaze them, otherwise the glaze just melts and slides off.
- Bench scraper or sharp knife — For cutting the dough into wedges. A bench scraper is ideal because it cuts cleanly without dragging through the dough.
- Pastry brush (optional) — For brushing the tops with cream before baking. You can also just drizzle it on with a spoon.
- Small whisk or fork — For mixing the glaze. A fork works surprisingly well.
If you don’t have a pastry cutter, honestly, just use your hands. Rub the cold butter cubes into the flour mixture using your fingertips until it looks like coarse meal. Work quickly so the butter doesn’t warm up. Your hands are the best tool you’ve got.
Preparation Method
This method looks long, but I’m being detailed because the little things matter here. Once you’ve done it once, you’ll fly through it the next time.
Step 1: Prep Your Ingredients and Oven
Preheat your oven to 400°F (200°C). Line a baking sheet with parchment paper. Cut your cold butter into small cubes—about ½-inch pieces—and put them back in the fridge while you measure the dry ingredients. Cold butter is non-negotiable here.
Step 2: Mix the Dry Ingredients
In a large mixing bowl, whisk together the flour, sugar, baking powder, pumpkin pie spice, cinnamon, and salt. Make sure everything is evenly distributed. I usually give it a good 20 seconds of whisking to break up any clumps of spice or baking powder.
Step 3: Cut in the Butter
Add the cold butter cubes to the flour mixture. Using a pastry cutter or two forks, cut the butter into the flour until the mixture looks like coarse sand with some pea-sized butter pieces still visible. This is the key to flaky scones—those little chunks of butter create steam pockets in the oven, which turn into layers. Don’t overdo it. You want some butter pieces to remain.
Step 4: Mix the Wet Ingredients
In a separate small bowl, whisk together the pumpkin puree, heavy cream, egg, and vanilla extract until smooth. The mixture should be a uniform orange color with no streaks of egg white.
Step 5: Combine Wet and Dry
Pour the wet ingredients into the dry ingredients. Stir with a fork or spatula just until the dough comes together. It will look shaggy and a little messy—that’s exactly what you want. If there are a few dry bits at the bottom of the bowl, use your hands to gently press them into the dough. Do not knead. Overmixing develops gluten, and gluten makes scones tough.
Step 6: Shape the Dough
Turn the dough out onto a lightly floured surface. Gently bring it together into a rough ball, then pat it into a circle about ¾-inch thick. Don’t use a rolling pin—just use your hands. The warmth of your hands is fine as long as you work quickly. If the dough feels sticky, dust your hands with a little flour.
Step 7: Cut the Scones
Using a bench scraper or a sharp knife, cut the circle into 8 wedges like you’re slicing a pizza. Transfer the wedges to the prepared baking sheet, spacing them about 2 inches apart. They won’t spread much, so you don’t need a ton of room.
Step 8: Brush and Bake
Brush the tops of the scones with a little extra heavy cream or milk. This helps them brown and gives the tops a nice, slightly crisp finish. Bake for 15-18 minutes, or until the scones are golden brown on the edges and firm to the touch. A toothpick inserted into the center should come out clean or with a few moist crumbs.
Step 9: Cool
Let the scones cool on the baking sheet for 5 minutes, then transfer them to a cooling rack. Let them cool completely before glazing—about 20-30 minutes. If you glaze them while they’re still warm, the glaze will melt and soak in instead of sitting on top.
Step 10: Make the Glaze
While the scones cool, make the glaze. In a small bowl, whisk together the powdered sugar, maple syrup, vanilla extract, and a pinch of salt. Add heavy cream or milk 1 tablespoon at a time, whisking until the glaze is thick but pourable. It should fall off the whisk in a smooth ribbon. If it’s too thick, add another teaspoon of cream. If it’s too thin, add a little more powdered sugar.
Step 11: Glaze and Serve
Drizzle the glaze over the cooled scones using a spoon or a small whisk. Let the glaze set for about 10 minutes before serving. The glaze will firm up slightly but stay soft and sticky.
Cooking Tips & Techniques
I learned most of these through trial and error—and a few batches that went straight into the trash. Here’s what I wish someone had told me the first time.
Keep everything cold. This is the number one rule of flaky scones. If your butter warms up before the dough hits the oven, you won’t get layers. I stick the butter cubes in the freezer for 10 minutes before cutting them into the flour. On hot days, I chill the mixing bowl too.
Don’t overwork the dough. I know I keep saying this, but it’s because I’ve ruined scones by overmixing more times than I want to admit. Mix until the dough just comes together. A few dry spots are fine. Pat the dough into a circle gently—don’t press it flat like you’re making a pie crust.
Use a sharp cutter. When you cut the scones, press straight down without twisting. Twisting seals the edges and prevents the scones from rising evenly. A bench scraper gives you the cleanest cut.
Chill the shaped scones. If you have time, pop the baking sheet with the cut scones into the fridge for 15 minutes before baking. This firms up the butter again and gives you even more lift in the oven. I do this whenever I’m not in a rush.
Watch the bake time. Ovens vary. Start checking at 15 minutes. The scones are done when the edges are golden brown and the bottoms sound hollow when tapped. Overbaked scones are dry scones, and there’s no fixing that.
Glaze with confidence. Don’t be precious about the glaze. Drizzle it in zigzags or circles. Let some drip down the sides. Imperfect glazing looks more homemade and inviting anyway.
Variations & Adaptations
This recipe is flexible, and I’ve tried most of these variations myself. Here are some ways to make it your own.
Gluten-Free Version : Substitute the all-purpose flour with a 1:1 gluten-free baking flour blend that contains xanthan gum. I’ve used King Arthur Measure for Measure with good results. The texture will be slightly more tender and less flaky, but still delicious. Add an extra tablespoon of cream if the dough feels dry.
Dairy-Free Version : Use cold vegan butter sticks (not margarine from a tub) and substitute the heavy cream with full-fat coconut cream or a dairy-free milk alternative. The scones won’t be quite as flaky, but they’ll still be tender and flavorful. I’ve made these for a friend with dairy allergies and she couldn’t tell the difference.
Spice It Up : Add ¼ teaspoon of ground ginger and a pinch of cardamom to the spice blend for a warmer, more complex flavor. I did this on a whim one morning and now it’s my default version.
Add Mix-Ins : Fold in ½ cup of chopped pecans, walnuts, or dried cranberries after you’ve cut in the butter but before adding the wet ingredients. The nuts add crunch, and the cranberries add little bursts of tartness that play nicely with the maple glaze.
Make Them Savory-Sweet : Reduce the sugar to 2 tablespoons, skip the maple glaze, and sprinkle the tops with coarse sea salt before baking. The combination of pumpkin, salt, and butter is surprisingly good—almost like a pumpkin biscuit.
Mini Scones : Pat the dough into a circle and cut it into 12 smaller wedges instead of 8. Reduce the bake time to 12-14 minutes. These are perfect for brunch buffets or snack-size portions.
Serving & Storage Suggestions
These scones are best the day they’re made, but they keep well enough that you can bake them ahead if you know what you’re doing.
Serving Temperature : Serve the scones at room temperature or slightly warm. If you want to reheat them, pop them in a 300°F oven for 5 minutes. The microwave makes them rubbery—I learned this the hard way.
What to Serve With Them : A hot cup of coffee is the obvious choice, and I’ve been known to make my copycat Starbucks brown sugar oat milk shaken espresso alongside these scones for the ultimate fall pairing. A creamy homemade pumpkin spice latte also works beautifully if you want to double down on the pumpkin theme. For a non-coffee option, a tall glass of cold milk or a cup of chai tea is perfect.
Presentation : Arrange the glazed scones on a wooden board or a simple white plate. A dusting of extra cinnamon on top looks pretty and adds a little more spice aroma when you lean in.
Storage : Store unglazed scones in an airtight container at room temperature for up to 3 days. If you’ve already glazed them, layer parchment paper between the scones so the glaze doesn’t stick to the lid. Do not refrigerate—the fridge dries them out.
Freezing : You can freeze the unbaked scones. Cut them into wedges, place them on a baking sheet, and freeze until solid. Transfer the frozen wedges to a freezer bag. Bake directly from frozen, adding 2-3 minutes to the bake time. You can also freeze baked, unglazed scones for up to 2 months. Thaw at room temperature and glaze before serving.
Flavor Development : The spices mellow and meld together after a day, so day-old scones actually taste more balanced in a way. The texture won’t be as flaky, but the flavor is still wonderful.
Nutritional Information & Benefits
These scones are a treat, so I’m not going to pretend they’re health food. But there are a few redeeming qualities worth noting.
Estimated Nutritional Values (per scone, with glaze) :
- Calories: 320
- Fat: 16g
- Saturated Fat: 10g
- Carbohydrates: 42g
- Sugar: 20g
- Fiber: 2g
- Protein: 5g
Pumpkin Benefits : Pumpkin puree is a good source of vitamin A, which supports eye health and immune function. It also adds fiber and moisture to the scones without requiring extra fat. I like knowing there’s a vegetable hiding in my breakfast pastry.
Dietary Considerations : This recipe contains gluten, dairy, and eggs. See the variations section for gluten-free and dairy-free adaptations. The scones are nut-free as written, though the maple glaze is made with tree-derived maple syrup.
Portion Control : One scone is plenty satisfying, especially with a cup of coffee. I sometimes cut the scones smaller and make 12 instead of 8, just to have a little something without going overboard.
My Take : Baking from scratch means you control what goes in. Real butter, real pumpkin, real maple syrup. No preservatives, no artificial flavors, no mystery ingredients. That counts for something, even when you’re eating dessert for breakfast.
Conclusion
These flaky pumpkin scones with maple glaze are the kind of recipe that earns a permanent spot in your fall rotation. They’re not fussy or complicated—just good baking that works because the technique is sound and the ingredients are simple. The flaky layers, the warm spices, that sticky maple glaze on top. It’s a combination that feels special without requiring a whole afternoon in the kitchen.
I’ve made these scones for quiet Saturday mornings, for friends dropping by unannounced, and for no reason at all except that I wanted the house to smell like cinnamon and butter. Every time, they disappear faster than I expect. That’s how I know the recipe is worth sharing.
Try them once, and I think you’ll see what I mean. Adjust the spices to your taste, double the glaze if you’re feeling generous, and don’t stress about making them perfect. Scones are forgiving in their own way, and the imperfect ones are often the best ones anyway.
If you make these, I’d love to hear how they turn out. Drop a comment below or tag me in your photos. And if you’re already thinking about what to bake next, my maple pecan pumpkin cheesecake bars are another fall favorite that uses similar ingredients. Happy baking, and save me a scone.
Frequently Asked Questions
Can I use fresh pumpkin puree instead of canned?
Yes, but you’ll need to strain it first. Fresh pumpkin puree tends to be more watery than canned, which can make the dough too wet and the scones dense. Spread the puree on a paper towel-lined plate for 10 minutes to absorb excess moisture before using it.
Why did my scones turn out dry?
Dry scones usually come from one of three things: too much flour (from scooping instead of spooning), overbaking, or overmixing the dough. Measure your flour carefully, check the scones at 15 minutes, and stop mixing as soon as the dough comes together.
Can I make the dough ahead of time?
Absolutely. Shape the scones, place them on a parchment-lined baking sheet, and refrigerate for up to 24 hours. Bake them straight from the fridge, adding 1-2 minutes to the bake time. You can also freeze the unbaked scones for up to 3 months.
How do I get a thicker glaze?
Add more powdered sugar, 1 tablespoon at a time, until the glaze reaches your desired consistency. The glaze should be thick enough to hold its shape on the scone without running off the edges. A pinch more salt helps balance the sweetness too.
Can I skip the maple glaze?
Of course. The scones are lovely on their own with just a dusting of powdered sugar or a drizzle of honey. You could also serve them with butter and jam for a completely different experience. The glaze adds sweetness and maple flavor, but the scones hold their own without it.
Pin This Recipe!

Flaky Pumpkin Scones with Easy Maple Glaze
These flaky pumpkin scones are tender, buttery, and layered with warm fall spices, topped with a thick maple glaze that stays put. Perfect for cozy mornings or fall brunches.
- Prep Time: 15 minutes
- Cook Time: 18 minutes
- Total Time: 33 minutes
- Yield: 8 servings 1x
- Category: Breakfast
- Cuisine: American
Ingredients
- All-purpose flour, 2 ½ cups (315g)
- Granulated sugar, ⅓ cup (65g)
- Baking powder, 1 tablespoon
- Pumpkin pie spice, 2 teaspoons
- Ground cinnamon, 1 teaspoon
- Salt, ½ teaspoon
- Cold unsalted butter, ½ cup (1 stick, 113g)
- Canned pumpkin puree, ½ cup (120g)
- Heavy cream, ¼ cup (60ml)
- Vanilla extract, 1 teaspoon
- 1 large egg
- Powdered sugar, 1 cup (120g)
- Pure maple syrup, 2 tablespoons
- Heavy cream or milk, 1-2 tablespoons
- Vanilla extract, ½ teaspoon
- Pinch of salt
Instructions
- Preheat your oven to 400°F (200°C). Line a baking sheet with parchment paper. Cut cold butter into small cubes and refrigerate.
- In a large mixing bowl, whisk together flour, sugar, baking powder, pumpkin pie spice, cinnamon, and salt.
- Add cold butter cubes to the flour mixture. Using a pastry cutter or two forks, cut the butter into the flour until the mixture looks like coarse sand with some pea-sized butter pieces.
- In a separate small bowl, whisk together pumpkin puree, heavy cream, egg, and vanilla extract until smooth.
- Pour the wet ingredients into the dry ingredients. Stir with a fork or spatula just until the dough comes together. Do not overmix.
- Turn the dough out onto a lightly floured surface. Gently bring it together into a rough ball, then pat into a circle about ¾-inch thick.
- Using a bench scraper or sharp knife, cut the circle into 8 wedges. Transfer to the prepared baking sheet, spacing them about 2 inches apart.
- Brush the tops of the scones with extra heavy cream or milk. Bake for 15-18 minutes, until golden brown on the edges and firm to the touch.
- Let the scones cool on the baking sheet for 5 minutes, then transfer to a cooling rack. Cool completely before glazing (about 20-30 minutes).
- While the scones cool, make the glaze: In a small bowl, whisk together powdered sugar, maple syrup, vanilla extract, and a pinch of salt. Add heavy cream or milk 1 tablespoon at a time until thick but pourable.
- Drizzle the glaze over the cooled scones. Let set for about 10 minutes before serving.
Notes
Keep butter cold for flaky layers. Do not overwork the dough. For extra lift, chill shaped scones for 15 minutes before baking. Glaze only when completely cool.
Nutrition
- Serving Size: 1 scone
- Calories: 320
- Sugar: 20
- Fat: 16
- Saturated Fat: 10
- Carbohydrates: 42
- Fiber: 2
- Protein: 5
Keywords: pumpkin scones, maple glaze, fall baking, flaky scones, pumpkin spice


