Third batch in two days and I finally figured out the olive placement. The first tray of Spooky Easy Spider Deviled Eggs looked less like arachnids and more like sad little beetles that had seen better days. The second tray—well, let’s just say my piping technique was a little too aggressive and the filling ended up everywhere except the egg white. But this third round? Something clicked. The legs sat at the perfect angle, the filling held its shape like a cloud, and I stood there in my kitchen at 11 PM actually whispering “yes” to myself like a total weirdo. That’s the thing about this recipe—it looks fussy but it’s really just hard-boiled eggs, basic pantry stuff, and a little patience with your piping bag. I kept making them because I knew there was a version where everything lined up, where the creepy factor hit just right without the stress. Turns out, the trick is simpler than I thought. And now I can’t stop thinking about all the Halloween parties these little guys are about to crash.
Why You’ll Love This Recipe
Let’s be real—Halloween appetizers are usually a minefield. You want something that looks impressive but doesn’t have you sweating in the kitchen while your guests are having fun. These Spooky Easy Spider Deviled Eggs hit that sweet spot perfectly. I’ve tested this recipe about seven times now (obsessive? maybe) and here’s what I’ve learned:
- Quick & Easy: You can have these done in about 30 minutes flat. The active time is maybe 15 minutes once your eggs are boiled. That leaves you plenty of time to throw together a batch of Easy One-Pot Mummy Meatball Halloween Pasta for the main event.
- Simple Ingredients: Eggs, mayo, mustard, paprika, olives. That’s it. No weird specialty items you’ll never use again.
- Perfect for Halloween Parties: These are the kind of appetizer that makes people stop and take a picture before they eat. The spider legs made from black olives are genuinely creepy in the best way.
- Crowd-Pleaser: I brought these to a neighborhood gathering last weekend and they were gone in twenty minutes. Kids loved the spider look, adults loved the classic deviled egg taste.
- Unbelievably Delicious: The filling is creamy, tangy, and has that perfect paprika kick. It’s classic deviled egg done right—just with a spooky makeover.
What makes this recipe different from every other spider deviled egg out there? It’s the technique. I spent way too long figuring out the best way to cut the olives so the legs don’t fall off, the perfect piping consistency so the filling holds its shape, and the ideal egg boiling method so the whites are tender but sturdy enough to hold everything. This isn’t just another version—it’s the one that actually works without making you want to throw an olive across the room.
What Ingredients You Will Need
This recipe keeps things simple. No fancy ingredients, no last-minute grocery store panic. Everything here is probably already in your kitchen. Here’s what you need and why each ingredient matters:
- Large eggs (12): The foundation of everything. Use large eggs, not extra-large or jumbo. The size matters for consistent boiling and filling ratios. I prefer farm-fresh when I can get them—the yolks are brighter and the flavor is richer.
- Mayonnaise (1/3 cup): This is your creamy base. Don’t use salad dressing or miracle whip here—the sweetness throws off the balance. I’m a Dukes person myself, but any full-fat mayo works. Low-fat mayo makes the filling runny, so stick with the real stuff.
- Yellow mustard (1 teaspoon): Adds that tangy kick that makes deviled eggs taste like deviled eggs. You can use Dijon if you want a sharper flavor, but yellow mustard gives that classic diner-style taste.
- White vinegar (1/2 teaspoon): Sounds weird, I know, but a tiny splash brightens everything up. Don’t skip it—you won’t taste vinegar, you’ll just notice the eggs taste more balanced.
- Salt (1/4 teaspoon): Fine salt dissolves better than coarse here. Table salt or fine sea salt works perfectly.
- Black pepper (1/8 teaspoon): Fresh ground if you have it. It makes a subtle difference.
- Paprika (for garnish): Smoked paprika adds a deeper flavor, but regular works great too. I use smoked because it makes the eggs look more dramatic against the black olives.
- Large black olives (1 can): These become your spider bodies and legs. Get the large pitted ones—you need the size to cut legs. I’ve tried using jumbo olives but they’re actually too big. Standard large is the sweet spot.
Ingredient Notes & Substitutions: If you’re feeding a crowd that includes kids who might not love olives, you can use black olive slices from a jar for the bodies and skip the legs. The eggs will still look cute and spooky. For a richer filling, swap one tablespoon of mayo with sour cream. For a lighter version, Greek yogurt works but the texture will be slightly tangier and less creamy. I’ve tested both and prefer the mayo version for parties—it holds up better at room temperature.
Equipment Needed
You don’t need fancy equipment for these Spooky Easy Spider Deviled Eggs. Here’s what you’ll want:
- Medium saucepan: For boiling the eggs. Any pot works as long as the eggs fit in a single layer.
- Mixing bowls: One medium bowl for the filling, one small bowl for the olive pieces.
- Sharp knife and cutting board: You need a sharp knife to cut the olives cleanly. A dull knife will squish them.
- Piping bag or zip-top bag: A piping bag gives you more control, but a zip-top bag with the corner snipped off works perfectly. I’ve used both and honestly prefer the zip-top bag for these—less cleanup.
- Large star tip (optional): If you want that classic piped look, a star tip makes the filling look fancy. But a plain round tip or just a snipped corner works fine too.
- Egg platter or serving dish: Something with a flat surface so the spiders don’t roll around. I use a rectangular platter lined with lettuce for contrast.
Budget-Friendly Tip: Don’t have a piping bag? Grab a quart-size zip-top bag, spoon the filling into one corner, twist the top, and snip off about 1/4 inch. Works like a charm and costs nothing extra.
Preparation Method
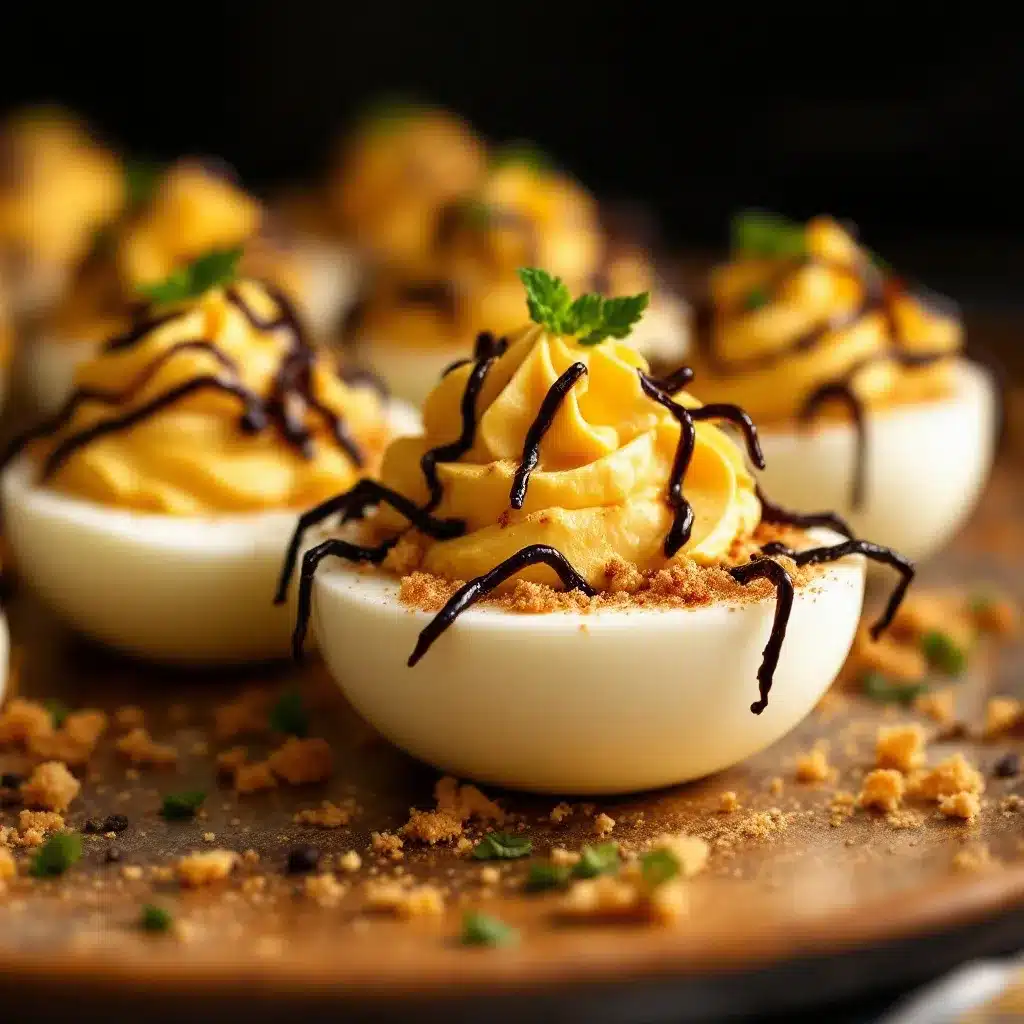
Let me walk you through this step by step. I’ve made these enough times to know exactly where things can go wrong, so I’ll save you the trouble.
Step 1: Boil the Perfect Eggs
Place your 12 eggs in a single layer in your saucepan. Cover them with cold water by about an inch. Bring to a boil over high heat—watch it, don’t walk away. Once the water reaches a rolling boil, cover the pot, turn off the heat, and let it sit for exactly 12 minutes. While the eggs cook, fill a large bowl with ice water. When the timer goes off, transfer the eggs to the ice bath immediately. Let them chill for at least 10 minutes. This method gives you fully cooked yolks with no green ring and shells that peel off easily.
Step 2: Peel and Halve the Eggs
Gently tap each egg on the counter to crack the shell all over, then peel under running cold water. The water helps separate the shell from the white. Pat the peeled eggs dry with paper towels. Using a sharp knife, slice each egg in half lengthwise. Pop the yolks into your medium mixing bowl and arrange the whites on your serving platter, cut side up.
Step 3: Make the Filling
Add the mayo, mustard, vinegar, salt, and pepper to the bowl with the yolks. Mash everything together with a fork until smooth, then switch to a spoon and stir until the mixture is creamy with no lumps. Taste it and adjust the salt or mustard if needed. The filling should be thick enough to hold its shape when piped—if it seems too runny, add another yolk (you can save one from another batch or just use a hard-boiled egg from the fridge).
Step 4: Prepare the Spider Parts
Drain your olives and pat them dry with paper towels. This is important—wet olives won’t stay put. For each spider, you need one whole olive for the body and half an olive cut into legs. Take half an olive and slice it lengthwise into thin strips—you want 4 to 5 strips per half. Each strip becomes one leg. You’ll need 8 legs per spider, so plan accordingly. I usually prep all the olive pieces at once and keep them in a small bowl.
Step 5: Pipe the Filling
Spoon your filling into your piping bag or zip-top bag. If using a zip-top bag, squeeze the filling into one corner and twist the top to create pressure. Snip off about 1/4 inch from the corner. Pipe the filling into each egg white half, starting from one end and moving to the other. You want a nice mound that rises above the edge of the white. Don’t overfill—you need room to place the spider on top.
Step 6: Assemble the Spiders
Here’s where the magic happens. Take one whole olive and place it on top of the filling in the center of each egg. Gently press it down so it sticks. Now take 8 olive leg strips and arrange them around the olive—4 on each side—sticking out like spider legs. The legs should curve slightly outward. Don’t worry if they look uneven; real spiders aren’t perfectly symmetrical either. That’s what makes them creepy!
Step 7: Garnish and Serve
Lightly dust the eggs with paprika using a small sieve or just a pinch of your fingers. The paprika adds color contrast and makes the spiders pop. Serve immediately or refrigerate until ready to serve. These look amazing on a platter with some fresh herbs or lettuce underneath for contrast.
Cooking Tips & Techniques
I’ve made enough mistakes with these Spooky Easy Spider Deviled Eggs to fill a horror movie. Let me save you the trouble.
The Egg Peeling Nightmare: Fresh eggs are actually harder to peel. If you can, use eggs that are at least a week old. The air pocket inside older eggs makes the shell separate more easily. If you’re stuck with fresh eggs, steaming them instead of boiling helps. I learned this after peeling my way through a dozen eggs that looked like they’d been through a war.
The Olive Leg Problem: Here’s the thing nobody tells you—olive legs are fragile. They break easily, they slide around, and they never look quite right on the first try. The solution is patience and a sharp knife. Cut your olive strips as evenly as possible and dry them thoroughly. If they’re too wet, they’ll slide right off the filling. I keep a paper towel nearby and blot each strip before placing it.
Piping Consistency: Your filling should be thick enough to hold a peak when piped but soft enough to pipe smoothly. If it’s too stiff, add a tiny splash of vinegar or a drop of mayo. If it’s too runny, add another yolk or a pinch of salt. The texture should be like thick frosting—spreadable but not drippy.
Make-Ahead Strategy: You can boil and peel the eggs up to 3 days ahead. Store them in the fridge in a covered container. You can also make the filling a day ahead and keep it in a piping bag in the fridge. Assemble the spiders the day of your party for best results—the olives stay fresher and the filling looks prettier.
Timing Tip: These take about 30 minutes total if your eggs are already boiled. If you’re making them for a party, boil the eggs the night before, prep the olives in the morning, and assemble everything an hour before guests arrive. That way you’re not scrambling (pun intended) at the last minute.
Variations & Adaptations
One of the best things about this recipe is how easy it is to change up. Here are some variations I’ve tried and loved:
The Classic Spooky: Stick with the black olive spiders. It’s the most recognizable and always gets the best reaction. Plus, olives and deviled eggs taste amazing together.
The Mummy Egg: Instead of spiders, pipe the filling in a zigzag pattern across the egg white, leaving a small space for “eyes.” Use two small dots of black olive for eyes. It’s a fun twist that takes no extra time.
The Pumpkin Patch: Add a pinch of turmeric or a drop of orange food coloring to the filling to make it pumpkin-colored. Top with a small piece of chive for a stem. These are adorable and perfect for a non-scary Halloween party.
Spicy Spider: Add 1/4 teaspoon of cayenne pepper or a dash of hot sauce to the filling. The heat pairs surprisingly well with the briny olives. My husband loves this version—he says it wakes up the flavor.
Herb Garden: Mix in 1 tablespoon of fresh chopped chives or dill into the filling. The green flecks look pretty against the yellow and add a fresh flavor that cuts through the richness.
Dietary Adaptations: For a dairy-free version, use vegan mayo (it works perfectly). For a low-carb option, these are naturally keto-friendly—just skip any sweet additions. For a gluten-free version, you’re already good to go since there’s no gluten in any of the ingredients.
Serving & Storage Suggestions
These Spooky Easy Spider Deviled Eggs are best served chilled or at room temperature. I like to take them out of the fridge about 15 minutes before serving so the filling softens slightly and the flavors come through.
Presentation Ideas: Arrange them on a black platter for maximum spooky factor. Add some fake spider webs around the edges of the platter (the stretchy kind from the dollar store). Garnish with fresh parsley or lettuce leaves for color contrast. If you’re serving them at a Halloween party, label them with a cute sign—something like “Creepy Crawly Deviled Eggs” always gets a laugh.
What to Serve With Them: These pair perfectly with other Halloween party snacks. I love serving them alongside Best Bacon-Wrapped Smokies with Easy Brown Sugar Glaze for a sweet and savory combo. They also go great with Ultimate Game Day Loaded Nacho Bar with Ground Beef if you’re doing a full spread.
Storage Instructions: Store leftover deviled eggs in an airtight container in the refrigerator for up to 2 days. The filling might absorb some moisture from the fridge, so they’re best eaten within 24 hours. Don’t freeze them—the texture of the egg whites will turn rubbery.
Reheating: These are served cold, so no reheating needed. If you’ve refrigerated them for more than a few hours, let them sit at room temperature for 10-15 minutes before serving to take the chill off.
Nutritional Information & Benefits
Here’s the nutritional breakdown for one spider deviled egg (based on 24 servings from 12 eggs):
| Nutrient | Amount per Serving |
|---|---|
| Calories | 65 |
| Protein | 5g |
| Fat | 4.5g |
| Saturated Fat | 1g |
| Carbohydrates | 1g |
| Fiber | 0g |
| Sugar | 0.5g |
| Sodium | 150mg |
Eggs are a fantastic source of high-quality protein and contain all nine essential amino acids. They’re also rich in choline, which supports brain health, and lutein, which is good for your eyes. The olives add healthy monounsaturated fats and a dose of vitamin E. This recipe is naturally low-carb, keto-friendly, and gluten-free. The main allergens are eggs and (if you’re sensitive) olives, though olive allergy is rare.
Frequently Asked Questions
Can I make these spider deviled eggs ahead of time?
Absolutely! You can boil and peel the eggs up to 3 days ahead and store them in the fridge. Make the filling a day ahead and keep it in a piping bag. Assemble the spiders the day of your event for the best presentation.
Why are my eggs hard to peel?
Fresh eggs are notoriously difficult to peel. Use eggs that are at least a week old for easier peeling. Also, shocking them in an ice bath immediately after boiling helps separate the shell from the white. Peeling under running water makes a huge difference too.
Can I use something other than olives for the spiders?
Definitely! You can use capers for tiny spiders, sliced almonds for a different look, or even small pieces of roasted red pepper for a colorful twist. Just make sure whatever you use is dry so it sticks to the filling.
How do I keep the olive legs from falling off?
The key is making sure both the olive pieces and the filling are dry. Blot your olives with paper towels before cutting. When you place the legs, press them gently into the filling so they stick. If they’re still sliding, try adding a tiny dab of filling under each leg as “glue.”
Can I make these without a piping bag?
Yes! You can use a zip-top bag with the corner snipped off, or you can simply spoon the filling into the egg whites and smooth it with the back of a spoon. The piping bag just gives a prettier presentation, but the taste is exactly the same.
Conclusion
These Spooky Easy Spider Deviled Eggs are the kind of recipe that makes you look like a Halloween hero without actually working that hard. They’re creepy, they’re delicious, and they’re guaranteed to be the first thing to disappear from any party table. I love how something so simple can bring so much joy—watching people’s faces light up when they see the little olive spiders never gets old.
Don’t be afraid to make these your own. Change up the filling, try different toppings, or experiment with the spider design. The beauty of this recipe is that it’s forgiving. Even if your spiders look a little wonky, they’ll still taste amazing. And honestly, wonky spiders are more realistic anyway.
I’d love to hear how yours turn out! Drop a comment below and let me know if your guests screamed (in a good way) when they saw these little guys. And if you come up with a fun variation, share that too—I’m always looking for new ideas to test in my kitchen!
Pin This Recipe!

Spooky Easy Spider Deviled Eggs: Best Halloween Appetizer
These Spooky Easy Spider Deviled Eggs are the perfect Halloween appetizer—creepy, delicious, and surprisingly simple to make. With a creamy filling and olive spiders, they’re guaranteed to be the hit of any party.
- Prep Time: 15 minutes
- Cook Time: 12 minutes
- Total Time: 30 minutes
- Yield: 24 servings 1x
- Category: Appetizer
- Cuisine: American
Ingredients
- 12 large eggs
- 1/3 cup mayonnaise
- 1 teaspoon yellow mustard
- 1/2 teaspoon white vinegar
- 1/4 teaspoon salt
- 1/8 teaspoon black pepper
- Paprika for garnish
- 1 can large black olives (pitted)
Instructions
- Place 12 eggs in a single layer in a saucepan. Cover with cold water by about an inch. Bring to a boil over high heat. Once boiling, cover the pot, turn off the heat, and let sit for exactly 12 minutes.
- While eggs cook, fill a large bowl with ice water. Transfer eggs to ice bath immediately after 12 minutes. Let chill for at least 10 minutes.
- Gently tap each egg to crack the shell all over, then peel under running cold water. Pat dry with paper towels. Slice each egg in half lengthwise. Pop yolks into a medium mixing bowl and arrange whites on a serving platter, cut side up.
- Add mayonnaise, mustard, vinegar, salt, and pepper to the bowl with yolks. Mash with a fork until smooth, then stir until creamy with no lumps. Adjust seasoning if needed. Filling should be thick enough to hold its shape when piped.
- Drain olives and pat dry with paper towels. For each spider, use one whole olive for the body and half an olive cut lengthwise into thin strips (4-5 strips per half) for legs. You need 8 legs per spider.
- Spoon filling into a piping bag or zip-top bag. If using a zip-top bag, squeeze filling into one corner, twist the top, and snip off about 1/4 inch from the corner. Pipe filling into each egg white half, creating a mound that rises above the edge.
- Place one whole olive on top of the filling in the center of each egg. Gently press down. Arrange 8 olive leg strips around the olive—4 on each side—sticking out like spider legs.
- Lightly dust eggs with paprika using a small sieve or pinch of fingers. Serve immediately or refrigerate until ready to serve.
Notes
Use eggs that are at least a week old for easier peeling. Blot olives dry before cutting to prevent legs from sliding off. For make-ahead: boil and peel eggs up to 3 days ahead, make filling a day ahead, and assemble day of party. If filling is too runny, add another yolk; if too stiff, add a splash of vinegar or mayo.
Nutrition
- Serving Size: 1 spider deviled egg
- Calories: 65
- Sugar: 0.5
- Sodium: 150
- Fat: 4.5
- Saturated Fat: 1
- Carbohydrates: 1
- Protein: 5
Keywords: Halloween appetizer, spider deviled eggs, easy deviled eggs, spooky eggs, Halloween party food, olive spiders, deviled eggs recipe


