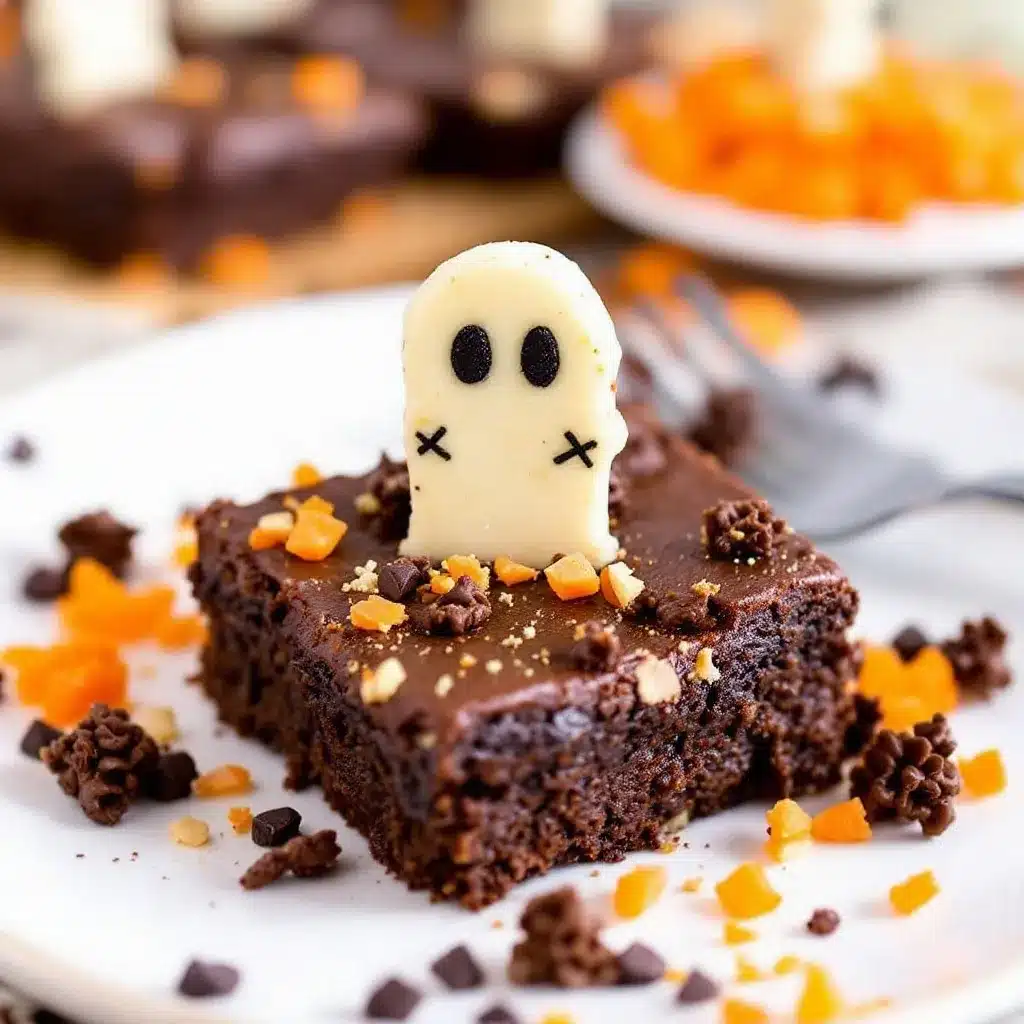
The way the crumb topping settled over that dense, fudgy brownie—like fresh soil mounded over a tiny grave—was what got me. I had spent the better part of an afternoon trying to make a Halloween dessert that didn’t feel like a sugar bomb wrapped in food coloring. And there it was, sitting on my baking sheet, looking genuinely like a miniature graveyard scene. I hadn’t even meant for it to look this good. The crushed chocolate cookies had fallen just right, the little tombstone-shaped shortbread had sunk at a perfect crooked angle, and for a second, I forgot I was supposed to be photographing it for the blog. I just stood there, staring at a pan of brownies that looked like a tiny, delicious burial ground. Honestly, that moment is why these Easy Halloween Brownie Graveyard Bites exist. They aren’t complicated. They aren’t fussy. They just look exactly like what they’re supposed to be—spooky, fun, and completely irresistible.
These little graveyard brownie bites are the kind of Halloween treat that makes people stop and smile. You know that feeling when you bring out a dessert and everyone just kind of looks at it before grabbing one? That’s this recipe. It’s the perfect balance of a rich, fudgy brownie base and a crunchy, cookie-dirt topping, all topped with a few gummy worms and a little cookie tombstone. I’ve made a lot of Halloween desserts over the years, and this one is the first that my kids actually helped me assemble without eating all the decorations first. That’s a win in my book.
Why You’ll Love This Recipe
Let me tell you why these Easy Halloween Brownie Graveyard Bites are about to become your go-to spooky season dessert. I’ve tested this recipe about six times now, tweaking the brownie base for the perfect fudgy texture and figuring out the best way to get that “dirt” topping to actually stay put. It’s been a labor of love—and a lot of chocolate consumption.
- Quick & Easy: From start to finish, you’re looking at about 45 minutes. That includes baking time. For a dessert that looks this impressive, that’s practically magic.
- Simple Ingredients: You probably already have most of these in your pantry. No weird candy melts or specialty baking mixes. Just real ingredients that come together beautifully.
- Perfect for Halloween Parties: Whether you’re hosting a spooky soiree or just want something fun for the kids after trick-or-treating, these bites are a guaranteed hit. They travel well, too, so they’re great for potlucks or classroom parties.
- Crowd-Pleaser: Kids love the gummy worms and the “dirt.” Adults love the rich, not-too-sweet brownie. It’s a win-win for everyone.
- Unbelievably Delicious: The texture is what gets me every time. That crackly top, the dense, fudgy center, and the crunch of the cookie topping. It’s next-level comfort food in a bite-sized form.
What makes this recipe different from the dozens of other graveyard brownie recipes out there? It’s the ratio. I spent a lot of time figuring out the perfect balance between the brownie, the crumb topping, and the decorations. Too much “dirt” and it overpowers the brownie. Too many gummy worms and it becomes a sticky mess. This version is calibrated for maximum spooky satisfaction without any of the hassle. It’s the kind of dessert that makes you close your eyes after the first bite—it’s that good.
What Ingredients You Will Need
This recipe uses simple, wholesome ingredients to deliver that rich, fudgy brownie texture and the perfect crunchy topping. No fancy grocery trips needed—you likely already have everything in your kitchen.
For the Brownie Base:
- 1/2 cup (1 stick) unsalted butter, melted (I use Kerrygold for the rich flavor, but any good unsalted butter works)
- 1 cup granulated sugar (adds sweetness and helps create that crackly top)
- 2 large eggs, room temperature (room temperature eggs incorporate better and give a smoother batter)
- 1 teaspoon vanilla extract (pure vanilla extract makes a difference, trust me)
- 1/3 cup unsweetened cocoa powder (I prefer Dutch-process for a deeper, darker chocolate flavor)
- 1/2 cup all-purpose flour (spoon and level it—don’t scoop directly from the bag)
- 1/4 teaspoon salt (balances the sweetness and enhances the chocolate)
- 1/4 teaspoon baking powder (just enough to give a little lift without making it cakey)
For the “Dirt” Topping:
- 1 cup chocolate sandwich cookies, crushed into fine crumbs (Oreos work perfectly, and you can use the filling too—it adds to the “dirt” texture)
- 2 tablespoons unsalted butter, melted (helps the crumbs stick together and gives that slightly clumpy “soil” look)
For the Decorations:
- Miniature shortbread cookies or graham crackers (for the tombstones—I like the Keebler Sandies for their sturdy texture)
- Gummy worms (the classic Halloween candy, and they look amazing peeking out of the “dirt”)
- Optional: Black icing pen or melted dark chocolate (for writing “RIP” or other spooky messages on the tombstones)
Ingredient Tips: For the best texture, make sure your eggs are truly at room temperature. If you forget to take them out of the fridge, place them in a bowl of warm water for 5 minutes. Also, when crushing the cookies for the “dirt,” you want a mix of fine crumbs and a few slightly larger pieces. It looks more realistic that way. If you’re using a gluten-free flour blend, this recipe adapts beautifully—just make sure the blend contains xanthan gum for structure.
Equipment Needed
You don’t need a professional pastry kitchen to make these Easy Halloween Brownie Graveyard Bites. Here’s what you’ll need:
- 8×8 inch baking pan (a 9×9 works too, but the brownies will be slightly thinner)
- Parchment paper (for easy removal—don’t skip this, it’s a lifesaver)
- Mixing bowls (one medium, one small)
- Whisk (for the brownie batter)
- Spatula (for spreading the batter evenly)
- Food processor or ziplock bag and rolling pin (for crushing the cookies into “dirt”)
- Small knife or toothpick (for writing on the tombstones, if you’re going that route)
- Cooling rack (essential for letting the brownies cool completely before topping)
I’ve made these with a cheap 8×8 pan and a fancy one, and honestly, the results are the same. The parchment paper is the real hero here—it makes lifting the entire slab of brownies out so much easier. If you don’t have a food processor for the cookies, just put them in a ziplock bag and go to town with a rolling pin. It’s oddly satisfying and a great way to get out any pre-Halloween jitters.
Preparation Method
Alright, let’s get to the fun part. Here’s how to make these spooky little bites of heaven.
- Preheat and Prep: Preheat your oven to 350°F (175°C). Line your 8×8 baking pan with parchment paper, leaving a little overhang on two opposite sides. This will make lifting the brownies out a breeze later.
- Melt the Butter: In a medium microwave-safe bowl, melt the 1/2 cup of butter in 30-second intervals until completely melted. Let it cool for a minute or two—you don’t want it hot enough to cook the eggs.
- Mix Wet Ingredients: Add the 1 cup of sugar to the melted butter and whisk until well combined. It will look a bit grainy, and that’s okay. Add the 2 room-temperature eggs and 1 teaspoon of vanilla extract. Whisk vigorously for about a minute until the mixture is smooth, glossy, and slightly lighter in color. This is where that crackly top starts to develop.
- Add Dry Ingredients: Sift the 1/3 cup cocoa powder, 1/2 cup all-purpose flour, 1/4 teaspoon salt, and 1/4 teaspoon baking powder over the wet mixture. Fold gently with a spatula until just combined. Do not overmix—you want to see a few streaks of flour disappear, and then stop. Overmixing will make the brownies tough.
- Bake: Pour the batter into the prepared pan and spread it evenly. Bake for 20-25 minutes, or until a toothpick inserted into the center comes out with a few moist crumbs attached. The edges should be set and starting to pull away from the sides of the pan. Let the brownies cool completely in the pan on a cooling rack. This is crucial—if you try to add the “dirt” while they’re warm, it will melt into a gooey mess.
- Make the “Dirt”: While the brownies are cooling, make the topping. Place the 1 cup of chocolate sandwich cookies in a food processor and pulse until you have fine crumbs with a few slightly larger pieces. Transfer to a small bowl and drizzle with the 2 tablespoons of melted butter. Stir with a fork until the mixture looks like damp, clumpy soil.
- Prepare the Tombstones: If you’re using mini shortbread cookies, you can leave them plain or write “RIP” on them with a black icing pen or a toothpick dipped in melted dark chocolate. Let them set while the brownies finish cooling.
- Assemble the Graveyard: Once the brownies are completely cool, lift them out of the pan using the parchment paper overhang. Place them on a cutting board. Using a sharp knife, cut the brownie slab into 9 or 12 even squares. Sprinkle the “dirt” topping generously over each square, pressing it down gently so it sticks. Place one or two gummy worms on top, letting them peek out of the “dirt” like they’re crawling out of the ground. Gently press a prepared tombstone cookie into the center of each brownie bite.
- Serve and Enjoy: These are best served the same day, but they’ll keep for a day or two in an airtight container at room temperature.
Sensory Cues: When you’re mixing the wet ingredients, you should see the mixture become thick and glossy, almost like a ribbon when you lift the whisk. When you fold in the dry ingredients, the batter should be thick and fudgy, not runny. And when you sprinkle that “dirt” topping on the cooled brownies, listen for that slight crunch—it’s the sound of perfection.
Cooking Tips & Techniques
I’ve made a lot of brownies in my time, and I’ve learned a few things the hard way. Here are my best tips for nailing these Easy Halloween Brownie Graveyard Bites every single time.
Don’t Overbake: This is the number one mistake people make with brownies. They look at the clock and think “five more minutes” and end up with a dry, cakey mess. Pull them out when a toothpick inserted into the center comes out with a few moist crumbs. The brownies will continue to cook slightly from the residual heat in the pan as they cool.
Cool Completely: I cannot stress this enough. If you add the “dirt” topping while the brownies are even slightly warm, that butter in the cookie crumbs will melt and you’ll end up with a soggy, sticky topping instead of a crumbly, dirt-like texture. Patience is a virtue here.
Crush the Cookies Right: You want a mix of textures in your “dirt.” Some fine powder, some small chunks. If you pulse too long in the food processor, you’ll get dust. If you don’t pulse enough, you’ll get chunks that look like, well, chunks. Aim for a texture that resembles coarse sand with a few pebbles mixed in.
Press the Topping Gently: When you sprinkle the “dirt” on top of the brownie bites, use your fingers to press it down just slightly. This helps it adhere to the brownie surface without crushing the brownie itself. You want it to look like a freshly dug grave, not a compacted dirt road.
Timing and Multitasking: While the brownies are baking, crush the cookies and prepare the tombstones. This way, everything is ready to go as soon as the brownies are cool. I’ve learned that having all your components prepped and ready makes the assembly process so much more enjoyable—and less messy.
Variations & Adaptations
One of the best things about this recipe is how easy it is to customize. Here are a few variations I’ve tried and loved.
Gluten-Free Version: Use a 1:1 gluten-free all-purpose flour blend in the brownie batter. For the “dirt,” use gluten-free chocolate sandwich cookies. The texture will be slightly different, but it’s still delicious and spooky.
Peanut Butter Twist: Swirl in 2 tablespoons of creamy peanut butter into the brownie batter before baking. The combination of chocolate and peanut butter is always a hit, and it adds a nice salty-sweet balance to the dessert.
Spider Web Decoration: Instead of tombstones, pipe a spider web pattern on top of each brownie bite using melted white chocolate. Place a small chocolate spider or a black licorice spider on top for an extra creepy touch.
Mint Chocolate Version: Add 1/2 teaspoon of peppermint extract to the brownie batter along with the vanilla. Top with crushed Andes mints or mint chocolate cookies for the “dirt.” It’s a fresh, cool twist on the classic.
Extra Spooky Elements: Add a few candy eyeballs peeking out of the “dirt” alongside the gummy worms. You can also use orange-tinted white chocolate to create little pumpkins or ghosts to place on top of the graveyard.
I once made a version with crushed pretzels mixed into the “dirt” for a salty crunch, and it was a huge hit. Don’t be afraid to experiment—that’s half the fun of Halloween baking.
Serving & Storage Suggestions
These Easy Halloween Brownie Graveyard Bites are best served at room temperature. The texture of the brownie is at its fudgiest, and the “dirt” topping stays perfectly crunchy. I like to arrange them on a black platter or a wooden board for that extra spooky vibe.
For a party, you can place them on a large serving tray with a few extra gummy worms scattered around for decoration. They pair beautifully with a glass of cold milk, a warm pumpkin cream cold foam coffee, or even a scoop of vanilla ice cream on the side.
Storage: Store any leftover brownie bites in an airtight container at room temperature for up to 3 days. I’ve found that they actually taste better on the second day—the flavors meld together and the brownie becomes even more fudgy. If you’re stacking them, place a sheet of parchment paper between the layers to prevent the “dirt” from sticking to the bottom of the brownie above them.
Freezing: You can freeze the unfrosted brownies for up to 3 months. Wrap the cooled brownie slab tightly in plastic wrap, then in a layer of aluminum foil. When you’re ready to serve, thaw the slab at room temperature, cut into bites, and then add the “dirt” topping and decorations. Do not freeze the assembled bites—the gummy worms will become hard and the “dirt” will lose its crunch.
Reheating: If you want that just-baked experience, pop a brownie bite in the microwave for about 10 seconds. The chocolate will get all melty and delicious. Just be careful not to overheat it, or the “dirt” topping might get a bit soggy.
Flavor Development: These brownies are one of those rare treats that actually get better with a little time. The chocolate flavor deepens and the texture becomes even more dense and fudgy after a day or two. So if you’re planning ahead, you can absolutely make the brownie base a day in advance and assemble the graveyard bites just before serving.
Nutritional Information & Benefits
Let’s be real—these are a treat, and they’re meant to be enjoyed as such. But here’s a rough breakdown of what you’re looking at per brownie bite (assuming 12 servings):
- Calories: Approximately 220-250 per bite
- Fat: 12-14g
- Carbohydrates: 28-32g
- Protein: 3-4g
- Fiber: 1-2g
- Sugar: 18-22g
While these aren’t a health food by any stretch, there are a few small benefits to note. The cocoa powder is rich in antioxidants and flavonoids, which have been linked to heart health. The eggs provide a good source of protein, and the butter, well, it makes everything taste better.
If you’re looking to lighten things up a bit, you can swap the all-purpose flour for whole wheat pastry flour, which adds a bit of fiber. You can also reduce the sugar by a quarter cup, though this will affect the texture of the brownie slightly—it won’t have that same crackly top.
Personally, I think Halloween is a time to indulge a little. These brownie bites are a fun, festive way to celebrate the season without going overboard. One or two is usually enough to satisfy that sweet tooth, and they’re so rich and satisfying that you don’t need a huge portion to feel like you’ve had a treat.
Conclusion
These Easy Halloween Brownie Graveyard Bites are everything I want in a Halloween dessert—fun, spooky, and absolutely delicious. They’re the kind of treat that makes people smile the moment they see them, and that first bite always delivers on the promise of that rich, fudgy brownie and that satisfying crunch of the “dirt” topping.
I’ve made these for Halloween parties, classroom celebrations, and just for a fun weekend baking project with my kids, and they’ve never disappointed. The best part? They’re so easy to customize. Add your favorite Halloween candies, change up the decorations, or experiment with different brownie add-ins. This recipe is a canvas for your spooky creativity.
I’d love to hear how your graveyard bites turn out! Drop a comment below and let me know what decorations you used, or tag me in your photos on social media. And if you’re looking for more Halloween fun, check out my Easy One-Pot Mummy Meatball Halloween Pasta for a savory spooky dinner idea. Happy Halloween, and happy baking!
Frequently Asked Questions
Can I use a boxed brownie mix for this recipe?
Absolutely! If you’re short on time, a boxed mix works perfectly. Just follow the package instructions for fudgy brownies (usually using fewer eggs and oil instead of butter) and let them cool completely before adding the “dirt” topping. The homemade version is richer, but the boxed version is still delicious and spooky.
How do I keep the gummy worms from melting into the topping?
Make sure the brownies are completely cool before you add the gummy worms. If the brownies are even slightly warm, the heat can cause the gummy worms to soften and melt into the “dirt.” I usually let my brownies cool for at least an hour before assembling.
Can I make these ahead of time for a party?
Yes! You can bake the brownies up to 2 days in advance and store them in an airtight container at room temperature. Assemble the graveyard bites the morning of your party or just before serving. The “dirt” topping and decorations are best added right before serving to keep them crunchy and fresh.
What can I use instead of gummy worms?
Any Halloween candy works great! Try candy corn, candy pumpkins, chocolate spiders, or even little marshmallow ghosts. You can also use pretzel sticks to look like broken bones or licorice strings to look like spider webs. Get creative with whatever you have on hand.
How do I get the “dirt” topping to look realistic?
The key is in the texture. Pulse the chocolate sandwich cookies in a food processor until you have a mix of fine crumbs and slightly larger pieces. Then mix in the melted butter and stir until the mixture looks like damp, clumpy soil. Don’t over-process—you want some variation in the crumb size for that realistic dirt look.
Pin This Recipe!

Easy Halloween Brownie Graveyard Bites: Best Spooky Treat
These Easy Halloween Brownie Graveyard Bites are the perfect spooky treat—rich, fudgy brownies topped with a crunchy cookie ‘dirt’ topping, gummy worms, and tombstone cookies. They’re quick, easy, and guaranteed to be a hit at any Halloween party.
- Prep Time: 15 minutes
- Cook Time: 25 minutes
- Total Time: 45 minutes
- Yield: 12 servings 1x
- Category: Dessert
- Cuisine: American
Ingredients
- 1/2 cup (1 stick) unsalted butter, melted
- 1 cup granulated sugar
- 2 large eggs, room temperature
- 1 teaspoon vanilla extract
- 1/3 cup unsweetened cocoa powder (Dutch-process preferred)
- 1/2 cup all-purpose flour
- 1/4 teaspoon salt
- 1/4 teaspoon baking powder
- 1 cup chocolate sandwich cookies (e.g., Oreos), crushed into fine crumbs
- 2 tablespoons unsalted butter, melted
- Miniature shortbread cookies or graham crackers (for tombstones)
- Gummy worms
- Optional: Black icing pen or melted dark chocolate (for writing on tombstones)
Instructions
- Preheat your oven to 350°F (175°C). Line an 8×8 inch baking pan with parchment paper, leaving overhang on two opposite sides.
- In a medium microwave-safe bowl, melt 1/2 cup of butter in 30-second intervals until completely melted. Let cool for a minute or two.
- Add 1 cup of sugar to the melted butter and whisk until well combined. Add 2 room-temperature eggs and 1 teaspoon of vanilla extract. Whisk vigorously for about a minute until smooth, glossy, and slightly lighter in color.
- Sift 1/3 cup cocoa powder, 1/2 cup all-purpose flour, 1/4 teaspoon salt, and 1/4 teaspoon baking powder over the wet mixture. Fold gently with a spatula until just combined. Do not overmix.
- Pour the batter into the prepared pan and spread evenly. Bake for 20-25 minutes, or until a toothpick inserted into the center comes out with a few moist crumbs. Let the brownies cool completely in the pan on a cooling rack.
- While the brownies cool, make the ‘dirt’ topping: Place 1 cup of chocolate sandwich cookies in a food processor and pulse until you have fine crumbs with a few larger pieces. Transfer to a small bowl and drizzle with 2 tablespoons of melted butter. Stir with a fork until the mixture looks like damp, clumpy soil.
- Prepare the tombstones: If using mini shortbread cookies, leave them plain or write ‘RIP’ on them with a black icing pen or a toothpick dipped in melted dark chocolate. Let set.
- Once the brownies are completely cool, lift them out of the pan using the parchment paper overhang. Place on a cutting board and cut into 9 or 12 even squares.
- Sprinkle the ‘dirt’ topping generously over each square, pressing it down gently. Place one or two gummy worms on top, letting them peek out. Gently press a prepared tombstone cookie into the center of each brownie bite.
- Serve the same day, or store in an airtight container at room temperature for up to 3 days.
Notes
For best results, ensure brownies are completely cool before adding the ‘dirt’ topping to prevent melting. Crush cookies to a mix of fine crumbs and slightly larger pieces for a realistic dirt texture. Brownies can be baked up to 2 days in advance; assemble just before serving.
Nutrition
- Serving Size: 1 brownie bite
- Calories: 235
- Sugar: 20
- Sodium: 150
- Fat: 13
- Saturated Fat: 8
- Carbohydrates: 30
- Fiber: 1.5
- Protein: 3.5
Keywords: Halloween brownies, graveyard brownies, spooky treats, easy Halloween dessert, fudgy brownies, brownie bites


