My six-year-old looked up from her cookie, web string dangling from her teeth, and said, “Mom, can we make these every day until Halloween?” That’s when I knew this recipe was a keeper. Not because she loved the sugar rush, but because she actually helped me pipe every single spiderweb without losing patience. That never happens, you know.
I’d been messing around with different royal icing consistencies for weeks, trying to get that perfect, clean web design that didn’t bleed into the cookie. Honestly, I ruined two batches of perfectly good sugar cookies before I figured out the trick. But watching her carefully squeeze that piping bag, tongue poking out in concentration, made every sticky mess worth it.
These Easy Spiderweb Halloween Sugar Cookies aren’t just cute—they’re the kind of project that actually works with kids. The dough comes together fast, the icing sets firm enough to stack, and that spiderweb design? It looks way more impressive than it is to make. I promise, if my kindergartener can nail it, so can you.
This is the recipe that turned me into the “cool mom” at the school Halloween party. And honestly, that feels pretty good.
Why You’ll Love This Recipe
Let me tell you why these cookies have become my go-to for every Halloween gathering. I’ve tested this recipe at least eight times, tweaking the butter temperature and chilling times until the texture was absolutely perfect.
- Quick & Easy: From start to finish, you’re looking at about 45 minutes of active work. The dough chills for 30 minutes, and the decorating goes fast once you get the hang of it.
- Simple Ingredients: Butter, sugar, flour, eggs—you probably have everything already. No weird specialty items that cost ten bucks and sit in your pantry for a year.
- Perfect for Halloween Parties: These cookies are showstoppers on any dessert table. I brought them to our school’s fall festival and they disappeared before the cupcakes.
- Crowd-Pleaser: Kids love the design, adults love the buttery vanilla flavor. It’s a win-win situation.
- Unbelievably Delicious: The cookie itself is soft in the middle with slightly crispy edges. The royal icing hardens with a nice snap, but the cookie underneath stays tender.
What makes this recipe different from all the others? It’s the icing consistency. I spent a whole afternoon figuring out the exact ratio of powdered sugar to milk so the webs stay sharp and don’t spread into a blob. This isn’t just another sugar cookie recipe—it’s the one that actually works.
These cookies make you feel like a baking genius without the stress. And honestly, isn’t that what Halloween baking should be about?
What Ingredients You Will Need
This recipe uses simple, wholesome ingredients that come together to create something truly special. No fancy extracts or hard-to-find decorations required.
For the Sugar Cookies
- Unsalted butter, 1 cup (2 sticks), softened to room temperature (I use Kerrygold for the richest flavor)
- Granulated sugar, 1 cup (adds sweetness and helps create that tender crumb)
- Large egg, 1, room temperature (cold eggs can make the dough seize up)
- Vanilla extract, 2 teaspoons (pure vanilla makes a difference, but imitation works fine too)
- All-purpose flour, 2 and ¾ cups (spoon and level for accuracy)
- Baking powder, 1 teaspoon (gives just a little lift)
- Salt, ½ teaspoon (balances the sweetness)
For the Royal Icing
- Powdered sugar, 3 cups (sifted to remove lumps)
- Meringue powder, 2 tablespoons (this is the secret to stiff peaks and quick drying)
- Warm water, 4-5 tablespoons (add slowly until you reach the right consistency)
- Black gel food coloring, 1 teaspoon (gel works way better than liquid—it doesn’t thin the icing)
- Orange gel food coloring, ½ teaspoon (for the base layer, optional but fun)
For the white base icing, you’ll need the same ingredients minus the black coloring. I recommend AmeriColor for gel colors—they’re super concentrated and last forever. A little goes a long way, honestly.
If you don’t have meringue powder, you can substitute with 1 tablespoon of powdered egg whites mixed with 2 tablespoons of water. But meringue powder gives the most consistent results for royal icing.
Equipment Needed
You don’t need a professional bakery setup for these cookies. Here’s what I use in my own kitchen:
- Stand mixer or hand mixer—I’ve made these with both. My KitchenAid makes quick work of the dough, but a hand mixer works perfectly fine.
- Rolling pin—I prefer a French rolling pin without handles, but any rolling pin works. If you don’t have one, a clean wine bottle works in a pinch.
- Round cookie cutter—I use a 3-inch cutter. A drinking glass with a thin rim works if you’re in a bind.
- Piping bags—Disposable ones are easiest. You’ll need one for the white icing and one for the black.
- Small round piping tip—Size #2 or #3 works best for the spiderweb design. Wilton tips are my go-to.
- Baking sheets—Two large sheets so you can rotate them in the oven.
- Parchment paper—Non-negotiable. It prevents sticking and makes cleanup a breeze.
- Cooling rack—Wire racks help the cookies cool evenly so the icing sets properly.
I’ve ruined a batch of cookies by using a dark baking sheet—they browned too fast on the bottom. Stick with light-colored aluminum sheets for the most even baking.
Preparation Method
Making the Sugar Cookie Dough
- Cream the butter and sugar—In a large bowl, beat the softened butter and granulated sugar together until light and fluffy, about 2-3 minutes. Scrape down the sides halfway through. You want it pale yellow and airy.
- Add the egg and vanilla—Beat in the egg and vanilla extract until fully combined. The mixture might look slightly curdled at this point, but that’s normal. Don’t panic.
- Mix the dry ingredients—In a separate bowl, whisk together the flour, baking powder, and salt. Gradually add this to the wet mixture, mixing on low speed until just combined. Overmixing makes tough cookies, so stop as soon as no streaks of flour remain.
- Chill the dough—Divide the dough in half, flatten each into a disk, wrap in plastic wrap, and refrigerate for at least 30 minutes. This step is crucial—warm dough spreads into puddles instead of perfect circles. I’ve learned this the hard way.
Baking the Cookies
- Preheat the oven—Set your oven to 375°F (190°C). Line two baking sheets with parchment paper.
- Roll and cut—On a lightly floured surface, roll one disk of dough to about ¼-inch thickness. Cut out rounds and place them 2 inches apart on the prepared baking sheets. Gather scraps, reroll, and cut again.
- Bake—Bake for 8-10 minutes, or until the edges are just barely golden. The centers will look slightly underdone—that’s what you want. Overbaked cookies turn into hockey pucks.
- Cool completely—Let the cookies cool on the baking sheet for 5 minutes, then transfer to a wire rack to cool completely. Warm cookies will melt your icing into a disaster.
Making and Decorating with Royal Icing
- Make the white base icing—In a medium bowl, combine 1½ cups powdered sugar, 1 tablespoon meringue powder, and 2 tablespoons warm water. Beat on low until combined, then increase speed and beat for 3-4 minutes until stiff peaks form. Add water a teaspoon at a time until the icing reaches “flood consistency”—it should flow like honey and smooth out within 10 seconds after being stirred.
- Flood the cookies—Transfer the white icing to a piping bag fitted with a #2 tip. Pipe an outline around each cookie, then fill in the center. Use a toothpick to spread the icing into corners and pop any air bubbles. Let these dry completely—about 2-3 hours, or overnight if you’re patient.
- Make the black spiderweb icing—Repeat the icing process with the remaining powdered sugar and meringue powder, but add the black gel food coloring. The consistency should be a bit thicker than the flood icing—it needs to hold its shape when piped.
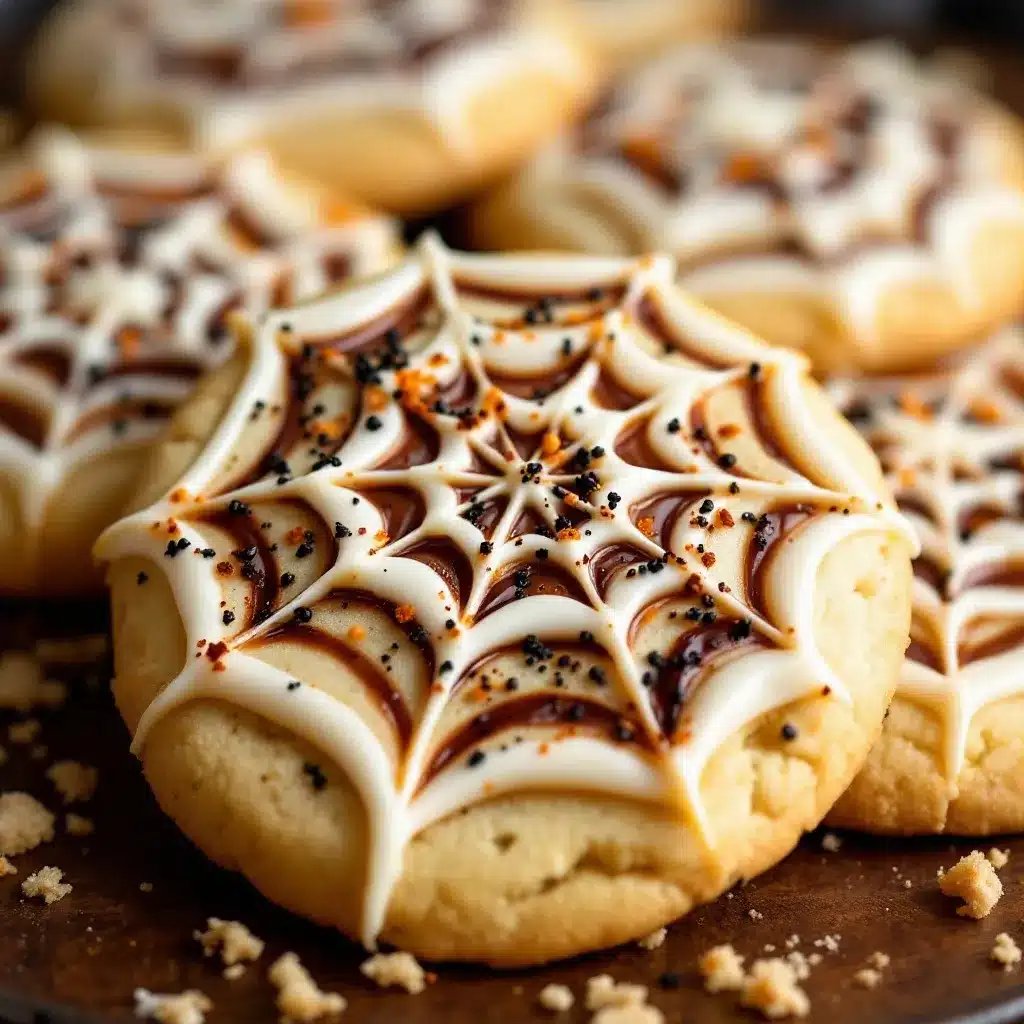
- Pipe the spiderwebs—Once the base icing is completely dry, pipe a small black dot in the center of each cookie. Then pipe 4-6 curved lines radiating from the center to the edges. Connect them with curved lines that follow the shape of the radiating lines—like a real spiderweb. I start from the center and work my way out.
- Let the webs set—Allow the black icing to dry for at least 1 hour before stacking or storing. The webs should be firm to the touch.
Cooking Tips & Techniques
Here are the things I wish someone had told me before I started making these cookies. Trust me, I learned these the hard way.
The dough must be cold. If your dough feels sticky or soft at any point, pop it back in the fridge for 10 minutes. I once skipped the chilling step because I was in a hurry, and my cookies spread into flat, ugly blobs that looked nothing like circles. Don’t be me.
Icing consistency is everything. For the base layer, the icing should be thin enough to smooth out on its own but thick enough to stay within your piped outline. Test it by lifting your spatula—the ribbon of icing should sink back into the bowl within 10 seconds. Too thick? Add a drop of water. Too thin? Add more powdered sugar.
Let the base icing dry completely. I know it’s tempting to start piping webs right away, but wet base icing will absorb the black icing and create a muddy mess. I ruined an entire batch this way. Give it at least 2 hours, or better yet, make the base layer the night before.
Use a toothpick for corrections. If your black icing blobs in the wrong spot, immediately drag a toothpick through it to reshape. You can also use the toothpick to pull the icing into thin lines if your piping hand isn’t steady.
Practice on parchment first. Before you touch a cookie, pipe a few test webs on a piece of parchment paper. This helps you get the feel of the piping bag and adjust your pressure. Plus, you can scrape it off and try again if it looks terrible.
Variations & Adaptations
These cookies are super flexible. Here are some ways I’ve changed them up over the years:
- Gluten-Free Version: Substitute the all-purpose flour with a 1:1 gluten-free baking flour. I’ve used Bob’s Red Mill with great results. The texture is slightly more crumbly, but the flavor is still amazing.
- Vegan Adaptation: Use vegan butter (I like Earth Balance) and replace the egg with a flax egg (1 tablespoon ground flaxseed mixed with 3 tablespoons water). For the royal icing, use aquafaba (the liquid from a can of chickpeas) instead of meringue powder—2 tablespoons of aquafaba whipped to stiff peaks does the trick.
- Different Colors: Instead of black and white, try orange base with purple webs, or green base with black webs. I made a batch for my daughter’s class with neon green icing and they were a huge hit.
- Chocolate Version: Swap out ¼ cup of the flour for unsweetened cocoa powder. The chocolate flavor pairs beautifully with the vanilla royal icing.
- Add Sprinkles: While the base icing is still wet, add some orange or black sprinkles around the edges. It adds a fun crunch and extra Halloween flair.
I once tried a version with cream cheese in the dough, thinking it would be fancy. Spoiler alert: it spread too much and the webs looked like melted plastic. Stick with the original recipe for best results.
Serving & Storage Suggestions
These cookies are best served at room temperature. The royal icing should be completely dry and firm to the touch before you serve them—usually about 4 hours after decorating.
For a Halloween party, arrange them on a platter with some candy corn bark and black velvet cupcakes for a themed dessert spread that looks incredible. The contrast of the white webs against the orange and black treats is so satisfying.
Storage Instructions:
Store the cookies in an airtight container at room temperature for up to 1 week. Place a sheet of parchment paper between layers to prevent the icing from sticking together. Do not refrigerate—the moisture will make the icing soft and sticky.
Freezer Instructions:
You can freeze the undecorated baked cookies for up to 3 months. Wrap them tightly in plastic wrap and then foil. When you’re ready to decorate, thaw them at room temperature and proceed with the icing. I’ve also frozen the decorated cookies—just place them in a single layer in a freezer-safe container with parchment between layers. Thaw in the container to avoid condensation ruining the webs.
The flavors actually get better after a day or two. The cookies soften slightly and the vanilla flavor melds with the icing. Honestly, I think day-two cookies are the best.
Nutritional Information & Benefits
Let’s be real—these are sugar cookies, so they’re not health food. But here’s the estimated breakdown per cookie (based on a 3-inch cookie with icing):
- Calories: 185
- Total Fat: 8g
- Saturated Fat: 5g
- Carbohydrates: 28g
- Sugar: 18g
- Protein: 2g
- Sodium: 85mg
The butter provides a small amount of vitamin A, and the egg adds a bit of protein. But honestly, these are about joy, not nutrition. They’re a treat for special occasions, and that’s perfectly fine.
If you’re looking for a slightly healthier option, you can reduce the sugar in the cookie dough by ¼ cup without affecting the texture too much. The royal icing needs the full amount of powdered sugar to set properly, though—no shortcuts there.
These cookies are vegetarian but not vegan (unless you use the adaptations above). They contain gluten, dairy, and eggs, so they’re not suitable for those with related allergies.
Conclusion
These Easy Spiderweb Halloween Sugar Cookies have become a tradition in our house, and I think they deserve a spot in yours too. They’re fun to make, gorgeous to look at, and absolutely delicious to eat. The best part? They actually work. No fancy techniques, no stressful steps—just butter, sugar, and a little bit of patience.
I love that this recipe brings people together. My daughter and I have made countless batches, and every time I watch her pipe those webs with intense concentration, I remember why I started baking in the first place. It’s not about perfection—it’s about the messy, sweet, wonderful moments in the kitchen.
So grab your rolling pin, put on your favorite Halloween playlist, and give these cookies a try. Tag me when you do—I’d love to see your spiderwebs! And if you have questions, drop them in the comments. I read every single one.
Happy Halloween, friends. Go make something spooky and delicious!
Frequently Asked Questions
Can I use store-bought sugar cookie dough instead?
Absolutely, but the texture won’t be as tender. Homemade dough has a better buttery flavor and holds its shape better during baking. If you’re short on time, refrigerated dough works—just roll it a bit thinner than the package suggests.
How far in advance can I make these cookies?
You can bake the cookies up to a week ahead and store them in an airtight container. Decorate them up to 3 days before serving. The royal icing stays firm and shiny for about 4-5 days before it starts to soften slightly.
My royal icing is too runny. What did I do wrong?
You probably added too much water. Add more powdered sugar, one tablespoon at a time, until it thickens to the right consistency. Remember, the base icing should be like honey, and the web icing should be like toothpaste.
Can I use liquid food coloring instead of gel?
You can, but it will thin out your icing and make it harder to control. Liquid coloring also produces less vibrant colors. Gel food coloring is worth the extra dollar—it gives you deep, rich colors without changing the icing consistency.
Why did my cookies spread in the oven?
Your dough was too warm. Make sure you chill it for at least 30 minutes before rolling and cutting. If your kitchen is warm, pop the cut cookies on the baking sheet back in the fridge for 10 minutes before baking. Cold dough holds its shape perfectly.
If you’re looking for more Halloween treats, check out my no-bake pumpkin pie and mummy meatball pasta for a complete spooky menu!
Pin This Recipe!

Easy Spiderweb Halloween Sugar Cookies: Best Recipe
These Easy Spiderweb Halloween Sugar Cookies are buttery, tender, and decorated with a stunning spiderweb design using royal icing. Perfect for Halloween parties, they’re simple enough for kids to help make and impressive enough to wow any crowd.
- Prep Time: 45 minutes
- Cook Time: 10 minutes
- Total Time: 55 minutes (plus 2-3 hours drying time)
- Yield: 24 servings 1x
- Category: Dessert
- Cuisine: American
Ingredients
- 1 cup (2 sticks) unsalted butter, softened to room temperature
- 1 cup granulated sugar
- 1 large egg, room temperature
- 2 teaspoons vanilla extract
- 2 and ¾ cups all-purpose flour, spooned and leveled
- 1 teaspoon baking powder
- ½ teaspoon salt
- 3 cups powdered sugar, sifted
- 2 tablespoons meringue powder
- 4–5 tablespoons warm water
- 1 teaspoon black gel food coloring
- ½ teaspoon orange gel food coloring (optional)
Instructions
- Cream the butter and sugar: In a large bowl, beat the softened butter and granulated sugar together until light and fluffy, about 2-3 minutes. Scrape down the sides halfway through.
- Add the egg and vanilla: Beat in the egg and vanilla extract until fully combined.
- Mix the dry ingredients: In a separate bowl, whisk together the flour, baking powder, and salt. Gradually add to the wet mixture, mixing on low speed until just combined.
- Chill the dough: Divide the dough in half, flatten each into a disk, wrap in plastic wrap, and refrigerate for at least 30 minutes.
- Preheat the oven to 375°F (190°C). Line two baking sheets with parchment paper.
- Roll and cut: On a lightly floured surface, roll one disk of dough to about ¼-inch thickness. Cut out rounds and place them 2 inches apart on the prepared baking sheets. Gather scraps, reroll, and cut again.
- Bake for 8-10 minutes, or until the edges are just barely golden. The centers will look slightly underdone.
- Cool completely: Let the cookies cool on the baking sheet for 5 minutes, then transfer to a wire rack to cool completely.
- Make the white base icing: In a medium bowl, combine 1½ cups powdered sugar, 1 tablespoon meringue powder, and 2 tablespoons warm water. Beat on low until combined, then increase speed and beat for 3-4 minutes until stiff peaks form. Add water a teaspoon at a time until the icing reaches flood consistency (flows like honey and smooths out within 10 seconds).
- Flood the cookies: Transfer the white icing to a piping bag fitted with a #2 tip. Pipe an outline around each cookie, then fill in the center. Use a toothpick to spread the icing into corners and pop any air bubbles. Let dry completely, about 2-3 hours or overnight.
- Make the black spiderweb icing: Repeat the icing process with the remaining powdered sugar and meringue powder, but add the black gel food coloring. The consistency should be a bit thicker than the flood icing.
- Pipe the spiderwebs: Once the base icing is completely dry, pipe a small black dot in the center of each cookie. Then pipe 4-6 curved lines radiating from the center to the edges. Connect them with curved lines that follow the shape of the radiating lines.
- Let the webs set: Allow the black icing to dry for at least 1 hour before stacking or storing.
Notes
The dough must be cold to prevent spreading. Icing consistency is crucial: base icing should be like honey, web icing like toothpaste. Let the base icing dry completely before piping webs to avoid bleeding. Practice on parchment first if needed. Store in an airtight container at room temperature for up to 1 week; do not refrigerate.
Nutrition
- Serving Size: 1 cookie
- Calories: 185
- Sugar: 18
- Sodium: 85
- Fat: 8
- Saturated Fat: 5
- Carbohydrates: 28
- Protein: 2
Keywords: Halloween cookies, spiderweb cookies, sugar cookies, royal icing, Halloween dessert, easy cookies, kid-friendly


