Introduction
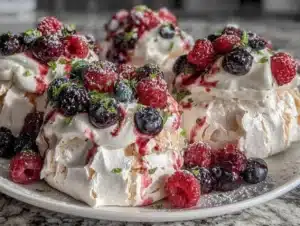
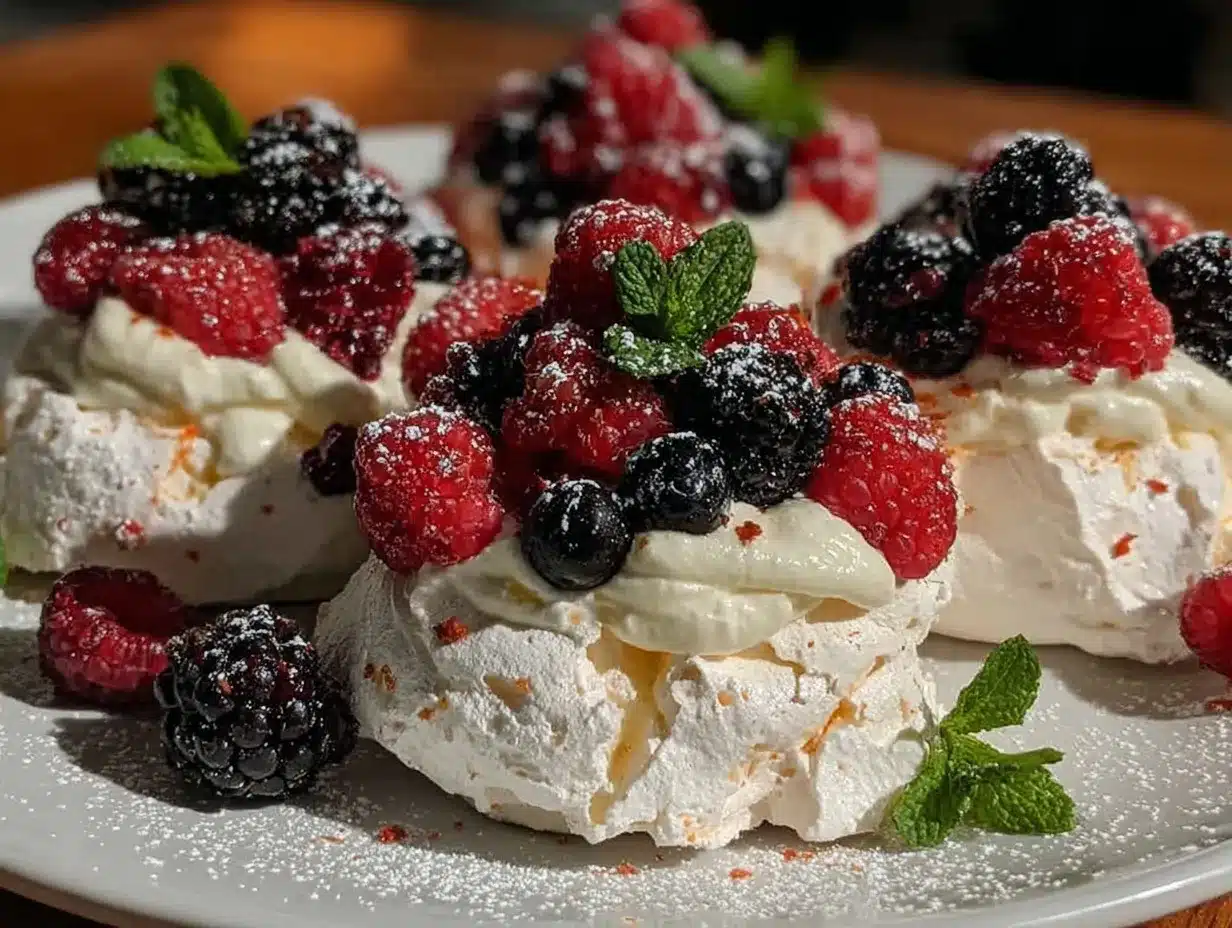
“You’ve got to try these mini pavlovas,” my friend texted me one summer afternoon. I was skeptical—meringues always seemed finicky to me, and the idea of whipping egg whites into fluffy clouds that actually held their shape? Honestly, I thought it was more luck than skill. But after a particularly chaotic day with the kids (you know the kind where nothing seems to go right), I decided to give it a shot. The kitchen smelled like toasted sugar, and by the time I topped those crisp little nests with fresh berries, something about the process felt oddly calming. The first bite was almost too light to believe—a crisp shell giving way to marshmallow-soft clouds, bursting with the tang of ripe strawberries and blueberries.
Since then, I’ve found myself making these light and fluffy mini pavlovas with fresh berries again and again on weekends, often sharing them with friends who can’t get enough. It’s funny how a simple dessert can turn a hectic day into a quiet moment of happiness. The recipe stuck not just because it’s delicious but because it’s the kind of sweet that feels like a little celebration, no matter the occasion.
Why You’ll Love This Recipe
- Quick & Easy: Comes together in just about 30 minutes, including baking time, making it perfect for last-minute dessert cravings or casual get-togethers.
- Simple Ingredients: Uses pantry staples like egg whites, sugar, and vanilla, paired with fresh berries that you probably already have on hand or can grab easily.
- Perfect for Entertaining: Mini pavlovas are elegant yet fuss-free, ideal for brunches, summer parties, or even holiday dinners.
- Crowd-Pleaser: The mix of crispy crust and marshmallow-soft inside with fresh berries always gets rave reviews from both kids and adults.
- Unbelievably Delicious: The balance of textures and flavors is what sets this recipe apart—the secret is in the gentle folding and slow baking that keeps the pavlovas light and airy.
This isn’t just another meringue recipe. The gentle addition of vinegar and cornstarch (trust me on this one) keeps the mini pavlovas from cracking or collapsing. Plus, I’ve found that topping them right before serving keeps the shells crisp and the insides fluffy. I sometimes swap in raspberry or even passionfruit for a twist. Honestly, it’s comfort food reimagined—light, fresh, and surprisingly satisfying.
What Ingredients You Will Need
This recipe uses simple, wholesome ingredients to create pavlovas that are both light and flavorful without any fuss. Most of these are pantry staples, and the fresh berries give it that seasonal pop.
- Egg whites (from 4 large eggs, room temperature) – The base for the meringue, make sure there’s no yolk mixed in for best volume.
- Granulated sugar (1 cup or 200g) – I prefer caster sugar for its fine texture, which dissolves more easily.
- Cornstarch (1 teaspoon) – Helps stabilize the meringue and keeps it marshmallowy inside.
- White vinegar (1 teaspoon) – Adds acidity to stabilize the egg whites and prevent weeping.
- Vanilla extract (1 teaspoon) – For a subtle, sweet aroma.
- Fresh berries (1 to 1.5 cups total) – Strawberries, blueberries, and raspberries work beautifully; you can swap in seasonal favorites like blackberries or sliced kiwi.
- Whipped cream (optional, about 1 cup) – For topping, lightly sweetened with a touch of powdered sugar.
If you like, you can substitute the granulated sugar with superfine sugar or even experiment with coconut sugar for a different flavor profile. For a dairy-free option, skip the whipped cream or use coconut whipped cream. I’ve found that checking the firmness of your egg whites is key—brands like Vital Farms or organic free-range eggs tend to whip better.
Equipment Needed
- Electric mixer or stand mixer: Essential for whipping the egg whites to stiff peaks. Hand whisks work but expect a workout!
- Baking sheet: A rimmed sheet works best to hold the pavlovas during baking.
- Parchment paper or silicone baking mat: Prevents sticking and helps with even baking.
- Mixing bowl: Glass or metal bowls are preferable; plastic bowls can retain grease, which hinders egg white whipping.
- Spatula or spoon: For folding in cornstarch and vinegar gently.
For a budget-friendly option, a good hand mixer is perfectly fine and easier to clean. Just make sure the bowl and beaters are completely grease-free. Over the years, I’ve learned that a wide bowl helps with whipping speed and volume, so keep that in mind if you’re upgrading your kitchen tools. Also, don’t skip the parchment paper—trust me, it saves you from frustrating cleanups and broken pavlovas.
Preparation Method
- Preheat your oven to 250°F (120°C). Line a baking sheet with parchment paper or a silicone mat. This low temperature is key for drying out the pavlovas slowly without browning.
- Separate the egg whites into a clean, grease-free bowl. Let them sit at room temperature for about 20 minutes to whip better.
- Start whipping the egg whites on medium speed until soft peaks form (about 2-3 minutes). Then gradually add sugar, one tablespoon at a time, while increasing speed to high. This should take about 7-10 minutes. The mixture will become glossy and stiff. Test by rubbing a bit between your fingers; it should feel smooth, not grainy.
- Gently fold in the cornstarch, vinegar, and vanilla extract using a spatula. Do this carefully to avoid deflating the meringue. The cornstarch helps give that marshmallowy center, while the vinegar stabilizes the structure.
- Using a spoon or piping bag, dollop or pipe small rounds (about 3 inches / 7.5 cm wide) onto the baking sheet, making a slight well in each for the filling. Bake for 1.5 hours, then turn off the oven and leave them inside for another hour to dry out slowly.
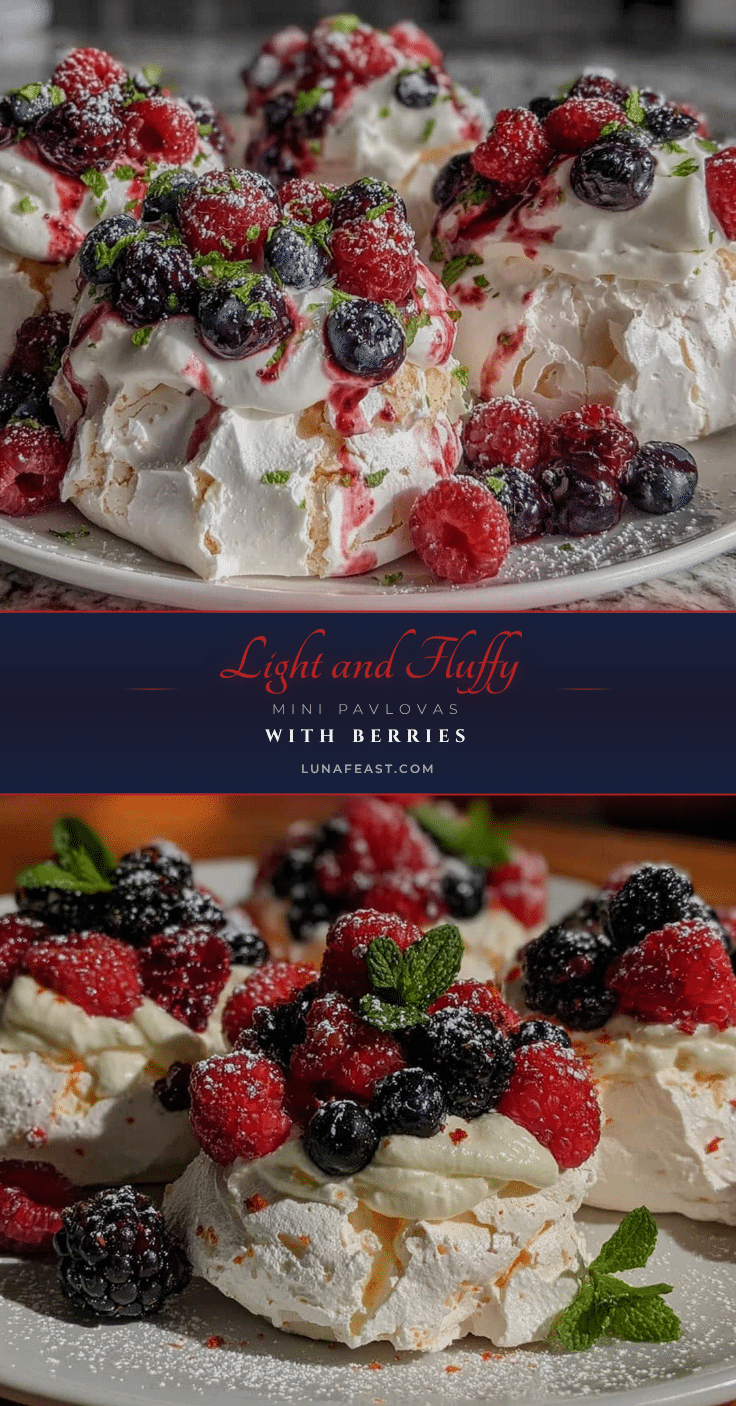
Once cooled, top each mini pavlova with a dollop of whipped cream and fresh berries right before serving. If you leave them too long, the shells can soften, so I recommend assembling just before guests arrive.
Common issues like cracking can usually be traced back to oven temperature or over-beating. If you notice cracks, try lowering the temperature by 10 degrees next time. Also, avoid opening the oven door during baking as sudden temperature changes can cause collapse.
Cooking Tips & Techniques
Getting the perfect mini pavlova is all about patience and attention to detail. Here are some tips I’ve picked up after a few trial runs (and not-so-successful attempts):
- Use room temperature egg whites: Cold whites don’t whip as well, so let them rest before starting.
- Gradual sugar addition is critical: Adding sugar too quickly can deflate the meringue or leave it grainy.
- Be gentle folding in cornstarch and vinegar: Vigorous mixing can knock out air, resulting in dense pavlovas.
- Low and slow baking: Resist the urge to crank the heat. Slow drying prevents browning and keeps the inside soft.
- Test your oven: Ovens can be tricky. I once had to rotate my trays halfway because my heat was uneven.
- Timing your assembly: Assemble right before serving to keep pavlovas crisp; leftovers can be stored unfilled.
One of the biggest lessons? Don’t rush the cooling phase. Leaving them in the oven after it’s off helps them dry evenly and reduces cracking. Also, I often multitask by prepping the berries and whipping cream while the pavlovas bake—saves time and keeps kitchen chaos at bay.
Variations & Adaptations
Mini pavlovas are incredibly versatile, so you can easily tweak the recipe to fit your preferences or dietary needs.
- Flavor twists: Add a teaspoon of lemon zest or a splash of almond extract to the meringue for a subtle flavor boost.
- Seasonal fruits: Swap out berries for mango, kiwi, or stone fruits depending on the season.
- Dietary adaptations: Use coconut whipped cream or a cashew-based cream for dairy-free versions.
- Chocolate lovers: Sprinkle mini chocolate chips on top or drizzle melted dark chocolate over the pavlovas just before serving.
- Different textures: Add a sprinkle of toasted nuts or a spoonful of passionfruit pulp for extra zing.
I once tried a version with a blueberry compote instead of fresh berries, reducing the sugar in the meringue slightly to balance. It was a hit at a summer gathering. Also, if you want a bigger showstopper, you can make one large pavlova instead of minis—just adjust baking time accordingly.
Serving & Storage Suggestions
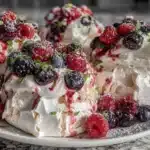
Serve these mini pavlovas fresh and slightly chilled for the best texture contrast. They look beautiful on a simple white platter, and the colorful berries really pop against the crisp-white meringue.
They pair nicely with a light sparkling wine or a cup of fragrant herbal tea. For a brunch spread, they complement dishes like lemon blueberry cheesecakes beautifully, which you can find in the mini lemon blueberry cheesecakes recipe.
Unfilled pavlovas can be stored in an airtight container at room temperature for up to 2 days. Avoid the fridge, or they will soften. Once topped with cream and berries, it’s best to eat within a few hours. Leftovers (if any!) can be gently reheated in a low oven for a few minutes, but fresh is always best.
Over time, the flavors of the berries meld with the cream and meringue, creating a slightly softer but equally delicious dessert experience.
Nutritional Information & Benefits
Each mini pavlova is relatively low in calories compared to heavier desserts, thanks to its mostly egg white and sugar composition. A single serving typically contains about 150-180 calories.
Egg whites provide a good source of protein without fat, while fresh berries add antioxidants, vitamins C and K, and fiber. Using natural sweeteners or reducing sugar can further lighten the recipe.
This dessert is naturally gluten-free, making it suitable for those with gluten intolerance. Just watch for any cross-contamination in your ingredients if needed.
From a wellness perspective, it’s a treat that feels indulgent without the heaviness of cream-filled cakes or buttery pastries, perfect for those who want a light sweet finish.
Conclusion
These light and fluffy mini pavlovas with fresh berries have become my go-to for any occasion where I want something that looks special but doesn’t require hours of work. They’re adaptable, forgiving, and honestly, a lot of fun to make once you get the hang of it.
Feel free to tweak the toppings or try different fruits to make the recipe your own—it’s all about what makes you happy in the kitchen. I love how this dessert brings a little brightness and ease to my gatherings, and I hope it does the same for you.
If you try it, I’d love to hear how it goes, or if you put your own spin on it! There’s nothing better than sharing kitchen wins with others.
FAQs about Mini Pavlovas
Can I make mini pavlovas ahead of time?
Yes, you can bake the meringue shells up to 2 days in advance and store them in an airtight container at room temperature. Add cream and berries just before serving to keep them crisp.
Why did my pavlovas crack?
Cracking usually happens if the oven temperature is too high or if the pavlovas cool too quickly. Try lowering the oven temperature by 10°F (5°C) and leave them in the turned-off oven to cool slowly.
Can I use frozen berries?
Frozen berries can work, but they tend to release more juice and may soften the meringue. If using frozen, thaw and drain excess liquid before topping.
How do I know when the meringue is ready to bake?
It should be glossy and form stiff peaks that don’t fall when you lift the whisk. The sugar should feel dissolved when you rub a bit between your fingers.
What’s the difference between pavlova and regular meringue?
Pavlova includes cornstarch and vinegar, which create a soft, marshmallow-like interior with a crisp shell, while regular meringue tends to be crunchy all the way through.
Pin This Recipe!
Light and Fluffy Mini Pavlovas
These mini pavlovas are light, fluffy meringue nests topped with fresh berries and optional whipped cream, perfect for a quick and elegant dessert.
- Prep Time: 25 minutes
- Cook Time: 2 hours 30 minutes
- Total Time: 2 hours 55 minutes
- Yield: 8 mini pavlovas 1x
- Category: Dessert
- Cuisine: Australian/New Zealand
Ingredients
- Egg whites from 4 large eggs (room temperature)
- 1 cup (200g) granulated sugar (caster sugar preferred)
- 1 teaspoon cornstarch
- 1 teaspoon white vinegar
- 1 teaspoon vanilla extract
- 1 to 1.5 cups fresh berries (strawberries, blueberries, raspberries, or seasonal favorites like blackberries or sliced kiwi)
- Optional: about 1 cup whipped cream, lightly sweetened with powdered sugar
Instructions
- Preheat your oven to 250°F (120°C). Line a baking sheet with parchment paper or a silicone mat.
- Separate the egg whites into a clean, grease-free bowl and let them sit at room temperature for about 20 minutes.
- Whip the egg whites on medium speed until soft peaks form (about 2-3 minutes). Gradually add sugar, one tablespoon at a time, increasing speed to high, whipping until glossy and stiff (7-10 minutes). Test by rubbing a bit between your fingers; it should feel smooth, not grainy.
- Gently fold in the cornstarch, vinegar, and vanilla extract using a spatula, being careful not to deflate the meringue.
- Using a spoon or piping bag, dollop or pipe small rounds about 3 inches (7.5 cm) wide onto the baking sheet, making a slight well in each for the filling.
- Bake for 1.5 hours, then turn off the oven and leave the pavlovas inside for another hour to dry out slowly.
- Once cooled, top each mini pavlova with a dollop of whipped cream and fresh berries just before serving.
Notes
Use room temperature egg whites for better volume. Add sugar gradually to avoid grainy texture. Fold cornstarch and vinegar gently to keep meringue airy. Bake low and slow to prevent browning and cracking. Assemble pavlovas just before serving to keep shells crisp. Store unfilled pavlovas in an airtight container at room temperature for up to 2 days. Avoid refrigerating unfilled pavlovas to prevent softening.
Nutrition
- Serving Size: 1 mini pavlova
- Calories: 165
- Sugar: 35
- Sodium: 10
- Fat: 0.5
- Saturated Fat: 0.3
- Carbohydrates: 38
- Fiber: 1
- Protein: 3
Keywords: mini pavlovas, meringue dessert, berry dessert, light dessert, easy pavlova recipe, gluten-free dessert, summer dessert