Introduction
“You really don’t need to turn on the oven for this one,” my friend Lisa said over the phone, sounding both tired and hopeful. It was one of those humid summer nights where the thought of baking felt like a punishment. I was intrigued—because honestly, who wants to heat up the kitchen when the weather’s already baking you? I found myself scribbling down a recipe she swore by: a creamy no-bake lemon icebox pie that promised a cool, tangy finish without the hassle.
That first try was almost accidental—I didn’t have all the usual pie ingredients, just some basic pantry staples and a jar of lemon curd lurking in the fridge. The pie turned out shockingly good, with a texture so smooth it practically melted on the tongue. The zingy lemon flavor was sharp but balanced by the sweet creaminess that felt like a hug on a hot day. It quickly became my go-to for last-minute guests or when I needed a little summer reset after a long, chaotic day.
What stuck with me wasn’t just the simplicity or the taste—it was how this pie could make a quiet afternoon feel special. That zing of lemon, the richness without overwhelming sweetness, and the chill factor made it a small joy I couldn’t keep to myself. If you’re looking for a refreshing treat that’s fuss-free but packs personality, this creamy no-bake lemon icebox pie might just become your new favorite.
Why You’ll Love This Recipe
This creamy no-bake lemon icebox pie is an absolute winner for plenty of reasons. Having made it countless times (sometimes multiple times a week, no joke), I can confidently say it hits all the right notes for a summer dessert that feels both indulgent and light.
- Quick & Easy: Ready in about 20 minutes plus chilling time, perfect for those busy summer afternoons or impromptu get-togethers.
- Simple Ingredients: No fancy trips to specialty stores—just pantry staples and a jar of lemon curd or fresh lemon juice, whichever you prefer.
- Perfect for Summer: This pie is the ideal cool-down after a day in the sun, and it’s great for backyard barbecues or a casual brunch.
- Crowd-Pleaser: Kids and adults alike are always asking for seconds; the creamy texture paired with that bright lemon zing is universally loved.
- Unbelievably Delicious: The balance of tart and sweet, combined with the velvety filling, makes this more than just “another lemon pie.”
What sets this recipe apart is the no-bake method combined with a perfectly crumbly crust that holds up without getting soggy. Instead of the usual cream cheese overload, I blend smooth, tangy ingredients to keep the filling light but rich. This pie offers that classic lemon flavor but with a modern twist that feels fresh and satisfying, not heavy or overly sweet.
Honestly, it’s the kind of dessert that makes you close your eyes after the first bite and think, “Yep, this is summer in a slice.”
What Ingredients You Will Need
This recipe uses simple, wholesome ingredients to deliver bold flavor and satisfying texture without the fuss. Most of these are pantry staples, and you can easily swap a few depending on what’s on hand.
- For the Crust:
- 1 ½ cups graham cracker crumbs (about 10 full sheets, finely crushed)
- 6 tablespoons unsalted butter, melted (I usually go for Kerrygold for that rich flavor)
- 2 tablespoons granulated sugar (balances the tartness)
- For the Filling:
- 1 cup heavy cream, chilled (for whipping to fluffy perfection)
- 1 (14-ounce) can sweetened condensed milk (the magic ingredient for creaminess)
- ½ cup lemon juice, freshly squeezed (about 3-4 lemons; fresh always tastes brighter)
- 1 tablespoon lemon zest (adds an extra punch of citrus aroma)
- Optional: ½ teaspoon vanilla extract (softens the sharp lemon edge)
- For Garnish (optional):
- Whipped cream
- Thin lemon slices or candied lemon peel
- Fresh mint leaves
If you prefer, you can swap graham crackers for crushed digestive biscuits or even gluten-free cookies to make this pie gluten-free. For the cream, coconut cream works well if you want a dairy-free version, although the texture changes slightly. This recipe pairs beautifully with fresh berries, so in warmer months, feel free to add a handful on top—similar to the fresh bursts you find in the mini lemon blueberry cheesecakes.
Equipment Needed
- 9-inch (23 cm) pie dish or springform pan (glass or metal works fine)
- Mixing bowls (one large for whipping cream, one medium for crust mixing)
- Electric hand mixer or stand mixer (for whipping the cream until stiff peaks form)
- Measuring cups and spoons (accuracy matters here for balance)
- Spatula (preferably silicone for scraping bowls clean)
- Food processor or rolling pin (to crush graham crackers, unless you buy pre-crumbled)
For budget-friendly options, you can crush crackers by placing them in a zip-top bag and rolling with a rolling pin or even a heavy bottle. An electric whisk isn’t mandatory but speeds up the process and helps achieve that fluffy texture more reliably. I’ve found that using a glass pie dish gives a nice presentation but a metal pan holds the crust shape a little better.
Preparation Method
- Make the Crust: Combine 1 ½ cups of graham cracker crumbs with 6 tablespoons melted butter and 2 tablespoons sugar in a medium bowl. Stir until the mixture resembles wet sand. Press firmly into the bottom and up the sides of the pie dish (about 9 inches in diameter). Use the bottom of a glass to smooth and compact the crust evenly. Chill in the refrigerator for at least 10 minutes to set while preparing the filling.
- Whip the Cream: In a large bowl, use an electric mixer to whip 1 cup of chilled heavy cream until stiff peaks form. This usually takes about 3-5 minutes on medium-high speed. Be careful not to over-whip or it’ll turn grainy. The cream should hold its shape but still look soft and cloud-like.
- Prepare the Filling: In another bowl, stir together the 14-ounce can of sweetened condensed milk, ½ cup fresh lemon juice, 1 tablespoon lemon zest, and optional vanilla extract until smooth. The lemon juice will start to thicken the mixture slightly, which is exactly what you want.
- Combine Cream and Lemon Mixture: Gently fold the whipped cream into the lemon mixture using a spatula. Fold carefully to keep the filling light and airy—no vigorous stirring. It should become smooth, creamy, and slightly thickened.
- Pour and Chill: Pour the filling over the chilled crust, smoothing the top with a spatula. Cover the pie loosely with plastic wrap and refrigerate for at least 4 hours, preferably overnight. This chilling time lets the filling set into that perfect creamy, sliceable texture.
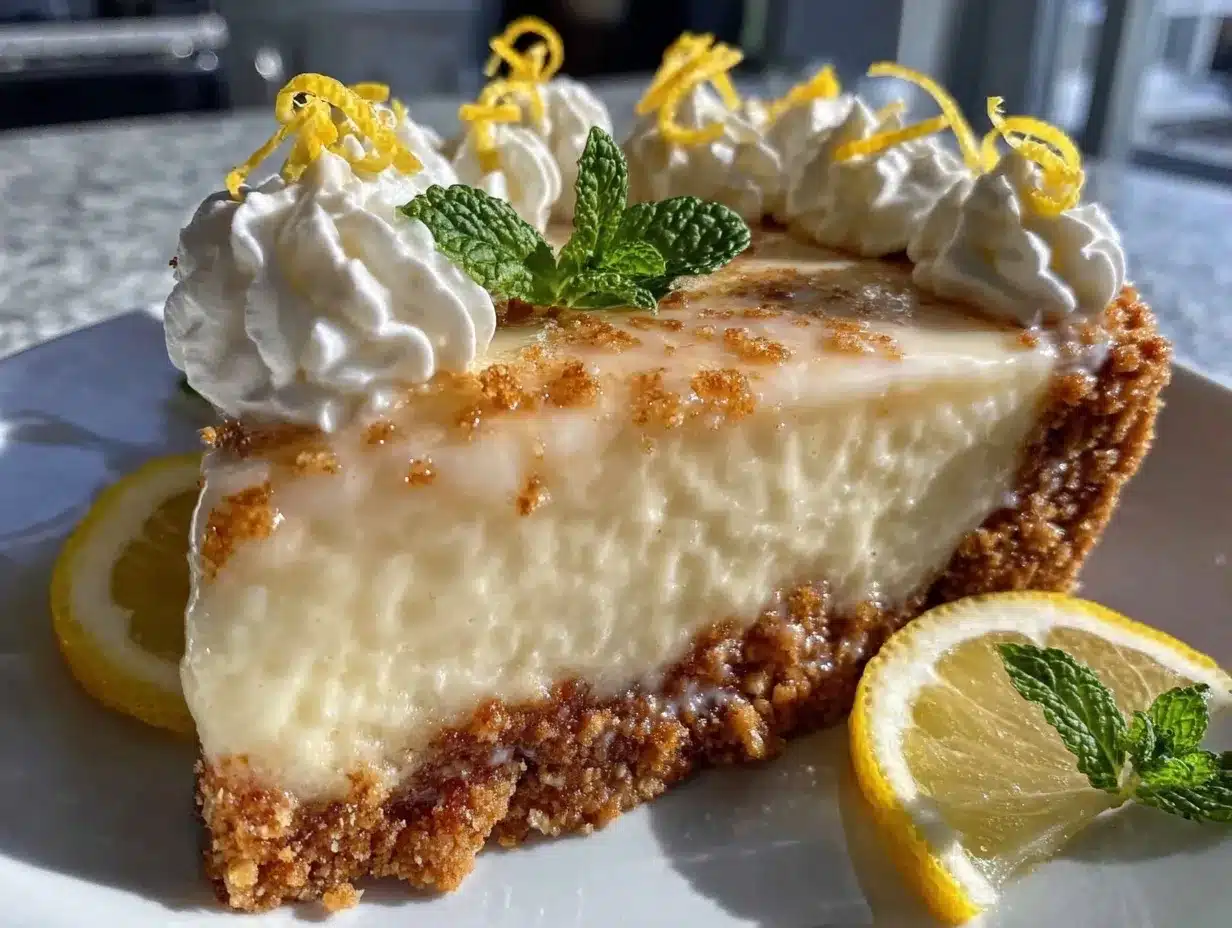
- Garnish and Serve: Before serving, top with whipped cream, thin lemon slices, or fresh mint if desired. Slice with a sharp knife dipped in hot water for clean cuts.
If your filling seems too runny after mixing, a little extra chilling usually does the trick. Also, don’t rush the whipping step—fluffy cream makes all the difference. This pie is your cool, creamy reward after a few simple, no-fuss steps.
Cooking Tips & Techniques
One of the secrets to this pie’s success is the careful balance of ingredients. Too much lemon juice can curdle the filling, while not enough weakens the signature tang. I always zest the lemons right before adding to maximize flavor and fragrance.
When whipping the heavy cream, cold equipment helps—a chilled bowl and beaters will speed things up and improve volume. If you’ve ever whipped cream that turned out watery or clumpy, it’s usually because the cream was too warm or overbeaten.
Pressing the crust firmly against the pie dish ensures it holds together and doesn’t crumble when you slice. I like to use the bottom of a small glass or measuring cup for this part—it’s a trick I picked up from a friend who bakes extensively.
Planning ahead is key. Though the prep time is short, that chilling time is non-negotiable. I sometimes make the crust the night before to save time. When ready to serve, dipping your knife in hot water and wiping it clean between cuts helps keep each slice pristine.
Variations & Adaptations
- Dietary Swaps: For a gluten-free crust, swap graham crackers with gluten-free cookies or oat-based crumbs. Use coconut cream whipped with a little powdered sugar in place of heavy cream for a dairy-free version.
- Flavor Twists: Add a teaspoon of finely grated ginger or a splash of limoncello for a grown-up touch. You can also swirl in a bit of raspberry puree before chilling for a fruity contrast.
- Alternative Crusts: Crushed vanilla wafers or shortbread cookies make a buttery crust that pairs well with lemon. For a nutty hint, mix some finely chopped almonds into the crust crumbs.
- Cooking Method: While this is designed as a no-bake pie, if you prefer a firmer crust, you can bake the crumb mixture at 350°F (175°C) for 8-10 minutes before chilling. Just let it cool completely before adding the filling.
I once swapped out lemon juice for lime juice and topped the pie with toasted coconut flakes—it was a tropical surprise that my family loved. You can always tweak the sweetness or tartness to fit your mood, which makes this recipe flexible and fun.
Serving & Storage Suggestions
This pie is best served chilled straight from the fridge, where it’s refreshingly cool but not too firm—perfect for that creamy mouthfeel. Presentation-wise, a dollop of freshly whipped cream and a few thin lemon slices or mint leaves add a bright, inviting touch.
Pair it with a light sparkling water or a simple iced tea to keep the meal feeling fresh and summery. For a little extra indulgence, a small scoop of vanilla bean ice cream on the side works wonders.
Store leftovers tightly covered in the refrigerator for up to 3 days. The flavors actually deepen after sitting overnight, so the next day’s slice might be even better. Avoid freezing, as the texture can become grainy and the crust soggy.
When reheating is needed (say, if your pie has softened too much), just let it sit at room temperature for 10 minutes before slicing to regain firmness. The balance of creamy and tart stays intact no matter what.
Nutritional Information & Benefits
Each slice of this creamy no-bake lemon icebox pie (assuming 8 slices) provides roughly 320 calories. It’s rich in fats from the heavy cream and butter, balanced by the vitamin C and antioxidants from the fresh lemon juice and zest.
The use of sweetened condensed milk adds sweetness without extra refined sugar, making it a bit less processed than some other desserts. For those mindful of gluten, swapping the crust to gluten-free cookies keeps it safe to enjoy.
Lemon is known for its digestive benefits and immune boost, and this pie offers a guilt-minimized indulgence that feels both satisfying and fresh, a rare combo in summer sweets.
Conclusion
This creamy no-bake lemon icebox pie is exactly the kind of recipe that makes summer nights a little cooler and simpler. With just a handful of ingredients, minimal fuss, and a flavor that hits that perfect balance of tart and sweet, it’s no wonder this pie has found a permanent spot in my dessert rotation.
Feel free to play around with the crust or add your own twist on the filling—it’s forgiving and flexible enough to handle a little experimentation. For a lighter citrus dessert journey, you might enjoy seeing how lemon shines in other treats like the mini lemon blueberry cheesecakes featured on this site.
Give it a shot next time the heat is on and your oven is off. I’d love to hear how you make it yours—drop a comment or share your variations. Here’s to sweet, simple, and refreshingly creamy moments ahead!
FAQs
Can I make this pie ahead of time?
Absolutely! This pie benefits from chilling overnight, which helps the filling set perfectly and deepens the flavors.
What if I don’t have fresh lemons?
Fresh lemon juice is best, but bottled juice can work in a pinch. Just reduce the quantity slightly, as bottled juice can be more concentrated or tart.
Can I use a different crust?
Yes! Crushed vanilla wafers, shortbread cookies, or gluten-free biscuits all make great alternatives to graham cracker crust.
Is this recipe suitable for vegans?
Not as written, but you can swap heavy cream for whipped coconut cream and use a vegan cookie crust to make it vegan-friendly.
How do I get clean slices when serving?
Dip your knife in hot water and wipe it clean between each cut for neat, pretty slices without smudging the filling.
Pin This Recipe!
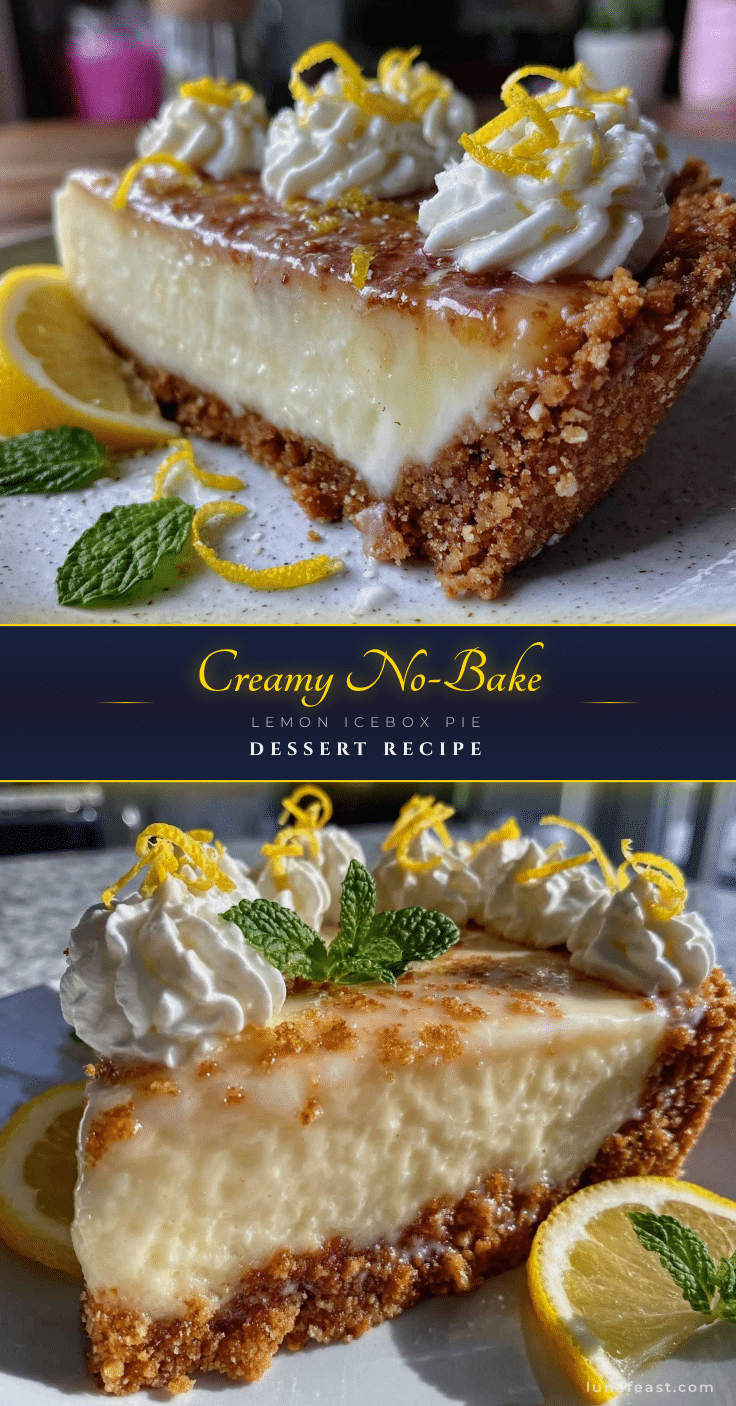
Creamy No-Bake Lemon Icebox Pie

A quick and easy no-bake lemon icebox pie with a creamy, tangy filling and a crumbly graham cracker crust, perfect for a refreshing summer dessert.
- Prep Time: 15 minutes
- Cook Time: 0 minutes
- Total Time: 4 hours 15 minutes
- Yield: 8 servings 1x
- Category: Dessert
- Cuisine: American
Ingredients
- 1 ½ cups graham cracker crumbs (about 10 full sheets, finely crushed)
- 6 tablespoons unsalted butter, melted
- 2 tablespoons granulated sugar
- 1 cup heavy cream, chilled
- 1 (14-ounce) can sweetened condensed milk
- ½ cup lemon juice, freshly squeezed (about 3–4 lemons)
- 1 tablespoon lemon zest
- ½ teaspoon vanilla extract (optional)
- Whipped cream (optional, for garnish)
- Thin lemon slices or candied lemon peel (optional, for garnish)
- Fresh mint leaves (optional, for garnish)
Instructions
- Make the Crust: Combine graham cracker crumbs, melted butter, and sugar in a medium bowl until mixture resembles wet sand. Press firmly into the bottom and up the sides of a 9-inch pie dish. Smooth and compact the crust evenly. Chill in the refrigerator for at least 10 minutes.
- Whip the Cream: In a large bowl, whip the chilled heavy cream with an electric mixer until stiff peaks form, about 3-5 minutes on medium-high speed. Avoid over-whipping.
- Prepare the Filling: In another bowl, stir together sweetened condensed milk, fresh lemon juice, lemon zest, and optional vanilla extract until smooth. The mixture will thicken slightly.
- Combine Cream and Lemon Mixture: Gently fold the whipped cream into the lemon mixture using a spatula until smooth and creamy.
- Pour and Chill: Pour the filling over the chilled crust and smooth the top. Cover loosely with plastic wrap and refrigerate for at least 4 hours or preferably overnight to set.
- Garnish and Serve: Before serving, top with whipped cream, thin lemon slices, or fresh mint if desired. Use a sharp knife dipped in hot water for clean slices.
Notes
Chilling overnight improves flavor and texture. Use cold equipment when whipping cream for best volume. Dip knife in hot water and wipe clean between cuts for neat slices. For gluten-free, swap graham crackers with gluten-free cookies. For dairy-free, use coconut cream instead of heavy cream.
Nutrition
- Serving Size: 1 slice (1/8 of pie)
- Calories: 320
- Sugar: 28
- Sodium: 150
- Fat: 20
- Saturated Fat: 12
- Carbohydrates: 35
- Fiber: 0.5
- Protein: 4
Keywords: no-bake, lemon pie, icebox pie, summer dessert, easy dessert, creamy pie, lemon curd, graham cracker crust