The clock on the microwave blinked 6:04 PM. Six minutes. That was the difference between serving a sad plate of crackers and actually looking like you planned this gathering. I was standing in my kitchen, holding a knife like a weapon, staring at a wedge of brie that was getting dangerously soft in the warm air. My guests were already parking their cars. I had cheese. I had bread. I had absolutely zero organization.
I ran to the pantry. Empty. I checked the fridge. Just that lonely brie and a bag of apples that had seen better days. One was bruised, the other was perfect. I grabbed the perfect one. I didn’t have time to peel it or slice it fancy. I just needed it to look good. I grabbed some honey from the back of the shelf, the thick kind that drips slow. I drizzled it over the cheese while it sat on the board. It looked intentional. It looked artistic. It looked like I had spent hours arranging it.
It was chaos, honestly. But it worked. The honey made the brie rich and warm. The apples added a crunch that cut through the fat. People didn’t care about the mess I made in the ten minutes before they arrived. They cared about the taste. They stood around that board for twenty minutes, talking, laughing, and eating. No one asked where the rest of the meal was. They were full on snacks.
That night, I realized I didn’t need to be a professional chef to host. I just needed the right combination of textures and flavors. The fall harvest theme wasn’t about perfection. It was about comfort. It was about grabbing what you have and making it shine. Since then, I’ve made this board dozens of times. It’s become my secret weapon for last-minute parties. It’s the kind of food that feels expensive but costs very little. It’s easy, it’s beautiful, and it saves your social life.
Why You’ll Love This Recipe
Let’s be honest, most charcuterie boards are just expensive snacks arranged pretty. But this easy fall harvest charcuterie board with apples and honey is different. It’s not just cheese and meat on a plate. It’s a whole experience. I’ve tested this combination over and over, and it always wins. Here is why you need to make it:
- Quick & Easy: You can put this together in under 15 minutes. Seriously. If you can open a package and slice an apple, you can do this. It is perfect for those nights when you forgot to plan dinner or need a quick appetizer for a last-minute guest.
- Simple Ingredients: You likely already have half of this in your kitchen. Apples, cheese, honey, and nuts are staples. You don’t need to go to a specialty shop. It’s budget-friendly and accessible for everyone.
- Perfect for Fall Gatherings: Whether it’s a housewarming party, a football game watch party, or just a cozy Tuesday night, this board fits the season. The warm spices and sweet flavors match the autumn weather perfectly.
- Crowd-Pleaser: Kids love the sweet honey. Adults love the sharp cheese. It bridges the gap. I’ve served this to picky eaters and food snobs, and both groups go back for seconds. It’s universally liked.
- Unbelievably Delicious: The combination of salty, sweet, crunchy, and creamy is next-level comfort food. The honey drizzle changes everything. It makes the cheese taste warmer and richer. It’s the kind of bite that makes you close your eyes and sigh.
This isn’t just another snack idea. It’s your best version of a simple board. The trick is the balance. Most people just throw things on a plate. This recipe uses the honey to tie the salty meats and sweet fruits together. It’s a flavor profile that feels curated, even if it took ten minutes. It’s the kind of recipe that makes you look like you have your life together, even when you don’t.
What Ingredients You Will Need
This recipe uses simple, wholesome ingredients to deliver bold flavor and satisfying texture without the fuss. You don’t need fancy imports. You need fresh, accessible items that come together to create a symphony of tastes. Here is what you need to grab:
- Cheeses:
- Brie or Camembert: One small wheel or wedge. Soft, creamy, and mild. It’s the star of the show. I recommend a local farm brand if you can find it, but a standard grocery store wheel works fine. It adds that rich, buttery base.
- Sharp Cheddar or Gouda: About 1 cup, cubed or sliced. You need something firm to contrast the soft brie. Sharp cheddar adds a bite, while smoked gouda adds a smoky depth. Both are great options.
- Meats (Optional but Recommended):
- Salami or Prosciutto: A few slices of cured meat. Salami is easier to fold and looks nice. Prosciutto is more delicate. If you skip meat, the board still works, but the saltiness is missed.
- Fruits:
- Fresh Apples: Two medium apples, sliced. Honeycrisp or Fuji are best because they stay crisp and don’t turn brown too fast. They add a necessary crunch and sweetness. In summer, you might swap for pears, but for fall, apples are non-negotiable.
- Grapes: A small bunch of red or green grapes. They are easy to eat and add bursts of juice. Leave them on the stem for a nicer look.
- Dried Fruits: A handful of dried apricots or figs. These add a chewy texture and concentrated sweetness. They look elegant and pair well with the cheese.
- Nuts & Crunch:
- Walnuts or Pecans: Half a cup, toasted. Toasting brings out the oils and makes them flavorful. Walnuts are classic with brie. Pecans are sweeter. Both work beautifully.
- Crackers: Two or three types. Water crackers, wheat thins, or brioche crisps. You need something sturdy to hold the cheese. Avoid thin crackers that break easily.
- The Glue:
- Honey: A small jar of good quality honey. This is the most important part. It drizzles over the cheese and ties the salty and sweet elements together. Local honey is best for flavor.
You can swap the meats for vegan options if needed, but the honey and cheese combo is the heart of this dish. Keep it simple. Don’t overcomplicate the ingredient list. The magic is in the combination, not the complexity.
Equipment Needed
You don’t need a lot of fancy tools to make this board look professional. In fact, keeping it simple is part of the charm. Here is what you need:
- A Large Serving Board: A wooden board, slate, or even a large clean marble slab. Wood is traditional and warm for fall. If you don’t have a board, a large platter works. Just make sure it’s big enough so items aren’t touching too much.
- A Sharp Knife: Essential for slicing the apples and cutting the cheese. A serrated knife is great for the crusty bread or hard cheeses. A small paring knife works for the soft brie.
- Small Bowls or Ramekins: If you want to keep the honey separate or add extra nuts, small bowls prevent the board from getting messy. They also add height and visual interest.
- Fork or Spreaders: Soft cheeses like brie need their own utensil. Give guests a small fork or a cheese spreader so they don’t mix flavors. It’s a small detail that people appreciate.
- A Spoon or Drizzle Bottle: For the honey. A small spoon is fine, but a squeeze bottle gives you more control over the drizzle. It looks more artistic and prevents drips.
I’ve used everything from cheap plastic cutting boards to expensive walnut slabs. The board doesn’t have to be expensive, but it should be clean and sturdy. If you use wood, make sure it’s sealed so the moisture from the fruit doesn’t soak in. It’s easy to maintain and lasts forever.
Preparation Method
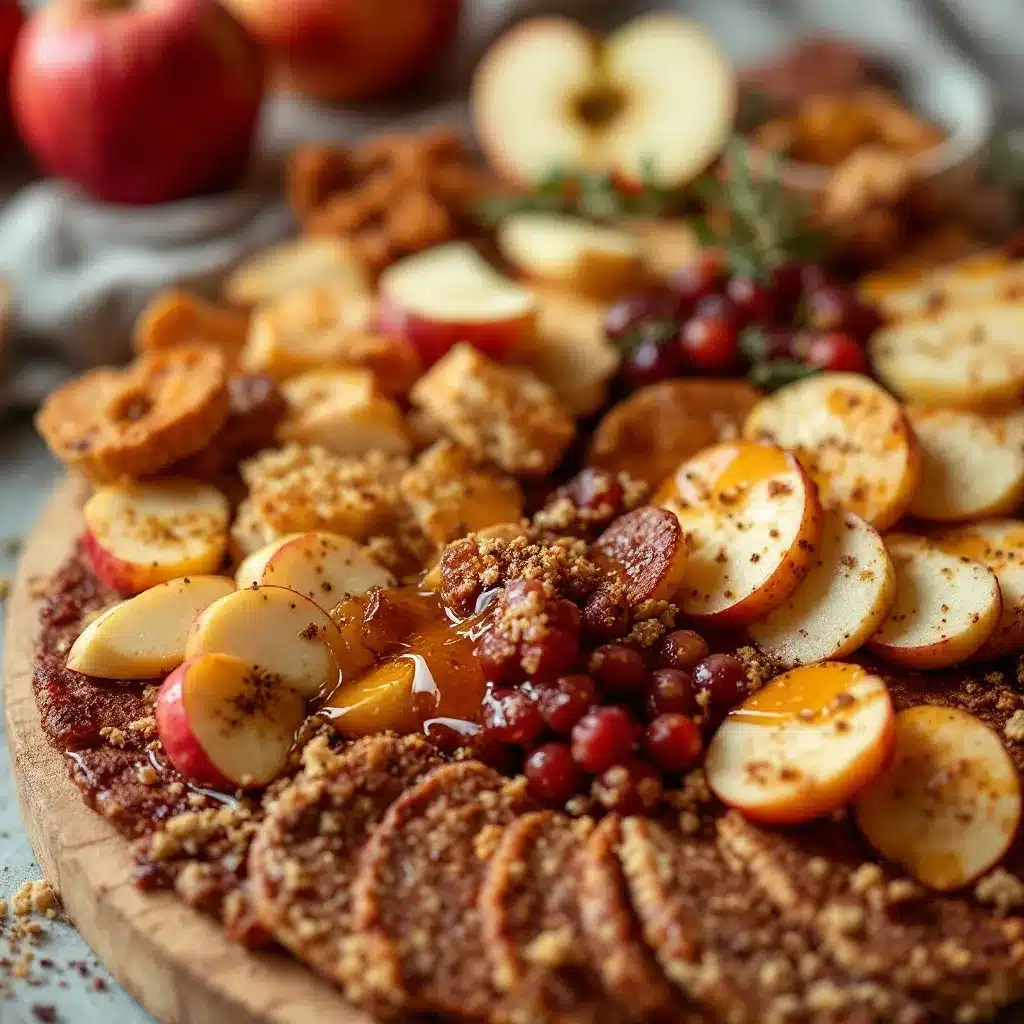
Making this board is straightforward, but the order matters. If you slice the apples too early, they brown. If you put the honey on before the cheese is placed, it gets messy. Follow these steps for the best results.
- Prep Your Station (2 minutes): Gather all your ingredients and equipment. Make sure your board is clean and dry. Have your knife and cutting board ready. This prevents panic later when guests are arriving. Take a deep breath. You’ve got this.
- Slice the Apples (3 minutes): Wash the apples thoroughly. You don’t need to peel them; the skin adds color and nutrients. Slice them into thin wedges or rounds. If you are worried about browning, you can toss them in a little lemon juice, but for a quick board, it’s usually fine. Place them on one side of the board. Fan them out for a nice look.
- Arrange the Cheeses (3 minutes): Place the wheel of brie in the center or slightly off-center. If you are using cheddar or gouda, cut them into cubes or slices. Place them near the brie but not touching it directly. You want visual separation. If you have a hard cheese, use a cheese knife to cut clean slices. It looks more professional than jagged chunks.
- Add the Meats (2 minutes): Fold the salami or prosciutto into loose rosettes or just lay them flat. Don’t lay them flat like a soldier; fold them. It adds volume and makes the board look fuller. Place them in the empty spaces between the cheeses.
- Fill the Gaps (3 minutes): This is the fun part. Add the grapes, dried fruits, and nuts. Scatter them around the board. Don’t make perfect rows. Random placement looks more natural and abundant. Think of it like a garden, not a grid. Fill in any holes with crackers. Stand some crackers up against the cheese for height.
- The Honey Drizzle (2 minutes): This is the final touch. Take your honey and drizzle it over the brie. You don’t need to cover the whole thing. Just a few zig-zags are enough. The heat from the cheese will help the honey melt slightly. If you want to get fancy, you can drizzle a tiny bit over the apples too, but keep it minimal. Wipe any drips off the edge of the board with a paper towel. Clean edges look sharp.
- Final Check (1 minute): Step back and look at your board. Is it balanced? Do you have enough of each item? Add a few more nuts or crackers if needed. Make sure you have utensils placed safely. You are ready to serve.
The whole process should take about 15 minutes. If you rush, you might make a mess, but honestly, a little mess adds to the homemade vibe. Just don’t rush the honey drizzle. That’s the moment of truth.
Cooking Tips & Techniques
Even though there is no “cooking” in the traditional sense, there are techniques that make a huge difference. I’ve made mistakes so you don’t have to. Here is what I’ve learned:
- Temperature Matters: Take your cheese out of the fridge 30 minutes before serving. Cold cheese loses its flavor. Room temperature brie is creamy and aromatic. If it’s too cold, it tastes waxy. This is a common mistake. Plan ahead.
- Color Contrast: Fall is all about warm colors. Use red apples, orange cheddar, brown nuts, and green grapes. The contrast makes the board pop on camera. If everything is beige, it looks boring. Add a pop of color with the fruit.
- Don’t Overcrowd: It’s tempting to pack every inch with food, but leave some empty space. Empty space highlights the items. It makes the board look elegant and not cluttered. Less is more.
- Toast Your Nuts: If you have five extra minutes, toast the walnuts or pecans in a dry pan. It releases the oils and makes them crunchy. Raw nuts can taste bland. Toasted nuts taste like you tried. It’s a small step that pays off.
- Use the Right Knife: For soft cheese like brie, use a thin wire cheese knife or a small butter knife. A serrated knife will squish the brie. It’s frustrating to watch someone struggle with a knife. Give them the right tool.
- Honey Consistency: If your honey is too thick, warm it slightly. Put the jar in a bowl of warm water for a minute. It will drizzle much easier. Cold honey globs up. You want a smooth stream.
I once served a board with cold cheese and everyone complained it tasted “off.” I didn’t realize the temperature was the issue. Now I always plan for that 30-minute window. It changes everything. Trust me on this one.
Variations & Adaptations
This recipe is flexible. You can adapt it to fit your diet or what you have on hand. Here are some ideas:
- Vegan Version: Skip the meat and dairy cheese. Use a vegan brie or cashew cheese. Swap the honey for maple syrup or agave nectar. The structure stays the same, but the flavors change slightly. It’s still delicious and satisfying.
- Gluten-Free Option: Use gluten-free crackers or rice crackers. Most cheeses and fruits are naturally gluten-free, so just check your meat and crackers. It’s an easy swap.
- Sweet Tooth Variation: Add chocolate-covered almonds or dried cranberries. The sweetness pairs well with the salty cheese. It’s like a dessert board. Great for after dinner.
- Savory Twist: Add some pickled onions or jalapeños. The acidity cuts through the richness of the cheese. It adds a kick. I tried this once with some spicy pickles, and it was a hit with the adults.
- Seasonal Swap: In autumn, use pears instead of apples. Or add some figs. In spring, use strawberries. The concept works year-round. Just adjust the fruit to what is fresh.
I usually stick to the classic fall combo, but I love adding a spicy element sometimes. It keeps the palate interested. Don’t be afraid to experiment. The base recipe is a guide, not a rule.
Serving & Storage Suggestions
How you serve this board affects the experience. Here is how to do it right:
- Serving Temperature: Serve at room temperature. As mentioned, cold cheese is bland. Let it sit out while you finish other preparations. It’s best enjoyed when the cheese is soft and the honey is slightly warm.
- Pairing Drinks: This board pairs beautifully with a crisp apple cider or a light red wine like Pinot Noir. For non-alcoholic options, spiced tea or sparkling cider works well. The flavors complement each other.
- Storage: Leftovers can be stored in the fridge. Keep the cheese in an airtight container or wrapped in wax paper. The fruit should be kept separate to avoid sogginess. The honey can be kept at room temperature.
- Reheating: You don’t need to reheat the board. But if you want to warm the cheese slightly, you can microwave the brie for 10 seconds. It makes it gooey. Just be careful not to melt it completely.
- Flavor Development: The flavors meld together over time. The honey soaks into the cheese slightly. The nuts absorb the moisture from the fruit. It actually tastes better the next day, as long as the fruit doesn’t get mushy.
I usually make this board an hour before guests arrive. That gives the cheese time to come to temperature. It’s the perfect timing. Don’t make it too early, or the crackers will get stale. Fresh is best.
Nutritional Information & Benefits
This board is a mix of macronutrients. The cheese provides protein and fat. The fruit provides fiber and vitamins. The nuts add healthy fats and minerals. It’s a balanced snack option.
- Protein: The cheese and nuts offer a good amount of protein. It helps keep you full. It’s not just empty calories.
- Fiber: Apples and dried fruits are high in fiber. It aids digestion. It’s a healthier option than plain crackers.
- Fats: The healthy fats from the nuts and cheese are good for brain health. They provide sustained energy.
- Sugar: The honey and fruit add natural sugars. It’s sweet, but it’s not refined sugar. It’s a better choice than candy.
- Allergens: This board contains dairy and nuts. Be aware of guests with allergies. The vegan version avoids these.
I view this as a mindful eating experience. It’s not about stuffing yourself. It’s about tasting different flavors. It encourages you to slow down and enjoy your food. It’s a wellness-friendly snack if you balance it right.
Conclusion
This easy fall harvest charcuterie board with apples and honey is more than just a snack. It’s a way to bring people together. It’s simple, it’s delicious, and it looks amazing. You don’t need to be a chef to make it. You just need a few ingredients and a little love.
I love this recipe because it takes the stress out of hosting. It’s my go-to for any occasion. I hope you try it and find joy in making it. Customize it to your taste. Add your favorite fruits or cheeses. Make it your own.
Please share your creations with me. I’d love to see how you style your board. Leave a comment below with your favorite additions. Did you add spicy pickles? Did you use pears? Let me know. And if you make this, tag me on social media. I love seeing your food art.
Thank you for reading. Happy hosting!
Frequently Asked Questions
Can I make this board ahead of time?
Yes, you can prepare most of it ahead. Slice the apples and arrange the cheeses and meats up to 2 hours in advance. Keep it covered in the fridge. Take it out 30 minutes before serving to let the cheese warm up. Add the honey and fresh herbs right before serving to keep it fresh.
What type of apples are best for this board?
Honeycrisp, Fuji, or Gala apples are best. They are crisp and sweet, and they hold their shape well. Avoid apples that are too mealy or soft. You want a crunch that contrasts with the soft cheese. Red apples look better visually than green ones for fall themes.
Can I use a different cheese instead of brie?
Absolutely. Camembert is a great substitute. You can also use goat cheese or a soft triple cream. If you prefer hard cheese, try aged gouda or manchego. The key is to have a soft cheese for the honey drizzle and a hard cheese for texture.
How long does the honey last on the board?
The honey will stay good for a few hours. If it sits out too long, it might crystallize or attract bugs. It’s best to drizzle it on just before serving. If you have leftovers, the honey-soaked cheese tastes amazing the next day. Just store it in the fridge.
Is this recipe gluten-free?
The cheese, fruit, nuts, and honey are naturally gluten-free. You just need to choose gluten-free crackers. Most water crackers or rice crackers work well. Check the labels on any processed meats to ensure they don’t contain gluten fillers. It’s an easy adjustment for gluten-free guests.
Pin This Recipe!
Easy Fall Harvest Charcuterie Board: 5 Best Autumn Snack Ideas
A quick and elegant autumn-themed charcuterie board featuring brie, sharp cheddar, fresh apples, honey, and nuts. Perfect for last-minute gatherings, this recipe balances sweet, salty, and crunchy textures for a crowd-pleasing snack.
- Prep Time: 15 minutes
- Cook Time: 0 minutes
- Total Time: 15 minutes
- Yield: 4 servings 1x
- Category: Appetizer
- Cuisine: American
Ingredients
- 1 small wheel or wedge of Brie or Camembert
- 1 cup Sharp Cheddar or Smoked Gouda, cubed or sliced
- 2 medium Apples (Honeycrisp or Fuji), sliced
- 1 small bunch of red or green grapes
- 1/2 cup Walnuts or Pecans, toasted
- Handful of dried apricots or figs
- 2–3 types of crackers (water crackers, wheat thins, or brioche crisps)
- Salami or Prosciutto slices (optional)
- Good quality honey for drizzling
Instructions
- Prep your station by gathering all ingredients and ensuring the serving board is clean and dry.
- Wash the apples and slice them into thin wedges or rounds. Fan them out on one side of the board.
- Place the wheel of brie in the center or slightly off-center. Arrange the cubed or sliced cheddar/gouda near the brie with visual separation.
- Fold salami or prosciutto into loose rosettes or lay them flat in the empty spaces between the cheeses.
- Scatter grapes, dried fruits, and toasted nuts around the board for a natural, abundant look. Stand crackers up against the cheese for height.
- Drizzle honey over the brie in a few zig-zags. Wipe any drips off the edge of the board for a clean presentation.
- Step back to check balance and ensure utensils are placed safely before serving.
Notes
[‘Take cheese out of the fridge 30 minutes before serving to allow it to reach room temperature for better flavor.’, ‘Toast nuts in a dry pan for 5 minutes to enhance flavor and crunch.’, ‘If honey is too thick, warm the jar in a bowl of warm water for easier drizzling.’, ‘Avoid overcrowding the board; leave empty space to highlight the items.’, ‘For a vegan version, swap dairy cheese for vegan alternatives and honey for maple syrup or agave.’]
Nutrition
- Serving Size: Varies based on indi
- Calories: 350
- Sugar: 18
- Sodium: 450
- Fat: 22
- Saturated Fat: 10
- Carbohydrates: 25
- Fiber: 4
- Protein: 12
Keywords: charcuterie board, fall snacks, autumn appetizer, brie and honey, easy entertaining, party food, cheese board, quick snacks


