I cracked a dozen eggs into a pot of boiling water and every single one split open. White tendrils of cooked egg white streamed out like ghost hair, and I stood there staring at the mess thinking, well, this is fitting for a Halloween recipe disaster. That was my third attempt at making these spooky monster eyeball deviled eggs before a neighborhood potluck, and I was about to give up entirely. See, I had this vision of creepy, bloodshot eyeballs staring up from a platter, and instead I got exploded egg soup.
The thing is, I don’t even really like deviled eggs that much. They’re fine. They show up at every picnic and family gathering, and I eat one politely and move on. But something about turning them into something grotesque for Halloween just clicked for me. Maybe it’s the contrast between something so perfectly normal and making it look genuinely unsettling. I kept coming back to the idea, even after those first failures, because I knew there was a version that would actually work.
After a dozen more eggs and a lot of trial and error, I figured out the tricks. The right boiling method. The perfect yolk-to-mayo ratio so the filling pipes clean. And most importantly, how to make those creepy red veins that make these look like real monster eyeballs. These spooky monster eyeball deviled eggs ended up being the hit of that potluck, and honestly, they’ve become my most-requested recipe every October since. I never expected to be the person known for deviled eggs, but here we are.
Why You’ll Love This Recipe
These aren’t your grandma’s deviled eggs. They’re creepy, they’re fun, and they’re genuinely delicious. I’ve tested every step to make sure you get perfect results without the frustration I went through.
- Quick & Easy: About 30 minutes of active time, and most of that is just waiting for eggs to boil and chill. Perfect for last-minute Halloween party prep.
- Simple Ingredients: Eggs, mayo, mustard, vinegar, paprika, and a few drops of red food coloring. That’s it. No weird specialty items.
- Perfect for Halloween Parties: These things get attention. Kids love the gross factor, adults appreciate the humor, and everyone eats them because deviled eggs are universally loved.
- Crowd-Pleaser: I’ve brought these to Halloween parties, work potlucks, and even a friend’s horror movie marathon. They disappear every single time.
- Unbelievably Delicious: The filling is creamy, tangy, and perfectly seasoned. The paprika adds a smoky warmth that balances the vinegar bite. They taste just as good as they look creepy.
What makes these different from every other deviled egg recipe out there is the technique. I spent weeks perfecting the boiling method so the yolks come out perfectly centered and bright yellow. The filling recipe is my own blend that pipes beautifully and holds its shape. And the monster eyeball effect? That came from a happy accident when I dropped a bottle of red food coloring and splattered it across a test batch. Sometimes mistakes turn into your best ideas.
There’s something deeply satisfying about watching someone’s face when they see these eggs. First they laugh, then they lean in closer, then they grab one and take a bite. That moment of hesitation followed by pure enjoyment is why I keep making them year after year. This isn’t just a recipe—it’s a conversation starter and a memory maker.
What Ingredients You Will Need
This recipe uses simple, everyday ingredients to create something that looks genuinely disturbing. Most of these are probably already in your kitchen, which makes this an easy last-minute Halloween project.
- 12 large eggs – Look for eggs that are at least a week old. Fresh eggs are harder to peel after boiling. I know that sounds backwards, but it’s true. Older eggs have a higher pH level, which makes the shells release more easily.
- 1/3 cup mayonnaise – Full-fat mayo gives the creamiest texture. I prefer Duke’s or Hellmann’s for their tangy flavor. If you’re using a lighter mayo, the filling might be slightly less rich, so you may need to adjust the seasoning.
- 1 tablespoon yellow mustard – This adds that classic deviled egg tang and a little color. You can use Dijon for a sharper flavor, but it will change the color slightly.
- 1 teaspoon white vinegar – Just a touch to brighten everything up. Apple cider vinegar works too, but it will add a slightly fruitier note.
- 1/4 teaspoon salt – Fine sea salt dissolves better than coarse. Adjust to taste at the end.
- 1/4 teaspoon black pepper – Freshly ground if you have it. It makes a difference in the overall flavor.
- 1/4 teaspoon paprika – Plus extra for garnish. Smoked paprika adds a deeper flavor, but regular works perfectly fine.
- Red food coloring gel – Gel works better than liquid because it’s more concentrated and won’t thin out the filling. You only need a tiny drop for the bloodshot veins.
- Black olives – For the pupils. Look for large pitted olives so you can cut clean circles. Canned sliced olives work in a pinch, but whole ones give you more control.
- Optional: Sriracha or hot sauce – A few drops in the filling for a spicy kick. Completely optional, but I love the extra layer of heat.
For the bloodshot effect, you can also use beet juice or natural red food coloring if you’re avoiding artificial dyes. The color won’t be quite as bright, but it still looks creepy enough. Just be aware that beet juice can stain your hands and cutting board, so work carefully.
Equipment Needed
You don’t need anything fancy for these, but a few specific tools make the process much smoother.
- Large pot – Big enough to hold all the eggs in a single layer. Crowding them leads to uneven cooking.
- Slotted spoon – For lowering eggs into boiling water and fishing them out. A spider strainer works even better.
- Bowl of ice water – Essential for stopping the cooking process and making peeling easier. Fill a large bowl with ice and cold water before you start.
- Sharp knife – A clean cut makes a big difference in how the eggs look. A dull knife will tear the whites.
- Small spoon or melon baller – For scooping out the yolks. A melon baller gives you perfectly round scoops, but a small spoon works fine.
- Mixing bowl and fork – For mashing the yolks. A fork gives you the best texture, but you can use a potato masher if you prefer.
- Piping bag or zip-top bag – For filling the eggs neatly. A piping bag with a star tip looks fancier, but a zip-top bag with the corner snipped off works just as well.
- Toothpick or small skewer – For drawing the bloodshot veins. A toothpick gives you the most control.
- Small round cookie cutter or bottle cap – For cutting the olive pupils. A 1/4-inch cutter is ideal, but a clean bottle cap works in a pinch.
I’ve made these with nothing but a pot, a fork, and a plastic bag, and they still turned out great. The piping bag is the only thing that really makes a difference in how professional they look. If you don’t have one, just use a spoon to carefully fill the whites. It takes a little longer, but the taste is exactly the same.
Preparation Method
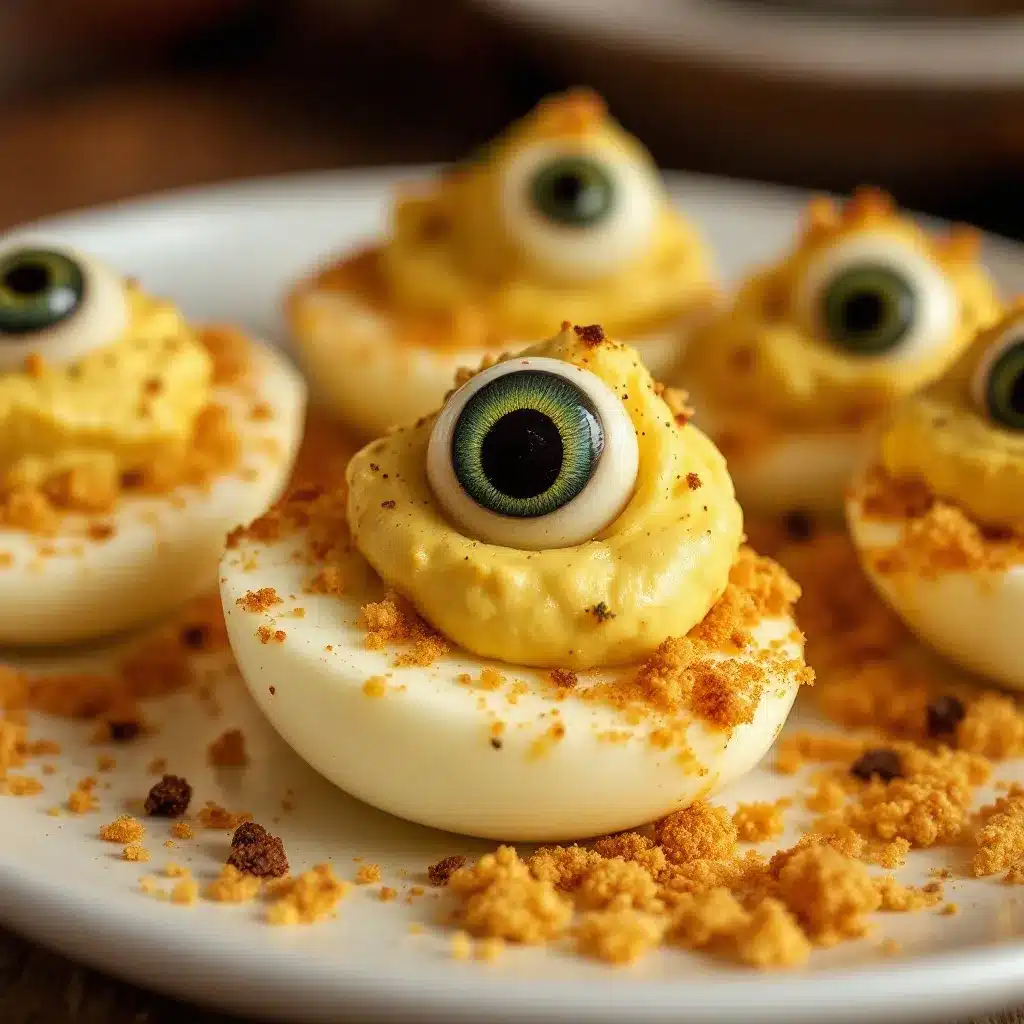
Let me walk you through this step by step. I’ve included every little detail I wish someone had told me when I was struggling through my first attempts.
- Boil the eggs. Place your eggs in a single layer in a large pot and cover them with cold water by about an inch. Bring the water to a rolling boil over high heat. As soon as it reaches a full boil, cover the pot, turn off the heat, and let it sit for exactly 12 minutes. Set a timer. Don’t guess. I’ve ruined more eggs by eyeballing the time than I care to admit.
- Ice bath. While the eggs are resting, prepare a large bowl of ice water. When the timer goes off, use your slotted spoon to transfer the eggs immediately into the ice bath. Let them sit for at least 10 minutes. This stops the cooking process and shocks the shells, which makes peeling much easier. The eggs should feel completely cold before you try to peel them.
- Peel carefully. Gently tap each egg on the counter to crack the shell all over, then roll it between your palms to loosen the shell. Start peeling from the wider end where the air pocket is. Running the egg under cold water as you peel helps remove stubborn bits. If you get a stubborn one, don’t fight it—just set it aside for another use and grab another egg. Perfect whites matter for the eyeball effect, so take your time.
- Slice and scoop. Using a sharp knife, slice each egg in half lengthwise. Wipe the knife clean between cuts to keep the edges neat. Gently pop out the yolks into a mixing bowl. Arrange the white halves on a serving platter, cut side up. If they wobble, slice a tiny sliver off the bottom to create a flat surface. Your deviled eggs should sit still, not roll around.
- Make the filling. Add the mayonnaise, yellow mustard, white vinegar, salt, pepper, and paprika to the bowl with the yolks. Mash everything together with a fork until smooth and creamy. Taste it. Adjust the salt, pepper, or mustard to your liking. This is your chance to make it perfect. If the filling seems too thick, add a tiny splash of vinegar or pickle juice. If it’s too thin, add another yolk if you have one, or just chill it for 10 minutes to firm up.
- Color the filling. Take about two tablespoons of the filling and put it in a small bowl. Add a tiny drop of red food coloring gel and mix until you get a pale pink color. This will be the bloodshot veining. Set it aside. The rest of the filling stays its natural yellow color.
- Pipe the filling. Spoon the yellow filling into a piping bag fitted with a star tip, or into a zip-top bag with a corner snipped off. Pipe a generous swirl into each egg white half. You want a nice mound that looks like the white of the eyeball. Don’t skimp here—full-looking eggs are more impressive.
- Add the pupils. Take your black olives and slice them into rounds about 1/4 inch thick. Use a small round cookie cutter or a clean bottle cap to punch out perfect circles. Place one olive circle in the center of each filling mound, pressing gently so it sticks. Position them slightly off-center for a crazier, more unhinged look. Dead-center pupils look too perfect and less monster-like.
- Create the bloodshot veins. Dip a toothpick into the pink filling and carefully draw thin lines radiating outward from the olive pupil. Start at the edge of the olive and drag the toothpick outward about a quarter inch. Do three or four lines per egg, spaced unevenly. The goal is to look like burst blood vessels, not a perfect pattern. Messy is better here. If you want a darker red, dip the toothpick in straight red food coloring and make tiny dots around the edge of the olive.
- Chill and serve. Refrigerate the finished eggs for at least 30 minutes before serving. This helps the filling set and makes the flavors meld together. When you’re ready to serve, sprinkle a tiny pinch of paprika over the top for extra color and flavor contrast.
The first time you pipe the filling, it might look a little lopsided. That’s okay. You’ll get the hang of it after a few eggs. By the time you finish the batch, you’ll be a pro. And honestly, wonky eyeballs look even creepier, so embrace the imperfections.
Cooking Tips & Techniques
After making these more times than I can count, here are the things I’ve learned the hard way so you don’t have to.
The peeling problem. I cannot stress this enough—older eggs peel better. If you buy eggs specifically for this recipe, buy them a week ahead of time. If you’re in a pinch, add a teaspoon of baking soda to the boiling water. It raises the pH and helps the shells slide off. Also, peel under running water. The water gets between the shell and the white and helps separate them naturally.
Perfect yellow yolks. Overcooked yolks turn greenish-gray around the edge. That’s from a chemical reaction between iron and sulfur in the egg. To avoid it, don’t boil the eggs for more than 12 minutes, and get them into the ice bath immediately. If you see green, you’ve cooked them too long. The filling will still taste fine, but the color won’t be as bright and appetizing.
Piping consistency. The filling should be thick enough to hold its shape when piped but soft enough to squeeze easily. If it’s too stiff, add a tiny splash of vinegar or pickle juice. If it’s too runny, add more yolk or chill it for 15 minutes. I once made a batch with filling that was too thin, and the eyeballs looked like they were melting. Which, honestly, was kind of appropriate for Halloween, but not what I was going for.
The bloodshot effect. Less is more with the red food coloring. Start with a tiny dot and mix it in. You can always add more, but you can’t take it out. The pink filling should look like diluted blood, not straight-up ketchup. And when you’re drawing the veins, use a light hand. You want thin, delicate lines, not thick red streaks.
Timing strategy. You can boil and peel the eggs up to two days ahead. Store them un-sliced in the refrigerator. You can make the filling a day ahead and keep it in a piping bag in the fridge. Assemble the eggs a few hours before serving. This breaks the work into manageable chunks and makes party day much less stressful.
Variations & Adaptations
Once you’ve mastered the basic monster eyeball, there are so many ways to make these your own. Here are some of my favorites.
Spicy Eyeballs: Add a teaspoon of sriracha or your favorite hot sauce to the filling. The heat cuts through the richness and adds an unexpected kick. I’ve also used chipotle powder for a smoky heat that pairs beautifully with the paprika. These are always the first ones to disappear at parties.
Avocado Eyeballs: Replace half the mayonnaise with mashed ripe avocado. The filling turns a pale green, which looks even more alien and unsettling. Plus, it adds healthy fats and a creamy texture. Just be aware that the filling will brown faster, so assemble these closer to serving time. A squeeze of lime juice in the filling helps slow the browning.
Bacon Monster Eyeballs: Crumble crispy bacon over the top of each egg before serving. The salty, smoky crunch contrasts beautifully with the creamy filling. It also makes them look even more grotesque, like a creature that’s been through something. I’ve also used bacon bits mixed into the filling for a more integrated flavor.
Vegan Eyeballs: Use silken tofu or mashed chickpeas as the base for the filling. Blend with vegan mayo, mustard, and nutritional yeast for a cheesy flavor. The texture won’t be exactly the same, but it’s surprisingly close. I made these for a vegan friend’s Halloween party and they were a hit with everyone, not just the vegans.
Different Pupils: Instead of black olives, try using sliced cherry tomatoes for a red pupil, or capers for a tiny, creepy dot. You can even use sliced black licorice for a sweet-and-savory contrast. The possibilities are endless, and each one gives the eyeballs a different personality.
Serving & Storage Suggestions
These eggs are best served cold, straight from the refrigerator. Arrange them on a platter lined with lettuce or kale for a creepy, nest-like presentation. I like to use a black platter to make the white eyeballs pop. You can also arrange them on a bed of fresh herbs like parsley or dill for a pop of green that contrasts with the red veins.
For a truly horrifying display, arrange the eggs in a circle on a large platter with a bowl of red dipping sauce in the center. Marinara sauce or spicy ketchup works great. It looks like a blood bath, and guests love the interactive element. Just make sure the eggs aren’t actually sitting in the sauce, or they’ll get soggy.
These pair perfectly with other Halloween party favorites. Serve them alongside a batch of mummy meatball pasta for a full creepy spread. The meatballs wrapped in pasta look like little mummies, and the visual contrast with the eyeballs is fantastic. For drinks, a batch of pumpkin cream cold foam coffee makes a surprisingly good non-alcoholic option that fits the fall theme.
Storage: Leftover deviled eggs keep in the refrigerator for up to three days. Store them in a single layer in an airtight container. Don’t stack them or the filling will get smushed. If you’re transporting them to a party, arrange them in a deviled egg carrier or on a platter covered tightly with plastic wrap. The bloodshot veins might fade slightly over time, so if you’re making them a day ahead, consider adding a fresh touch of red food coloring right before serving.
Reheating: Don’t. Deviled eggs are a cold dish. If you have leftovers, eat them cold straight from the fridge. The flavors actually get better after a day as everything melds together. I’ve been known to eat these for breakfast the next morning, and I have zero shame about it.
Nutritional Information & Benefits
Let’s be real—these are not health food. But they’re not terrible for you either, especially compared to most party snacks. Here’s the breakdown per egg half (filling included).
- Calories: Approximately 75-85 calories per half
- Protein: About 6 grams per half
- Fat: Around 5-6 grams per half
- Carbohydrates: Less than 1 gram per half
- Cholesterol: About 185 mg per half
Eggs are a great source of high-quality protein, vitamin D, and choline, which is important for brain health. The mayonnaise adds healthy fats that help you feel satisfied. If you’re watching your cholesterol, you can use light mayonnaise or make the avocado variation for a healthier fat profile.
These are naturally gluten-free and low-carb, making them a good option for guests with dietary restrictions. Just make sure your mustard and mayonnaise are certified gluten-free if that’s a concern. The red food coloring is the only potential allergen issue, but you can use natural alternatives like beet juice or paprika for color.
I like to think of these as a protein-packed snack that happens to look like something from a horror movie. One or two are a perfectly reasonable indulgence, especially if you’re filling up on veggies and other healthier options at the party.
FAQs
Can I make these ahead of time?
Yes, absolutely. You can boil and peel the eggs up to two days ahead. Store them un-sliced in the refrigerator. You can make the filling a day ahead and keep it in a piping bag. Assemble the eggs a few hours before serving for the freshest look. The bloodshot veins might fade slightly overnight, so add a fresh touch of red food coloring right before serving if you assemble them too far in advance.
Why are my eggs hard to peel?
Fresh eggs are the biggest culprit. Use eggs that are at least a week old. Also, shocking them in an ice bath immediately after boiling helps the shells release. Peeling under running water is another trick that works wonders. If you’re still struggling, add a teaspoon of baking soda to the boiling water. It raises the pH and helps the shells slide off more easily.
Can I use a different color for the bloodshot veins?
Sure! Green food coloring makes them look like alien eyeballs. Blue gives a frozen, undead vibe. You can even use purple for a truly otherworldly look. The technique is exactly the same—just swap out the red food coloring for whatever color you prefer. I’ve made a rainbow version for a themed party, and it was a huge hit.
How do I get the yolks perfectly centered?
This one takes practice. The key is to not move the eggs during the first few minutes of boiling. As the eggs cook, the yolks naturally float upward. If you gently stir the water in a circular motion during the first minute of boiling, the centrifugal force helps center the yolks. It’s not foolproof, but it helps. Also, store your eggs on their side in the refrigerator for a few hours before boiling. This allows the yolks to settle in the center.
Can I freeze deviled eggs?
I wouldn’t recommend it. The texture of both the egg whites and the filling changes dramatically after freezing and thawing. The whites become rubbery and watery, and the filling separates. If you need to make these far in advance, freeze the boiled egg yolks separately and make fresh filling when you’re ready to serve. The egg whites can be stored in the refrigerator for a few days, but freezing is a no-go.
Conclusion
These spooky monster eyeball deviled eggs are everything a Halloween appetizer should be. They’re creepy, they’re fun, and they taste genuinely delicious. I’ve made them for parties, potlucks, and even just for myself on a random Tuesday because I wanted something weird and wonderful to eat. Every time I make them, someone asks for the recipe, and I love watching their face when they realize how simple it actually is.
The best part is that you can tweak them to your heart’s content. Make them spicy, make them green, add bacon, go vegan—the base recipe is so forgiving that you can’t really mess it up. And if you do mess up? Well, it’s Halloween. Imperfect eyeballs are even scarier. That’s my story and I’m sticking to it.
I’d love to see how yours turn out. Tag me on social media or leave a comment below with your spooky creations. Tell me what variations you tried, how your guests reacted, and whether anyone was too scared to take a bite. And if you’re looking for more Halloween inspiration, check out that mummy meatball pasta I mentioned earlier—it’s the perfect main dish to serve alongside these creepy eyeballs. Happy haunting, and happy eating.
Pin This Recipe!
Spooky Monster Eyeball Deviled Eggs: Easy Halloween Appetizer
These spooky monster eyeball deviled eggs are a creepy, fun, and delicious Halloween appetizer. With a creamy, tangy filling and bloodshot red veins, they’re sure to be the hit of any party.
- Prep Time: 30 minutes
- Cook Time: 12 minutes
- Total Time: 1 hour 12 minutes (includes chilling)
- Yield: 24 deviled egg halves (12 servings of 2 halves each) 1x
- Category: Appetizer
- Cuisine: American
Ingredients
- 12 large eggs
- 1/3 cup mayonnaise
- 1 tablespoon yellow mustard
- 1 teaspoon white vinegar
- 1/4 teaspoon salt
- 1/4 teaspoon black pepper
- 1/4 teaspoon paprika
- Red food coloring gel
- Black olives (for pupils)
- Optional: Sriracha or hot sauce
Instructions
- Boil the eggs: Place eggs in a single layer in a large pot, cover with cold water by 1 inch. Bring to a rolling boil over high heat. Cover, turn off heat, and let sit for exactly 12 minutes.
- Ice bath: Transfer eggs to a bowl of ice water and let sit for at least 10 minutes until completely cold.
- Peel carefully: Tap each egg on the counter to crack the shell, roll between palms, and peel starting from the wider end. Run under cold water if needed.
- Slice and scoop: Slice each egg in half lengthwise. Remove yolks to a mixing bowl. Arrange whites on a platter, cut side up. Trim a tiny sliver off the bottom if they wobble.
- Make the filling: Add mayonnaise, mustard, vinegar, salt, pepper, and paprika to the yolks. Mash with a fork until smooth and creamy. Taste and adjust seasoning.
- Color the filling: Transfer 2 tablespoons of filling to a small bowl. Add a tiny drop of red food coloring gel and mix until pale pink. Set aside for bloodshot veins.
- Pipe the filling: Spoon yellow filling into a piping bag with a star tip (or zip-top bag with corner snipped). Pipe a generous swirl into each egg white half.
- Add the pupils: Slice black olives into 1/4-inch rounds. Use a small round cutter or bottle cap to punch out circles. Place one in the center of each filling mound, pressing gently. Position slightly off-center for a crazier look.
- Create the bloodshot veins: Dip a toothpick into the pink filling and draw thin lines radiating outward from the olive pupil. Do 3-4 lines per egg, spaced unevenly. For darker red, dip toothpick in straight red food coloring and make tiny dots around the olive edge.
- Chill and serve: Refrigerate finished eggs for at least 30 minutes before serving. Sprinkle with a pinch of paprika before serving.
Notes
Use eggs that are at least a week old for easier peeling. For perfect yellow yolks, don’t boil longer than 12 minutes and ice bath immediately. The filling should be thick enough to hold its shape when piped. For the bloodshot effect, less red food coloring is more—start with a tiny dot. You can boil and peel eggs up to 2 days ahead; make filling a day ahead. Store assembled eggs in a single layer in an airtight container for up to 3 days. Do not freeze.
Nutrition
- Serving Size: 2 deviled egg halves
- Calories: 150170
- Sodium: 250300
- Fat: 1012
- Saturated Fat: 23
- Carbohydrates: 12
- Protein: 12
Keywords: Halloween deviled eggs, monster eyeball deviled eggs, spooky deviled eggs, Halloween appetizer, deviled eggs recipe, easy Halloween recipe


