“You have to try this dip,” my friend Lisa insisted one Friday night as she slid a bowl across the table. I was skeptical—seven layers? It sounded complicated, messy even. But the first bite of that Flavorful Seven Layer Taco Dip changed my mind instantly. It wasn’t just a party appetizer; it was a whole mood. The creamy layers, the tangy salsa, the crunchy chips—it all came together like a little fiesta in my mouth.
I remember that night clearly, the kitchen buzzing with chatter and laughter, and me sneaking back for just one more scoop. Honestly, it felt like the perfect fix after a long, hectic week when cooking anything complicated was the last thing on my mind. Since then, I’ve made this dip so many times I’ve lost count—sometimes just to treat myself when I’m binge-watching my favorite shows alone.
What stuck with me was how effortlessly this recipe turned an ordinary gathering into something memorable. It’s not just about the layers; it’s about the comfort and ease it brings. You don’t need to be a pro cook, and you definitely don’t need to fuss over fancy ingredients. This dip feels like a warm hug from the snack world, and I trust you’ll feel it too once you give it a whirl.
Why You’ll Love This Recipe
After countless trial runs and tweaks, this Flavorful Seven Layer Taco Dip has become a staple in my recipe box. Here’s why it’s an absolute winner:
- Quick & Easy: Ready in under 20 minutes, it’s a lifesaver for those last-minute parties or casual get-togethers.
- Simple Ingredients: No need for specialty stores—everything is usually hanging out in your pantry or fridge already.
- Perfect for Every Occasion: Whether it’s a casual movie night, a family barbecue, or a lively holiday party, this dip fits right in.
- Crowd-Pleaser: From picky kids to foodie adults, everyone can’t get enough of this creamy, zesty delight.
- Unbelievably Delicious: The mix of textures—from silky beans to crisp veggies—keeps each bite exciting.
What sets this version apart is the balance. The refried beans layer isn’t just spread; it’s whipped to a smooth consistency that feels indulgent but not heavy. The salsa is chunky and fresh, never watery, and the cheese is shredded just right to melt perfectly under a little warmth or stay pleasantly chewy at room temperature. I’ve even swapped out the usual sour cream for a Greek yogurt blend sometimes, adding a subtle tang that keeps things lively without losing that creamy comfort.
Honestly, this recipe isn’t just a dip; it’s a little celebration in a bowl. The kind that makes you pause and savor, even on a hectic day.
What Ingredients You Will Need
This recipe uses straightforward, wholesome ingredients to deliver bold flavor and satisfying texture without any fuss. Most are pantry staples, and you can easily swap a few depending on what you have on hand.
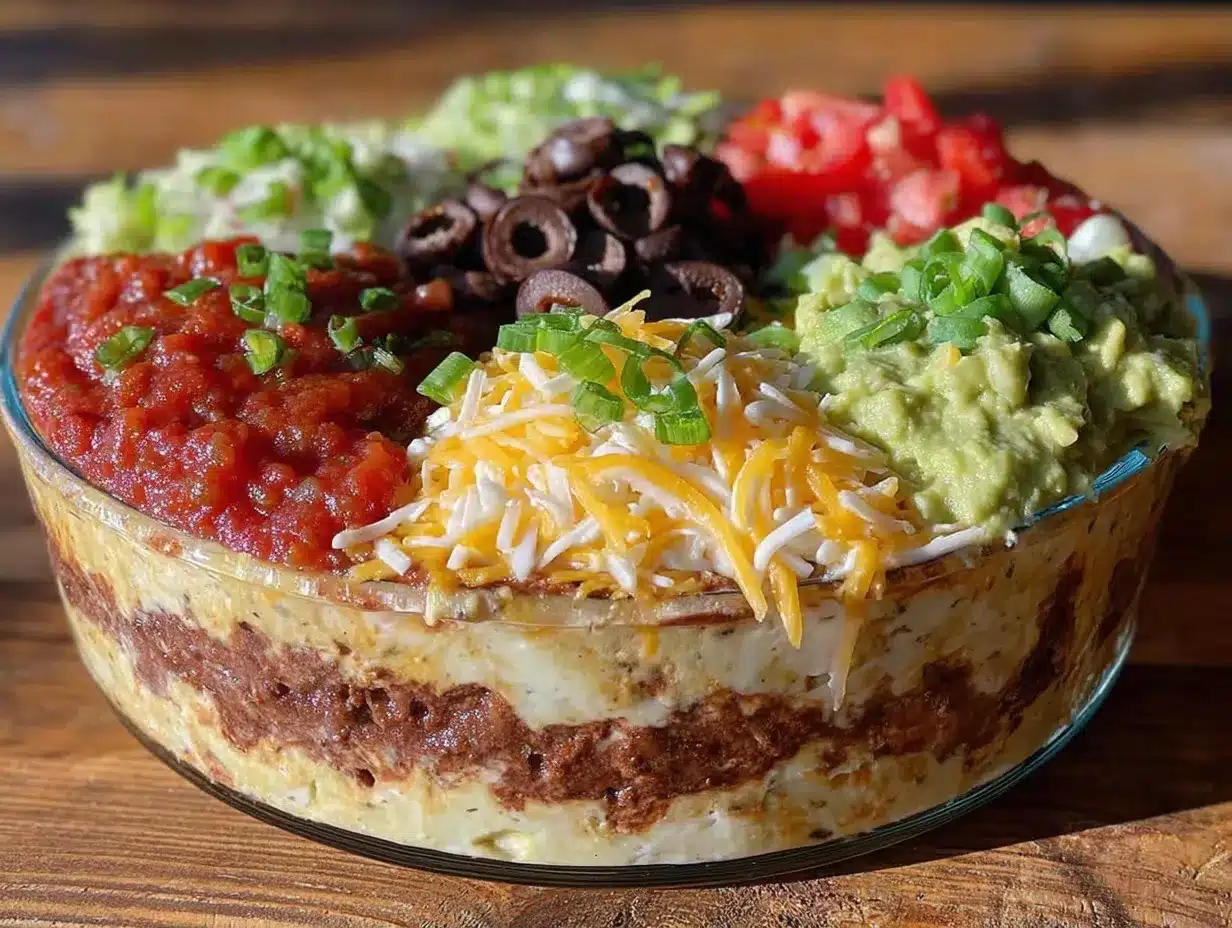
- Refried Beans (1 cup, canned or homemade) – The creamy base that holds everything together. I prefer Rosarita for a rich, authentic taste.
- Sour Cream (1 cup, full-fat or Greek yogurt for a tangier twist) – Adds cool creaminess to balance the spices.
- Guacamole (1 cup, fresh or store-bought) – Provides a smooth, buttery layer with a fresh punch.
- Salsa (1 cup, chunky and well-drained) – Choose a medium-spicy variety for that perfect kick without overpowering the other flavors.
- Shredded Cheese (1 to 1½ cups, cheddar or Mexican blend) – Go for freshly shredded for best melting and texture.
- Diced Tomatoes (½ cup, drained) – Adds brightness and a juicy pop.
- Sliced Black Olives (¼ cup) – For a salty, briny contrast that complements the rich layers.
- Chopped Green Onions (2 tablespoons) – Brings a mild sharpness and crunch.
- Tortilla Chips (for serving) – Sturdy enough to scoop and enjoy the layers without breaking apart.
You can swap out black olives for pickled jalapeños if you want a little extra heat or use a dairy-free sour cream to keep it vegan-friendly. In summer, swapping diced tomatoes for fresh pico de gallo adds a fresh, vibrant touch.
Equipment Needed
- Medium mixing bowls – for combining the sour cream and beans separately.
- Spoon or small spatula – perfect for smoothing each layer evenly.
- 9-inch glass pie dish or shallow serving bowl – glass works best to show off the colorful layers.
- Cheese grater – if shredding your own cheese, a box grater makes quick work.
- Knife and cutting board – for chopping tomatoes, green onions, and olives.
If you don’t have a pie dish, a shallow rectangular or square casserole dish works just as well. I’ve made this dip on a lazy Sunday using just a bowl and some chips—no fancy equipment needed! Just keep your layers neat, and you’ll be golden.
Preparation Method
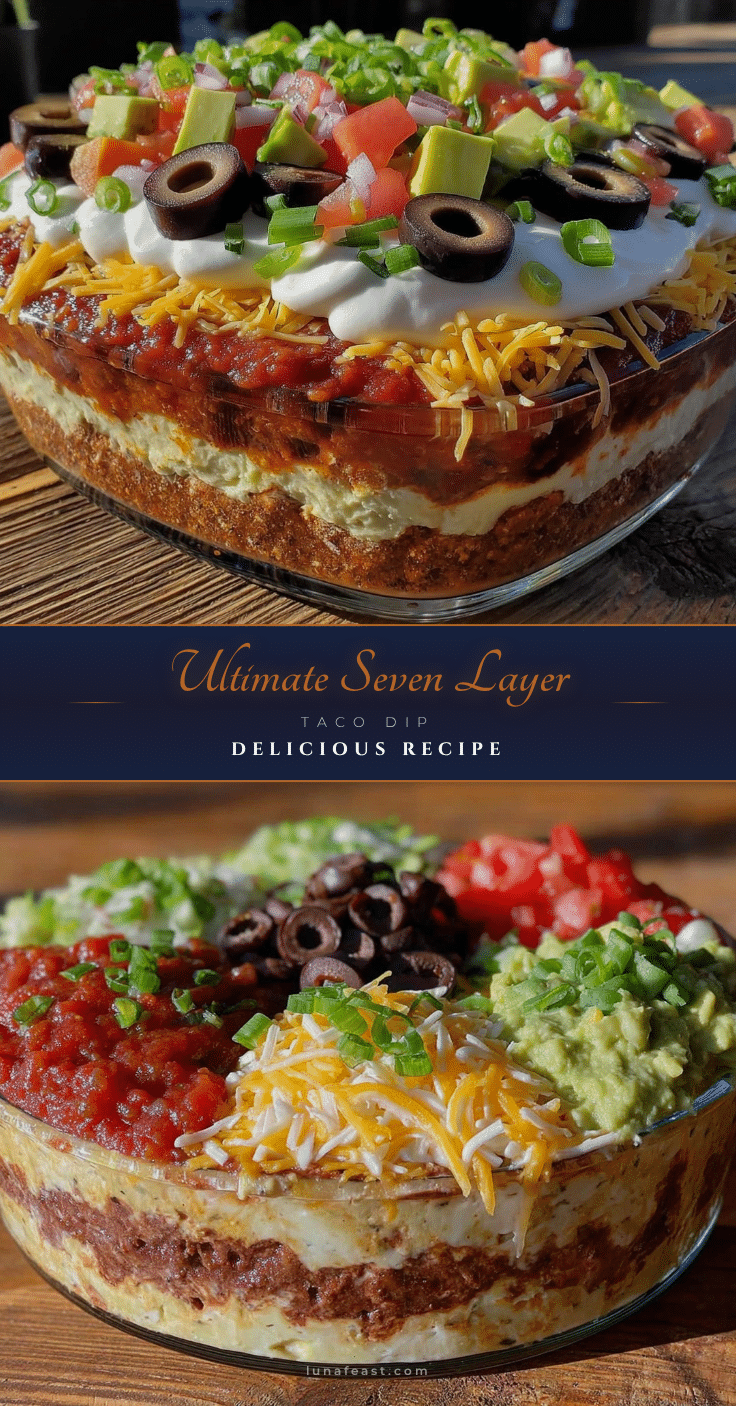
- Prepare the base: In a medium bowl, whip 1 cup of refried beans with a spoon or small whisk until smooth and creamy. Spread evenly in the bottom of your 9-inch glass pie dish (about 23 cm). This forms the foundation and keeps everything stable.
- Layer the sour cream: In another bowl, mix 1 cup sour cream with a pinch of taco seasoning or cumin if you like a subtle spice. Spread gently over the beans layer using a spatula. This cool layer contrasts beautifully with the beans.
- Add the guacamole: Dollop 1 cup of guacamole evenly on top of the sour cream. Use a spatula to smooth the layer but don’t press too hard—you want it distinct and fluffy.
- Spread the salsa: Spoon 1 cup of chunky salsa over the guacamole. Make sure to drain any excess liquid from the salsa beforehand to avoid sogginess. Spread gently but evenly.
- Cheese it up: Sprinkle 1 to 1½ cups of freshly shredded cheddar or Mexican cheese blend over the salsa. The cheese adds richness and ties the layers together.
- Top with fresh veggies: Scatter ½ cup diced tomatoes, ¼ cup sliced black olives, and 2 tablespoons chopped green onions evenly over the cheese. These bright, fresh toppings add both color and texture.
- Chill before serving: Cover with plastic wrap and refrigerate for at least 30 minutes to let the flavors meld. This step really makes a difference in taste and texture.
Pro tip: When spreading each layer, use light, gentle motions from the center outward to keep the layers neat and defined. If you want to make it ahead, layering the dip the night before is a smart move and actually improves the flavor.
Cooking Tips & Techniques
Making the perfect seven-layer taco dip is more about layering and balance than heat or fancy cooking. Here are some tips I’ve picked up over time:
- Drain your salsa well: Excess moisture can make the dip runny. I usually place the salsa in a fine mesh strainer for 5 minutes before layering.
- Whip the beans: Smooth, creamy beans are easier to spread and feel less dense. Using a fork or small whisk works better than a spoon for this step.
- Freshly shred cheese: Pre-shredded cheese often has anti-caking agents that affect melting and texture, so shred it yourself if you can.
- Chill to meld flavors: It’s tempting to dig in immediately, but a 30-minute chill helps the layers marry and flavors deepen.
- Layer order matters: Keep wet layers like salsa above creamy ones to avoid sogginess below.
One time, I accidentally skipped chilling and served it right away. The flavors felt flat and the salsa made the chips soggy quickly. Lesson learned! Also, multitasking by prepping the fresh veggies while the beans whip saves time and keeps the kitchen chaos down.
Variations & Adaptations
This dip’s flexible nature lets you customize it easily:
- Vegetarian or vegan: Use vegan sour cream and cheese alternatives, and swap refried beans for mashed black beans seasoned with taco spices.
- Spice it up: Add diced jalapeños to the salsa layer or sprinkle cayenne into the sour cream mixture for extra kick.
- Seasonal fresh twist: In warmer months, swap diced tomatoes and olives for fresh corn kernels, diced avocado, or even mango chunks for a sweet contrast.
- Different bases: Try layering with seasoned ground turkey or beef browned with taco seasoning if you want a meatier dip experience.
One variation I love is mixing fresh, diced pineapple into the salsa layer for a subtle sweet and tangy surprise—it brightens the dip in a way that feels totally unexpected but works so well.
Serving & Storage Suggestions
Serve this dip chilled or at room temperature with your favorite tortilla chips—corn chips hold up best. I like to arrange colorful bowls of chips around the dip, making it easy for everyone to grab a handful.
It pairs wonderfully with light, crisp beverages like sparkling water with lime or even a cold beer for casual gatherings. For a more festive setting, a chilled margarita complements the flavors beautifully.
Store leftovers covered in the refrigerator for up to 3 days. The dip may release some moisture upon sitting, so give it a gentle stir before serving again. To reheat (if you prefer warm), bake at 350°F (175°C) for about 10 minutes—just enough to melt the cheese without drying it out.
Flavors actually deepen after a day in the fridge, so if you can wait, this dip tastes even better the next day.
Nutritional Information & Benefits
This Flavorful Seven Layer Taco Dip offers a decent balance of protein and fiber, thanks to the refried beans and fresh veggies. One serving (about ¼ cup) typically contains approximately 150 calories, 8 grams of fat, 10 grams of carbohydrates, and 5 grams of protein.
Key ingredients like beans provide fiber that supports digestion, while avocados deliver heart-healthy fats. Using Greek yogurt instead of sour cream can boost protein and reduce saturated fat.
This dip is naturally gluten-free when served with corn tortilla chips, making it a friendly option for those avoiding gluten. However, it does contain dairy and olives, so keep that in mind for allergy considerations.
I appreciate how this recipe balances indulgence and nutrition—comfort food that feels a little less guilty.
Conclusion
This Flavorful Seven Layer Taco Dip has become my go-to party starter and casual snack for good reason. It’s simple, satisfying, and versatile enough to suit many tastes and occasions. The way the layers come together—each with its own personality—makes every bite a little adventure.
Feel free to tweak the layers, add your favorite toppings, or try different salsas. The recipe welcomes customization and grows with you. I love how this dip can bring people together, whether it’s a big family gathering or a quiet night in.
If you decide to make it, I’d love to hear how you put your own spin on it or what moments it ended up brightening. Sharing food stories is part of what makes cooking so enjoyable, after all. So go ahead, give this dip a chance to be the star of your next party!
Frequently Asked Questions
Can I make this seven-layer taco dip ahead of time?
Yes! It actually tastes better after chilling for at least 30 minutes or up to 24 hours. Just cover it tightly and refrigerate until ready to serve.
What can I use if I don’t have refried beans?
You can mash black beans or pinto beans with some taco seasoning for a similar effect. Just make sure they’re smooth enough to spread easily.
Is this dip gluten-free?
Yes, as long as you serve it with gluten-free chips. Corn tortilla chips are usually a safe bet.
Can I substitute the sour cream with something else?
Absolutely! Greek yogurt is a great substitute that adds tang and protein. For dairy-free options, try coconut-based sour cream alternatives.
How do I prevent the chips from getting soggy?
Drain excess liquid from salsa and tomatoes well, and serve the dip chilled. Also, don’t let the dip sit out too long before serving to keep the chips crisp.
For more party-perfect recipes that bring fun and flavor, check out the full recipe collection. And if you’re in the mood for something sweet to finish off your spread, these mini lemon blueberry cheesecakes are always a hit!
Pin This Recipe!
Flavorful Seven Layer Taco Dip

A quick and easy seven-layer taco dip perfect for parties and casual get-togethers, featuring creamy refried beans, tangy salsa, fresh veggies, and melty cheese.
- Prep Time: 15 minutes
- Cook Time: 0 minutes
- Total Time: 45 minutes
- Yield: 8 servings 1x
- Category: Appetizer
- Cuisine: Mexican
Ingredients
- 1 cup refried beans (canned or homemade)
- 1 cup sour cream (full-fat or Greek yogurt for a tangier twist)
- 1 cup guacamole (fresh or store-bought)
- 1 cup chunky salsa (well-drained, medium-spicy)
- 1 to 1½ cups shredded cheddar or Mexican cheese blend
- ½ cup diced tomatoes (drained)
- ¼ cup sliced black olives
- 2 tablespoons chopped green onions
- Tortilla chips (for serving)
Instructions
- In a medium bowl, whip 1 cup of refried beans with a spoon or small whisk until smooth and creamy. Spread evenly in the bottom of a 9-inch glass pie dish.
- In another bowl, mix 1 cup sour cream with a pinch of taco seasoning or cumin if desired. Spread gently over the beans layer using a spatula.
- Dollop 1 cup of guacamole evenly on top of the sour cream. Smooth the layer gently without pressing too hard.
- Spoon 1 cup of chunky salsa over the guacamole, ensuring excess liquid is drained. Spread gently and evenly.
- Sprinkle 1 to 1½ cups of freshly shredded cheddar or Mexican cheese blend over the salsa.
- Scatter ½ cup diced tomatoes, ¼ cup sliced black olives, and 2 tablespoons chopped green onions evenly over the cheese.
- Cover with plastic wrap and refrigerate for at least 30 minutes to let the flavors meld before serving.
Notes
Drain salsa well to avoid sogginess. Whip refried beans for a smooth base. Chill dip for at least 30 minutes to meld flavors. Use freshly shredded cheese for best texture. Can substitute sour cream with Greek yogurt or dairy-free alternatives. For vegan version, use vegan sour cream, cheese, and mashed black beans seasoned with taco spices.
Nutrition
- Serving Size: About 1/4 cup dip pe
- Calories: 150
- Sugar: 2
- Sodium: 250
- Fat: 8
- Saturated Fat: 3
- Carbohydrates: 10
- Fiber: 3
- Protein: 5
Keywords: seven layer dip, taco dip, party appetizer, easy dip, Mexican dip, layered dip, snack